Upgrading to the Pixel 6 Pro

After several Nexus phones, a Pixel 3 and a Pixel 3a, the new Google Pixel 6 was an easy upgrade choice. I’ve been very happy with both the Pixel 3 and Pixel 3a, especially the image quality, so much so that I virtually stopped using my cameras. Just about the only thing the DSLR still did better was the optical zoom. The new Pixel 6 Pro has one dedicated telephoto lens that should help narrow the gap. I ordered it in December and it arrived in the new year.

I chose to migrate the contents of my Pixel 3 to the Pixel 6 Pro, since that was my main camera phone before. The new phone has 512 GB of flash memory vs. 256 GB in the old one so there are no storage issues. Copying files across using the upgrade tool and a USB-C cable was relatively straightforward. I wish the migration did not default to Japanese (my old phone was set to English), but that was no major obstacle and I could change the language afterwards.

Moving Line and WhatsApp chats across via a Google account was not difficult either, I just had to do some searches to get the backup and restore steps right. I moved the data-only SIM card from the old phone to the new one before I started. With the data-only SIM card I use a Google Voice account for SMS-verification but I will soon swap the SIM card for a voice-enabled SIM that directly handles SMS with a new phone number.

On my Pixel 3a I am using Pasmo/Suica for contactless payments and train fares since it has the Mobile FeliCa chip needed for “osaifu ketai” (wallet mobile phones). My US sourced Pixel 3 does not have this functionality. I wasn’t sure if the Pixel 6 purchased from the Japanese Google online shop would have the chip or not, since I could not find any explicit reference to it. However, it seems to work.

First I tried to directly charge the phone with cash at a machine at train station but the phone wasn’t recognized when I placed it into the charging cradle.

Then I tried to install and setup the Mobile Suica app, a truly horrible piece of software that must have roots in the pre-smartphone era. No joy! It turns out there is also a Pasmo app in the Google Play store. Uusally I treat Pasmo and Suica as synonymous since they’re different brand names for the same technology but in this case they’re not the same thing. The Pasmo app was really easy to install and set up. I selected the configuration without personal details (i.e. not linked to a bank account or credit card) and everything went smoothly. Charging it at the train station worked and so did a payment at a convenience store.

So how about the camera, the main reason I bought the phone? I tested it on Monday, which was a public holiday (Coming of Age Day), on a 162 km bicycle ride in west Izu. The weather was perfect for the numerous Mt Fuji views. I took shots from morning to after sunset, many of them telephoto shots zooming into Mt Fuji (see image above and below).

I will be able to make good use of this on my bike rides.

wget: “Issued certificate has expired” after September 30, 2021

Two websites that I download data from using automated processes stopped giving me new data from October 1. When I investigated the problem, I could see an error message from the wget program in Linux:

Connecting to SOME.HOSTNAME (SOME.HOSTNAME)|1.2.3.4|:443… connected.
ERROR: cannot verify SOME.HOSTNAME’s certificate, issued by β€˜/C=US/O=Let’s Encrypt/CN=R3’:
Issued certificate has expired.
To connect to SOME.HOSTNAME insecurely, use `–no-check-certificate’.

The quick fix, obviously, was to add the –no-check-certificat to the command line, which allows the download to go ahead, but what’s the root cause? My assumption was that the site owner had let an SSL certificate expire, but after it happened with a second site from the same date, I got suspicious. It turns out, Let’s Encrypt which is used by many websites for free encryption certificates previously had a certificate that expired on September 30 and which has been replaced by a new certificate but many pieces of software don’t retrieve the new certificate. That’s because it’s signed with a new root certificate that a lot of older software don’t trust yet. They need an updated of the root certificate store.
In my case, running

sudo yum update

would update the ca-certificates package and that allowed wget to trust the new certificate.
Please see these links for more information:

Rescuing DVD-RAM Recordings from Obsolescence

I bought my first video camera more than 30 years ago. I went for Hi8, a higher resolution version of Video8, as opposed to VHS or VHS-C which was also popular at the time. Since then I have switched device and formats several times. There was always the worry that I would lose access to my recordings as devices able to read the old media become obsolete or die or the recording media themselves fail from old age. Losing irreplaceable videos of our kids when they were little is something I really didn’t want to experience. Here is a short summary of how I have been dealing with these challenges.

Hi8 (PAL) – early 1990s
I bough my first camcorder when I still lived in Germany so naturally it used the PAL standard (625 scan lines, 50 Hz). I did a lot of analog video editing using an S-VHS VCR, which could interface to the camcorder using S-Video cables. Even after I moved to Japan which uses the NTSC standard (525 scan lines, 60 Hz) I kept recording in PAL. A Samsung multi-standard recorder allowed me to record from the camcorder to NTSC VHS tapes. I also bought a multi-standard analog TV that could display PAL, SECAM and NTSC. However, for many years I just collected the Hi8 PAL master tapes in a cardboard box.
Along came Digital8, a successor to Hi8 that as the name indicates used digital recording but was backwards compatible with Hi8 and could play the old tapes. So eventually, as Hi8 camcorders were already becoming obsolete, I bought a second hand one off eBay when I was visiting Germany. It had an IEEE 1394 (Fireware) connector that made it possible to copy digital video to a computer equipped with that interface. I experimented with PCs with plug-in IEEE 1394 cards, but ultimately it was a Mac mini that allowed me to copy the old Hi8 PAL tapes to a hard disc using the German Digital8 camcorder, a Firewire cable and iMovie which was bundled with macOS. The output files were “.dv” files. Some tapes were difficult to load and took many tries before the camcorder would even play them, but I was largely successful.

Hi8 (NTSC) – late 1990s
When my kids started going to kindergarten I finally switched to a Japanese camcorder, still a Hi8 model but for the NTSC standard (US/Japan). Like with the PAL camcorder I saved all the tapes in a box. The Samsung multi-standard VCR developed issues and we bought a new S-VHS VCR equipped with a DVD drive. It supported DVD-R, DVD-RW and DVD-RAM, the latter with caddies (cartridges). It also supported S-Video. It was relatively easy to use the S-Video interface to copy from the Hi8 (NTSC) camcorder to double sided DVD-RAM media. About 2 hours of video would become one 4.2 GB file on DVD-RAM. I chose DVD RAM because it supposedly was more robust than DVD-RW (especially with the protective case), but as Blu-ray came along DVD-RAM became less and less common, with many DVD multi drives not supporting it any more. In 2008 and 2010 I made a stack of 6 double sided DVD RAM media that held video from 21 Hi8 NTSC tapes, but when the DVD section of the VCR died, I no longer had anywhere to play them.
This year I finally bought a USB 3.1 DVD drive that also supports DVD-RAM, though without support for caddies. I went for the BUFFALO DVSM-PTV8U3-BK/N (2180 yen, about US$21). It worked very well once I removed the DVD-RAM disks from their protective caddy. I hooked it up to a Windows 10 machine, plugging the two USB cables into different USB ports (USB 2.0 for power, USB 3.1 for data). I copied the entire folder structure on each side of the media to a separate new folder on the server hard disk. The actual video information on a DVD RAM disk is in a file called VR_MOVIE.VRO which is found inside a folder called DVD_RTAV. The open source VLC player will play this .vro file, as well as the .dv file captured on the Mac mini from the Hi8 recorder.

MPEG (NTSC) hard disc recorder – 2000s
After the various Hi8 recorders I moved from tape to a hard disk based camcorder, a Toshiba Gigashot GSC-R30. This used a Toshiba-made 1.8″ notebook hard disk. It also had a USB 2.0 interface and could be connected to any PC. The MPEG files would play on any MPEG player with support for its audio codec, including VLC. Therefore backing up and preserving these videos was pretty painless.

Smartphones – 2010s and beyond
The Toshiba GSC-R30 was the last camcorder I ever bought. Occasionally I still shot video on my Nikon D3300 DSLR camera, but mostly I moved on to mobile phones which may not have had an optical zoom or as much recording capacity, but they were always in your pocket and so easy to use and the quality improved with each generation.

Don’t lose your media!
If you value the images and videos you recorded over the years, make sure to migrate them to recording media that you can access for years to come and keep doing that. Also make sure you have backups. Tapes, DVDs, hard disks and SSDs will all become unreadable at some point. Don’t keep irreplaceable files on one laptop and hope that it will work forever because it won’t. At the very least, buy a USB drive and make a backup copy. Even better, buy another USB drive, make another backup copy and give it to someone else in your family. It’s better to have your valuable data saved in more than one place.
I am a great fan of the VideoLAN VLC media player. You can throw just about any video or audio format at it and it will be able to play it. I highly recommend it! πŸ™‚

Pixel 3a: “Analogue audio accessory detected. The attached device is not compatible with this phone”

Three months ago my wife and I both changed our local smartphone plans and changed to a Google Pixel 3a.

Within a week she had a problem where her phone would suddenly shut down when the battery still had 50-60% charge left, while doing nothing. This even happened after the phone had been factory reset, with no third party apps installed. It took a few weeks before Softbank Mobile replaced the phone under warranty.

Now it’s my turn it seems. Recently I would find the phone with less than 50% of battery left in the morning when I had left it hooked up to the charger (so it should have been at 100%). I would reconnect the phone but it would not show the charging symbol. I then tried different cables and chargers and also rebooted the phone. Eventually it would charge again.

Today it showed the following error:

Analogue audio accessory detected. The attached device is not compatible with this phone

Nothing was plugged into its headphone socket or into the USB C port. There was no analog audio device connected. I googled the problem and most results suggested it was a problem with the USB C port. That makes sense, since it would explain both the charging issues and the audio warning, as one can plug an analog device into the USB C port via an adapter.

Other results suggested a factory reset may get it working again, but that did not work for me. After the factory reset I could charge the phone with the charger from my earlier Nexus 6P and a USB C cable when powered off. However, after I powered it up and started the system restore, it no longer charged from either that charger or from the Pixel 3a charger or a Pixel 3 charger. The problem was back.

Time to take it back to the Softbank Mobile shop, I guess πŸ™

Needless to say, I am not impressed with a 2/2 failure rate for our Pixel 3a phones so far. The Pixel 3a was great while it worked. The picture quality seems as good as for its more powerful sibling, the more expensive Pixel 3 and battery life was decent too. But that is all meaningless if it randomly shuts down or you can no longer charge it.

UPDATE: Softbank Mobile sent the two months old Pixel 3a in for testing and repair. A couple of days later they quoted almost 20,000 yen (US$190) for the repair of the unspecified damage, which they said would not be covered under warranty πŸ™

Dekopon, Cherry Blossoms and Some Rain: BRM330 200 Km in West Izu

The dekopon season will be coming to an end soon, but to compensate the shorts-and-short-sleeves season has started! I enjoyed both on Saturday, buying local dekopon (4 big juicy ones for 300 yen) in West Izu. The roadside stand worked on the honour principle: I dropped my coins into the collection box and took one bag of fruits.

I was the only rider in shorts at the start of the 2019BRM330 200 km brevet in Mishima, out of 13 who had shown up, out of 30 who had signed up, the others having been put off by a weather forecast that predicted a high chance of rain in the evening.

I drove to Mishima on Friday night with the Elephant Bikes NFE in the back of my Prius and parked the car in a coin parking lot (700 yen for 24h). I stayed at the Toyoko Inn, which was also going to be the goal of the 203 km ride which started at Mishima station. There were 2 courses, the hilly Matsuzaki course and the insanely hilly Darumayama course. I had tried and DNFed the latter in 2017, so it was Matsuzaki again for me.

Before the 08:00 start I loaded up the course on my GPS unit, but hit an unexpected snag when it reported a file system error that required a factory reset of the unit, meaning I’d lose my stored breadcrumb trail for navigation that I normally use. So I had little alternative but using my phone and the paper cue sheets for navigation. However, I had not brought my usual plastic cover for the phone to protect it on the handle bars in case of rain, nor had I weather proofed the cue sheets. The map bag of my front bag is not totally waterproof.

I used RWGPS to load the course and map and it gave me verbal directions in English throughout the ride. I kept the phone connected to a 10,000 mAh USB battery in my front bag until the goal. I have two USB batteries and two phones. There’s always a plan B and sometimes a plan C! πŸ™‚

When the rain started to come down on the way back near Toi, I covered the phone with a plastic shower cap from a hotel stay which I secured it with rubber bands. I always keep one shower cap in the front bag as an emergency cover for the leather saddle or whatever. When my wet fingers made the touch screen difficult to operate, I used spare dry socks that I also kept in the same bag to wipe the screen dry again.

During a brevet on February 10, 2019 organized by Audax Kinki, a participant was sadly hit from behind and killed by a car in a tunnel. Brevet participants are required to wear reflective vests throughout the ride, but sometimes they wear a backpack which could partly obscure the reflective vest. Thus we were asked to wear the vest on top of any backpack. I actually brought two reflective vests, one to wear and one for my light string backpack (for spare clothes) to “wear”, which made getting changed quicker. I had bought the second at a brevet reception when I had forgotten the original one at home.

Most of the starter group did not spread out much until we turned the NW corner of Izu and the bigger climbs started. I took some pictures of the others and the scenery, but it was too hazy to see anything of Mt Fuji or even much of the mainland coast of Shizuoka on the other side of the bay. Mt Fuji remained totally hidden for the entire day.

As it got warmer towards noon I started fading a bit. I would have been really uncomfortable in long pants and thermal jacket. I was now riding on my own but comfortable in the knowledge that I was 50 minutes ahead of minimum pace at that point, which should normally ensure that I would complete the ride under the time limit.

There were a fair number of cherry trees, but most of them weren’t in full bloom yet, many quite sparse at the top still, so I didn’t take too many pictures of them.

There were only two timed controls on this course between the start and the goal, with 161 km in between. Near the southernmost point of the ride there was a photo check: We had to take a picture of a viewing platform on a mountain road together with our brevet card to prove we passed there. I climbed the mountain road together with a young couple. They had already suffered a puncture in NW Izu that had cost them time, while I frequently stopped for pictures.

From there I enjoyed a long descent to Kumomi Onsen. I had visited there in December and then climbed Mt Eboshi, which offers a breathtaking scenery of the coast. We passed Iwachi Onsen, where I had often visited by car when our children were still little.

I was trying to make it to near Heda village by sunset, where a staff member was taking pictures of all of us as we passed, but my own pictures took priority. At the last conbini in Toi before the wilderness it started raining and I put on my rain gear. On the descents I had to be a lot more careful. The wet asphalt soaked up all the light.

The rain became quite intense and I couldn’t help thinking of the 17 non-starters who had listened to the weather forecast… but with my time buffer I expected I’d still make it in time, unless I had bad navigation problems in the last 20 km. The phone became difficult to use when its touch screen got wet. Once, the RWGPS app somehow ended up back on the route selection and I had to restart the Navigation, which seemed to have cost me my downloaded maps πŸ™ Now I could only use the turn by turn instructions to follow the course, but no map view. Fortunately, those turn by turn instructions worked flawlessly, even if the sound volume wasn’t always high enough to be clearly audible. Worst case I had to check the screen. Twice I went off-course but it soon let me know and it recovered when I backtracked to the wrong turn.

After more than 3 hours of riding in the dark I finally got close to Mishima station. When I stopped at the traffic light across from the Toyoko Inn, a staff member waved at me and handed me a note with the finishing time after I crossed. It was 21:19, only 11 minutes under the cut-off time. At the goal reception I presented my brevet card, the receipts from PC1 and PC2 (both 7-11 stores) and showed a photograph of the viewing platform. I had successfully completed! The young couple also made it. They arrived a mere 2 minutes before closing time. Another cyclist who had punctured on the last part of the ride in the rain was over the time limit.

On the drive back to Tokyo I stopped twice at Tomei expressway service areas for some rest, as I was too sleepy. When I got home I unloaded the car, took a shower and went to bed at 02:00. Two more weekends before the 360+ km Fleche ride for which I’m preparing.

2019 AJ NishiTokyo 200 km Miura Peninsula

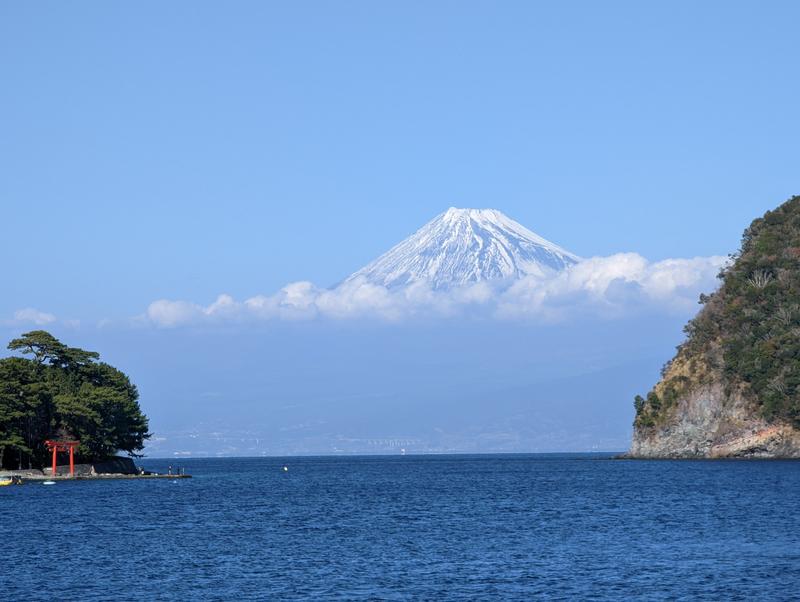
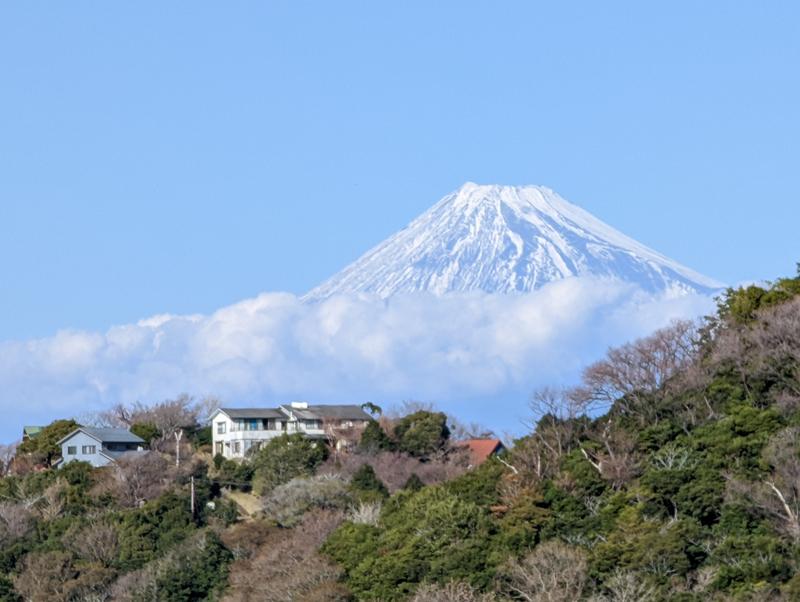
This is one of the last views of Mt Fuji I had last Saturday (2019-01-19), when I rode my first brevet of the year, BRM119 NishiTokyo 200 km Miura Peninsula. I also saw Mt Fuji from the Yamate area of Yokohama (near the Foreign General Cemetery), from the waterfront south of Yokosuka and from various spots on the west coast of Miura, including just before Enoshima.

This 200 km ride around Miura peninsula from Machida to Machida is one I have done before, though much of the course outside Miura was different from last year’s. There’s a 13h 30m time limit (6:00 start, 19:30 close), with two timed checkpoints and a third location for a picture check. I finished in 12h 42m. Together with my ride back to Tokyo it came to 237 km (on Strava).

First Brevet of the Year

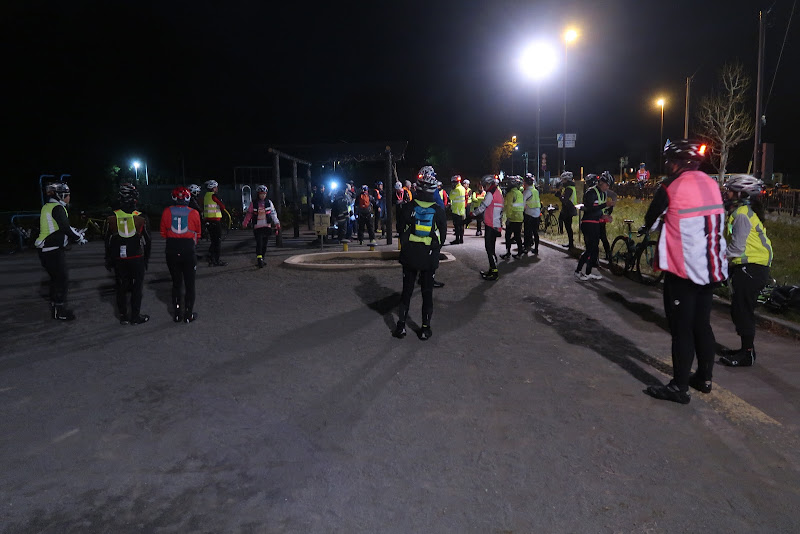
January brevets here are always very popular and fill up quickly when the signup period opens. BRM119 by AJ NishiTokyo was no exception. It filled up the first evening.

For a 200 km ride this course has minimal elevation gain (less than 1200 m) so it’s not quite as physically challenging as other 200 km brevets (hence maybe easier for people you didn’t ride much since the end of the 2018 brevet season in October), but there are no easy brevets. In this one you trade mountains for traffic lights and some busy roads. The January chill definitely will suck your energy, especially before sunrise and after sunset. You will be using a lot of energy just to stay warm, even when simply breathing in cold air!

The temperature on the ride ranged from -1Β° C at the start to 19Β° C near Jogashima, before dropping back to 5Β° C at Machida. This is a huge swing that’s difficult to dress for. I have a large front bag with sufficient space for clothes (and food), but I don’t know how others handled it — probably by feeling very chilly for the first few hours and very warm during the day!

The temperature swing aside, the weather was near perfect. The sky was nearly cloudless for almost the entire day. We were spoilt by ocean views and Fuji views.

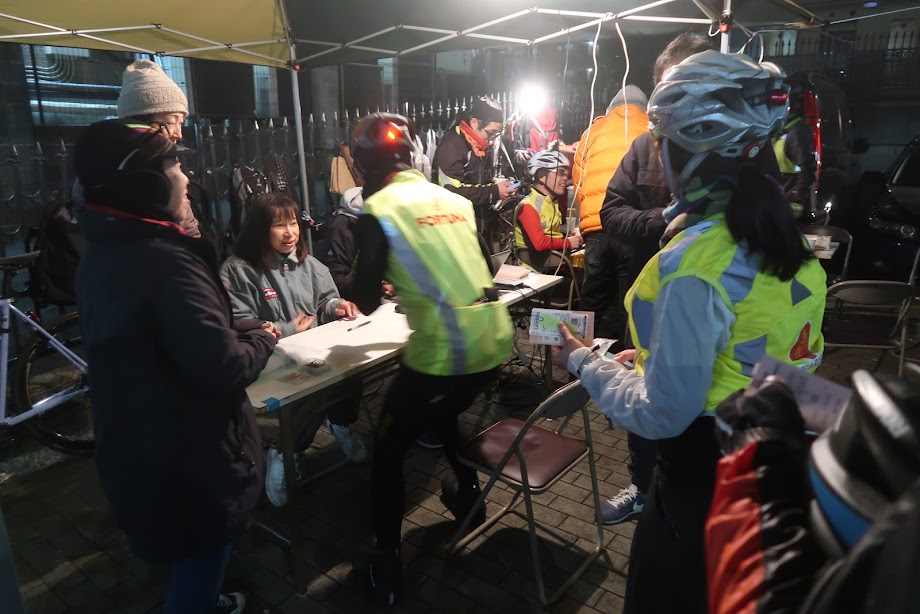
I rode from my home in Tokyo to Machida the night before, as I had booked a room at a ToyokoInn to better cope with the early start time (06:00). This is a chain of inexpensive hotels. The rooms are clean and offer all the essentials. The ride reception to pick up one’s brevet card opened at 05:00, with a pre-ride briefing scheduled for 05:30. I went to bed at 22:00 to get more than 6 hours of sleep. My alarm went off at 04:10 and I left the hotel 40 minutes later.

I was well prepared for this ride. It was my third Century (160.9+ km) ride of the month, all three of them started no later than 06:00 so I knew the temperatures before sunrise and how they would feel in what I was wearing.

These are my improvised shoe covers, a pair of old merino socks with strategically cut holes for the SPD cleats, during testing the week before:

I had more than enough clothes with me, for example a choice of a winter jacket or a windbreaker to wear on top of my LS merino jersey and I used both, at different times.

I wore most of my clothes at the start at 06:00 from Machida:

The only time I really did feel cold was when riding back to Tokyo after the event, as I hadn’t bothered to change back into my thermal underwear and base layer and consequently felt the wind chill on my hands. I improvised some poor man’s Bar Mitts ™ out of plastic bags and rubber bands that kept my hands toasty warm for the rest of the ride.

Pacing myself

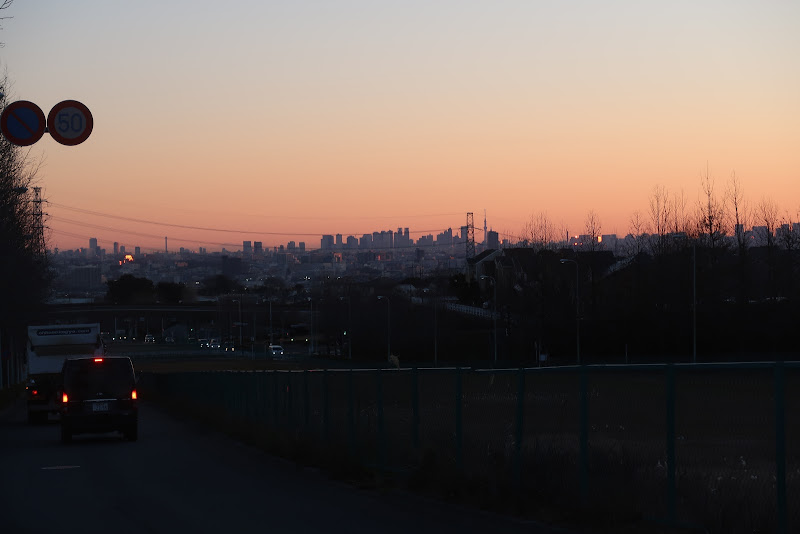
During the descent towards the Tamagawa river from the west I could see the whole of Tokyo below me in the dawn, including the skyscrapers of Shinjuku and Tokyo Skytree, the 634 m broadcast tower on the opposite side of the city.

About an hour into the ride, the sun rose. It was dazzling us at times. Near Kawasaki station we hit rush hour traffic, but after that we switched to a cycling path by the riverside. After 48 km we reached PC1, the first control. Here I took off some of my layers as it was warming up.

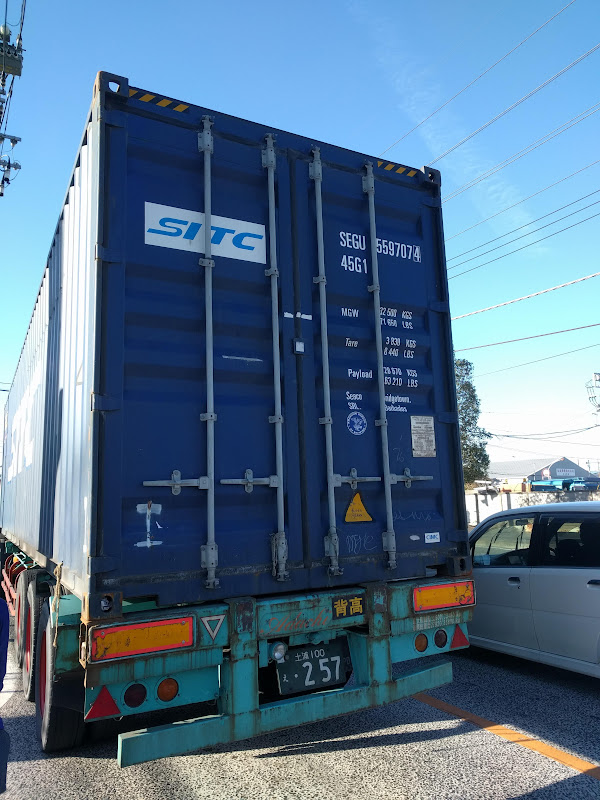
Between there and Tsurumi we were cycling near the port area, with many trucks carrying heavy shipping containers on the road.

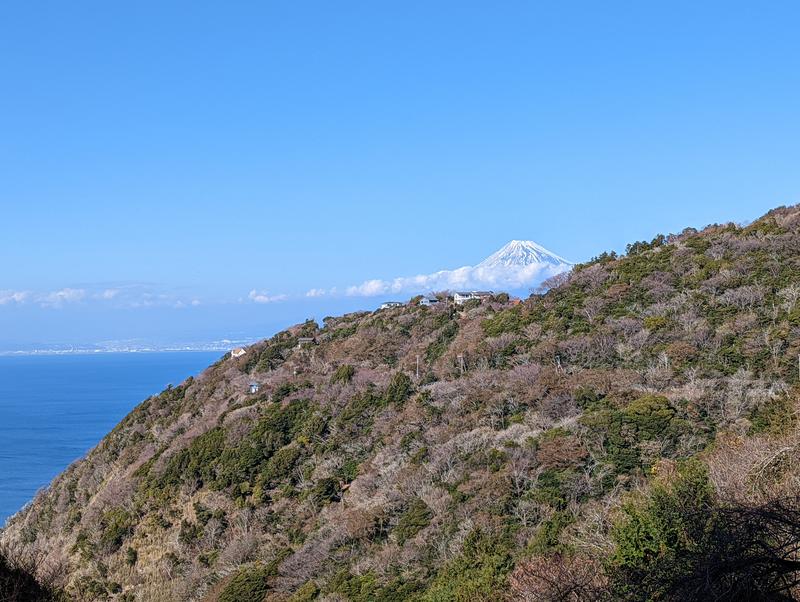
In Yokohama we passed Minato Mirai with its old brick warehouses and other historic buildings. After a Yamashita park we climbed up to the Yamate area, also known as the Bluff, a hillside that was home to the first foreigners who arrived in Japan for trading when Japan opened to the world in the final years of the Tokugawa shogunate. I got a surprising view of Mt Fuji from just outside the Foreign General Cemetery on the hill.

With a large group it’s always tempting to try to hang on to faster riders and I probably ended up doing that, riding a bit too fast for the first 60 km or so of the ride. Then my legs gradually started to complain and I dropped the pace and stopped for food near Yokosuka. I kept a more sustainable pace for the rest of the ride and felt pretty good. I also stopped often for pictures.

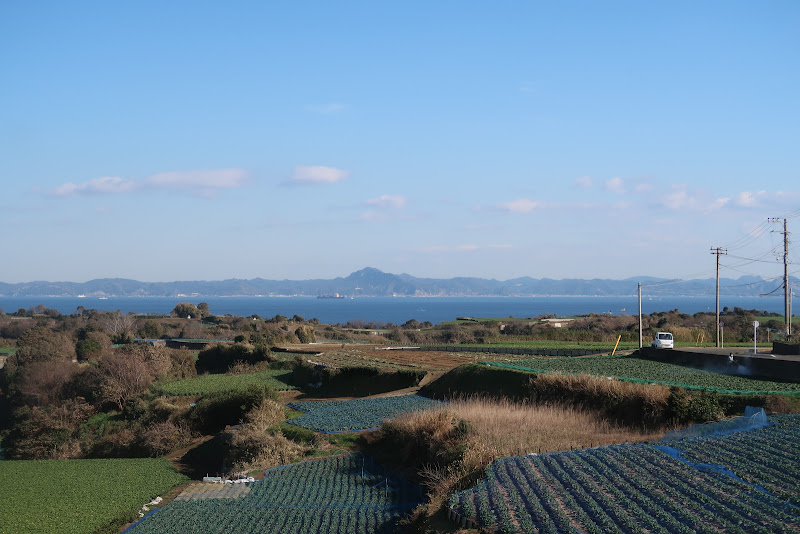
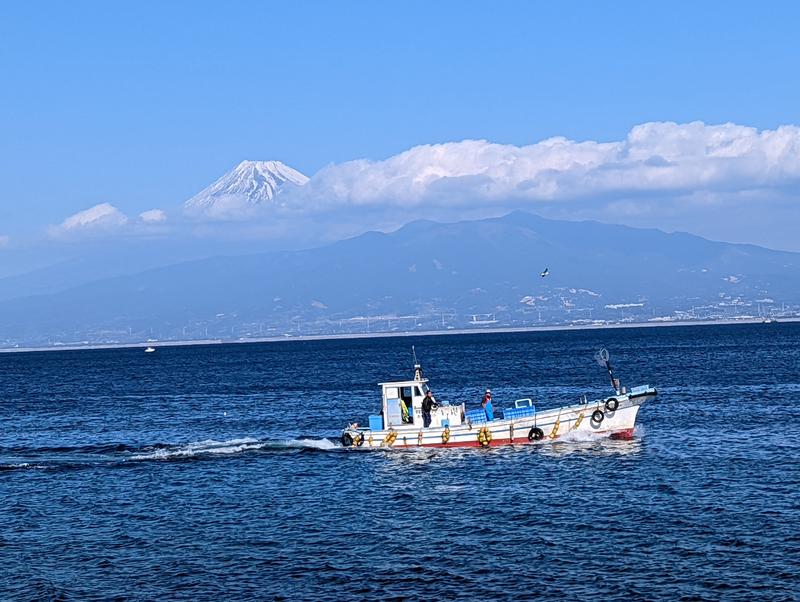
After Yokosuka you get good views of Boso peninsula on the opposite side of Tokyo bay. The scenery becomes more rural. By now the temperatures were much milder. I was riding without my winter jacket and later even removed my base layer under the long sleeve jersey.

I passed Hayama, Zushi and Kamakura on the west coast, enjoying views of the ocean and Mt Fuji. After Enoshima the road turned off the coast and headed north. I had a comfortable time buffer and didn’t have to worry about control closing times.

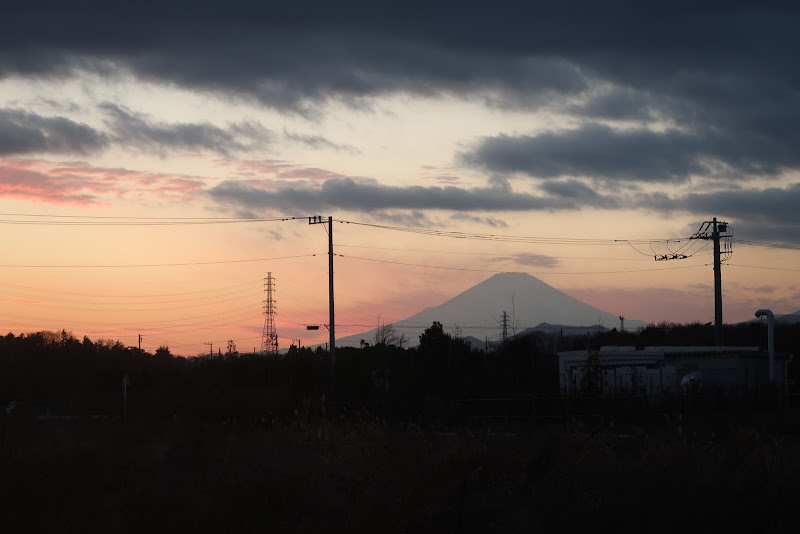
It was still daylight at PC2, the last control. From here it was 31 km to the goal. Once the sun set, the silhouette of Mt Fuji in the dusk was still visible to the west and I stopped a couple of times for more pictures.

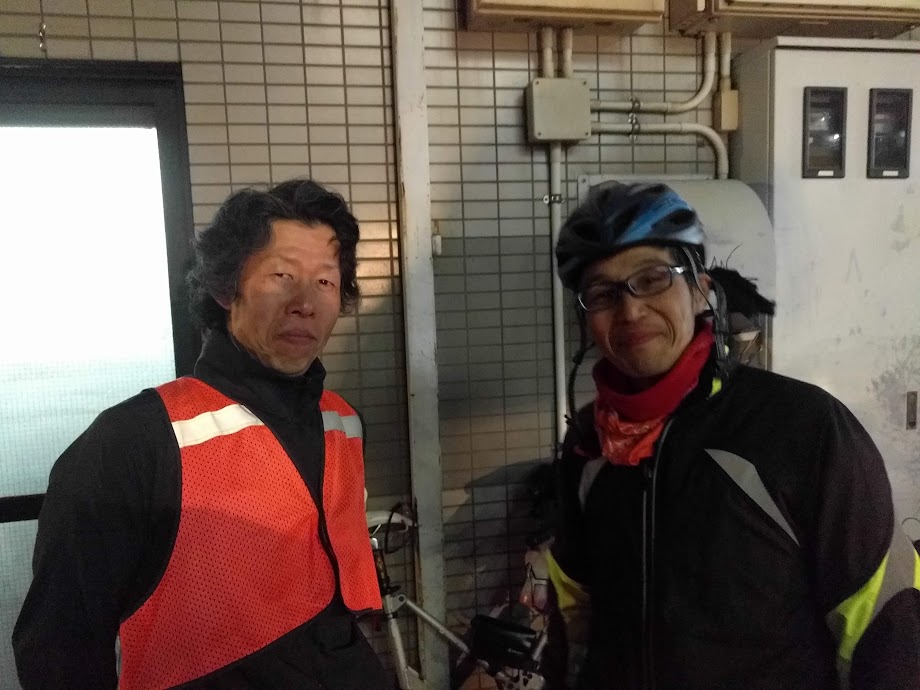
I arrived at the goal with about the last fifth of the participants still behind me. AJ NishiTokyo staff served hot drinks and snacks. We talked and took some pictures of each other and the arriving finishers.

Outlook into the season

My next brevet will be a 200 km ride in west Izu at the end of March which will be a lot more hilly, but before that I will do at least one Century ride in February. In April I will be participating in a FlΓ¨che as part of a mixed 5 person team riding 360 km in 24h to meet up with other Randonneurs in Tokyo. Most likely I’ll also be riding a 400 km brevet in May.

I am not aiming for a 600 km ride or for completing the Super Randonneur series (200, 300, 400 and 600 km) this year, let alone participating in Paris-Brest-Paris 2019 in August. Rides up to 400 km are enough of a challenge for me πŸ™‚

Outlook Express Error 0x800CCC0B and the End of TLS 1.0 (Deprecated SSL Protocol)

Microsoft Outlook Express (OE) is an obsolete mail client that was available in Microsoft Windows XP, Windows 2003 Server and older Microsoft operating systems. It was no longer available on Windows Vista and later, though Windows Live Mail is relatively close in user interface and appearance.

Despite being obsolete and only working on operating systems no longer supported or updated by Microsoft, it still has some users who prefer its simple but powerful user interface. Some of those users will have had a frustrating experience recently, when various mail servers stopped working for outbound mail in OE. Specifically, these are mail servers that use SSL on submission port 465 or 587 for SMTP.

Secure Socket Layer (SSL) is a mechanism for encrypting data between a client and a server. You may know it from website URIs starting with “https:” and web sessions displaying a padlock symbol next to the URI. There are various protocol versions that can implement this encryption layer. One of these, TLS 1.0 which was conceived in 1999, has now been officially deprecated (made officially obsolete) as of the end of June 2018. Software now has to use more recent protocols, such as TLS 1.1, TLS 1.2 or the recently defined TLS 1.3.

Unfortunately, TLS 1.0 is all that OE will speak. It does not understand TLS 1.1 or later. Therefore it can not pick up mail from a POP server using SSL on port 995 or an IMAP server on port 993 or send mail to an SMTP server on port 465 (or 587) with SSL enabled.

Workaround
The only workaround I am aware of (other than switching to a more modern mail client) is to use Stunnel, a tool for Windows or Linux that acts as a proxy. You can configure it to establish an SSL connection to a given host and port when a connection to a given local port is made. Thus you could configure OE to connect to port 9465 on the machine running Stunnel, which might then connect via SSL to smtp.example.com:465 using a more modern TLS version supported by Stunnel (but not directly by OE).

Example
Let’s say Outlook Express was configured to submit outbound mail to smtp.outboundmailserver.com, port 587 via SSL/TLS. This is our SMTP server. Once this server refuses to allow TLS 1.0 connections, Outlook Express will no longer work. Let’s say we also have a simple Linux server mylinuxserver.com. This could even be something like a Raspberry Pi single board computer booting off flash memory. It can run on a local IP in our LAN, if you don’t need to have access from outside your building (OE running on a desktop). On this server we install the stunnel package:

sudo yum install stunnel

Please read the documentation on how to enable the service and have it auto-start when the Linux server reboots.

Next we configure stunnel to act as a client on our behalf and configure it to accept TLS 1.0 connections from us and forward them to the real POP3, SMTP or IMAP server using the latest TLS on our behalf. We will create lines like these in /etc/stunnel/stunnel.conf:

client = yes

;cert = /etc/pki/tls/certs/stunnel.pem
;sslVersion = TLSv1
;chroot = /var/run/stunnel
;setuid = nobody
;setgid = nobody
;pid = /stunnel.pid
;socket = l:TCP_NODELAY=1
;socket = r:TCP_NODELAY=1

[smtp-outboundmailserver]
accept = 1587
connect = smtp.outboundmailserver.com:587

Create other entries for the services that you need TLS support for and restart the stunnel service. Then reconfigure Outlook Express to access the Linux host and the port number listed with “accept = ” in place of the original server that refused your Outlook Express TLS 1.0 connection. You should be good to go!

Long term you will still need to migrate to another mail client such as Thunderbird, Windows Mail or OE Classic, but this workaround will buy you some time for that.

Picasa: “Failed to download album list”

If you are still using the Picasa 3 desktop application by Google and got the above error message, here’s some bad news for you: Google has finally killed this app. On March 26, 2018 they announced that it would no longer be able to upload new albums. So this error message is not temporary and there is no direct fix.

I think it’s very regrettable that Google has been killing off Picasa step-by-step. This is only the latest nail in the coffin. I had been using Picasaweb and Picasa since 2010 and they were great products.

The good news is that you can still create albums from folders using a web browser. Say you have a folder named “2018-03-26 Cherry Blossom Party”. Just follow these steps (for Windows and Chrome):

1) Select its parent folder in Windows Explorer, then slowly click on the folder that you want to upload, twice: Once to select it, then once more to enable you to edit the folder name as if to rename it. When the name becomes editable, press Ctrl+C to copy the folder name, then press Esc to keep the name unchanged. This stores the folder name in the copy-and-paste clipboard, which will save you from having to manually retype the name later.

2) In Chrome, go to https://photos.google.com/ and click on “Upload” (on the top right). A file selector dialog will open up. Click through to the contents of the folder you want to upload. Select all files in the folder using Ctrl+A and click “Open” to confirm the upload.

3) The browser will upload all files and give you a choice of “Add to album” or “Shared album”. Select “Add to album”. To create a new album with the name of the folder, select “New album”. Click on the album name showing as “Untitled” and use Ctrl+V to paste the name you copied in step 1. Hit Enter and click on the check mark to confirm creation of the new album.

Voila, you have a new album online, with the same name as the local folder. Repeat as needed for multiple folders. This is as simple as it gets without the old Picasa app.

Strava Cycling Climbing Challenges

Strava is a popular service for logging bike rides and other activities, which provides a way of comparing one’s achievements with those of other cyclists and runners. Competition is a powerful stimulant and a main driver behind the success of the service. Monthly “challenges”, such as a Gran Fondo (a ride of at least 100 or 130 km, depending on the time of the year) or a monthly cumulative distance or elevation gain challenge, are particularly popular on Strava.

While I regularly participate in the Cycling Distance and Gran Fondo Challenge, I do not normally sign up for the Cycling Climbing Challenge, which is meant to encourage you do ride hilly courses. I love hilly courses. In fact, most of my weekend rides are hilly, usually going from close to sea level to over 900 m and back.

Last year I averaged one century ride (at least 160.9 km / 100 miles) about every other week, so the Gran Fondo challenge is not really that much of a challenge for me. My typical centuries are about 170-190 km with 1800-2100 m of elevation gain. Yet at 7500 to 8000 m the goal for the Cycling Climbing Challenge is set so high, I could do a hilly century ride four Saturdays in a row and still miss the climbing goal. So how do other people, who do not ride 170 km into the hills every other weekend complete the climbing challenge?

I think the Strava climbing goals are designed for people who record their rides with phones or other GPS devices that rely only on satellite data for elevation. GPS-based elevation data is much less precise than lattitude-longitude data. Other popular GPS units like the Garmin Edge 1000, Garmin Edge 520 (or my o_synce Navi2coach) use a barometer for more precise elevation tracking. The problem with GPS-based elevation is that it’s noisy, it will go up and down pretty randomly but all those little ups will be added up by Strava, resulting in a considerably inflated climbing total. If you’re using a GPS device measuring relatively accurate barometric elevation, you can’t really compete against all that noisy data πŸ™

I could confirm this in group rides with other people who were using mix of equipment, where I had a chance to compare the posted stats on Strava afterwards. The iPhone or Android-app recorded totals were often 50-100% higher than the Garmin-recorded totals, for one and the same course.

Here is one random example of 4 people doing the same course up a volcano in Tenerife, Gran Canria yesterday. Note, this not my ride, I just randomly stumbled on it while looking at high scorers in the March Cycling Climbing Challenge on the Strava website. Two of these cyclists were using the Strava iPhone app, the other two were using a Garmin Edge 520:

Strava iPhone App:
https://www.strava.com/activities/1437744625
5,080m

Strava iPhone App:
https://www.strava.com/activities/1437728113
4,635m

Garmin Edge 520:
https://www.strava.com/activities/1437709764
2,847m

Garmin Edge 520:
https://www.strava.com/activities/1437730812
2,556m

As you can see, the two cyclists using the phone app posted almost double the total climbing for the course as the Garmin users, despite riding the very same roads and posting the same elevation profile for the activity (i.e. no hill repeats).

Based on evidence like that, I don’t think elevation gain competitions on Strava are happening on a level playing field! πŸ˜‰

Downloading routes from RouteLabo (Yahoo LatLongLab)

Most of the brevets I ride are with AJ NishiTokyo, a randonneuring club based in the Machida/Sagamihara area. One thing I like about their rides is that they provide a link to a RouteLabo page for each event (RouteLabo is an online map service run by Yahoo Japan). This page shows a map of the course as well as download links for KML, GPX and TCX files of the course. By copying these files to your GPS device (Garmin or other) or by uploading a KML file to Google “My Maps” for your smartphone, you can almost completely do away with the need for paper cue sheets. I navigate all my brevets and many of my personal rides by following a “breadcrumb trail” on the screen of my GPS unit.

Unfortunately other clubs often only provide a map without any download option, like this Randonneurs Tokyo 2018 BRM421 Tokyo 600 Lake Hamana (BRM421東京600ζ΅œεζΉ–ι°») page:

This does not help you much on the road. Without a link to the full RouteLabo page with download links, there’s no obvious way to obtain a GPX or KML file. You are still expected to navigate via printed turn instruction on a paper cue sheet, which I find cumbersome and error-prone.

However, there is a way!

The web page uses some Javascript code to display the map off the RouteLabo website, including a magic value that identifies the particular course to be shown. To see this value, view the source code of the page. This step varies by browser and operating system. On Chrome under MS Windows, Ctrl+U will show the source code, on a Mac under Chrome, Option+Command+U will do it. On Safari, once you enable the option via Safari > Preferences > Advanced > Show Develop Menu, you can also use Option+Command+U (just like in Chrome).

In the displayed HTML code, search until you find a line for Javascript like this one:

<script type="text/javascript" encoding="UTF-8" src="https://latlonglab.yahoo.co.jp/route/paste?
id=b86f940851b6ebed2538ffc5f80b2fc8&width=480&
height=640&mapstyle=map&graph=true&maponly=true"></script>

The value consisting of 32 hexadecimal characters (128 bit) after “id=” is the magic value you’re looking for. A full RouteLabo page URI with the download options will look like this:

https://latlonglab.yahoo.co.jp/route/watch?id=b86f940851b6ebed2538ffc5f80b2fc8

By replacing the value after “id=” in the URI with the ID from inside the HTML code using copy and paste, you will get a browser URI that will give you full access to the route, including route file download links to feed your GPS device of choice. You can then bookmark it for future reference. Bonne route! πŸ™‚