Using Sanyo Eneloop Ni-MH AA batteries to power your mobile phone

About two years ago I started using Sanyo’s rechargeable eneloop batteries. These relatively inexpensive Nickel-Metal Hydride (Ni-MH) cells are available in both AA (単3形) and AAA (単4形) sizes. They are low self-discharge cells that keep their charge for months when not in use. I’ve bought boxes of 8 cells of either type, for use in flash lights, bike blinkies, helmet lights and Bluetooth keyboards.

They are initially more expensive to buy than regular alkaline (primary) cells, but you only need to re-use them about three times before they work out much cheaper than primary cells, while you can actually recharge them hundreds of times before they start losing significant capacity.

Here are some nice gadgets that will take them, which I found sold in convenience stores here Japan.

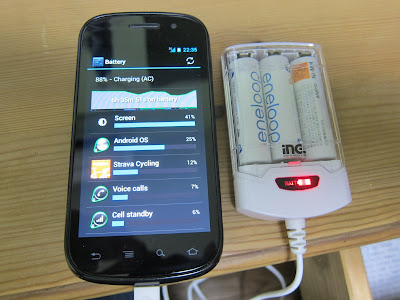
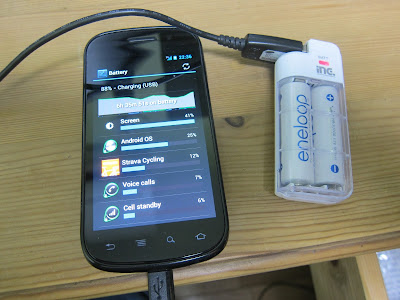
These little cases (by alicty.co.jp) take power from two or three regular alkaline AA or Ni-MH AA cells and provide a USB port for powering mobile phones and other small gadgets with a USB power cable. As you would expect, the three cell version is slightly more powerful, looking to my Google Samsung Nexus S as an AC charger (i.e. it provides more than 500 mA). For the two cell version, the phone shows “charging (USB)” as the status, i.e. it can draw up to 500 mA. The two cell version has a USB-A socket (female) for generic USB cables while the three cell version comes with an integrated micro USB (male) cable. A very similar concept has been around for a while as the MintyBoost.

The nice thing is, if you carry enough pre-charged eneloop cells with you, you can swap cells as needed and have virtually unlimited power. You could even buy primary cells to top up if desperate (one set came bundled with each device), but they would end up costing you more than re-usable eneloop cells in the long term. I’ll carry some Ni-MH cells as spares on long bike trips or hikes, which could come in handy with these little cases.

UPDATE 2012-04-04: I also tried using this adapter with alkaline (primary = non-rechargable) AA cells and it goes through them quite rapidly. Alkaline AA batteries have a notoriously poor performance in high drain applications because of their high internal resistance. You’re much better off sticking with Ni-MH batteries such as Sanyo Eneloop!

It says on the pack that a set of 3 AAs will boost the charge state of a smartphone battery by 30-40%, i.e. it would take you about 3 sets (9 cells) to fully recharge an empty battery. Or put another way, if the phone lasts 5 hours on one charge doing whatever you’re doing, you will consume a set of fresh AAs every 100 minutes to keep it topped up. To provide 500 mA at 5 V (2.5 W) on the USB connector at 80% efficiency would draw 3 W from the batteries, or 700 mA at 4.5 V (3 x 1.5 V). At that kind of load, an alkaline battery might only supply a quarter of its rated capacity, which is normally measured at a much smaller load (which is OK for alarm clocks, TV remote controls, etc. but not high powered electronics like digital cameras or smart phones).

227 km a day on my Bike Friday

One month after my 155 km bike ride around Miura peninsula, a friend and I got up very early on a Sunday morning and cycled until after sunset. We went from Machida in the west of Tokyo to Mt Fuji and back. My total for the day came to 227 km (see route).

Why this ride? Earlier this month I had signed up for a 300 km brevet ride (randonnée) organised by AJ Nishitokyo for Sat/Sun, May 19/20, 2012. A randonnée is not a race, but individual riders do have to clear certain checkpoints within prescribed time limits. There’s an overall limit of 13 1/2 hours for 200 km rides and 20 hours for 300 km. For more ambitious riders there are also 400 and 600 km events. The most famous randonee is the 1200 km Paris-Brest-Paris that takes place every 4 years. I would have started with 200 km, but all events near Tokyo were already closed for signup, so I went for the next one up. Given that 300 km was almost twice the distance of my longest ride until then, I knew I needed some training to prepare.

My plan was to follow the 300 km route as much as possible to familiarize myself with it, but to cut it to a more manageable distance by taking a shortcut. The full route heads south from Machida in Tokyo to the Pacific coast in Enoshima (Kanagawa prefecture), from there west along the coast to Odawara, then up to Gotemba (Shizuoka prefecture) near Mt Fuji. It swings clockwise around the mountain into Yamanashi prefecture, then returns east to Machida via a route across the mountains. I decided to head north at Gotemba, replacing the long loop around Fuji with a much shorter section near Yamanaka-ko (Lake Yamanaka) to the east of the mountain. According to MapMyRide.com the shorter route would come to 213 km.

I would take the first morning train from central Tokyo out to Machida, ride several km from the station to the starting point and then follow the route. My friend Jose, an experienced randonneur (brevet rider) offered to join me and I gladly accepted. It would have been a lot more difficult without his company and experience.

We started at around 06:30, but I first needed to replace the batteries in my bike lights, attach my waterproof cue sheet to the handlebar and sort out some temporary GPS problems, which took more than half an hour. It’s better to encounter such problems on the training run than in the real time-limited ride…

As we rode along the Pacific coast from Enoshima to Odawara on this March 11, we couldn’t help thinking of the disaster that had struck the Tohoku region exactly one year earlier. The coast here is just as exposed. About 500 years ago, a tsunami destroyed a temple housing the Great Buddha of Kamakura (daibutsu) near Enoshima, almost a km from the coast. Only the bronze statue itself was left. We won’t know what will happen during the next Great Kanto Earthquake until it strikes.

After Odawara the road started climbing towards Gotemba. From there we climbed all the way to Kagosaka pass (1104 m above sea level), where we crossed into Yamanashi prefecture. It started snowing after Gotemba and persisted until we got to Fujiyoshida. We never really saw Mt Fuji, though we passed right in front of it, because of all the snow clouds. On the pass and around the lake everything but the road was covered in snow. I had to rest several times during the climb. I tried to eat and drink as often as possible in order not to run out of energy or get dehydrated (I was sweating a lot, even though temperatures were anywhere from 0C to 6C).

At the top of the mountain pass I knew we still had about 100 km to go, including two climbs of several 100 m each. I started to seriously doubt if I could really get back to Machida by bike or if I would have to catch a train from somewhere. But then we descended for something like 25 km from Yamanaka-ko and my energy came back as I could take it easy. Jose proposed a different route back to Machida that avoided some of the highest climbs and that’s what we did. There were still many climbs around Uenohara and Sagamiko, but I could manage them. Towards the end we rejoined the original 300 km route and got back to Machida around 20:00, which means I would have been within a 13 1/2 hour overall limit for a 200 km ride.

So what did I learn from this experience?

  • “There is no such thing as bad weather, only the wrong clothes” Jose told me and he was right. We were dressed appropriately and didn’t have a problem with drizzle or light snow. I was wearing mostly Uniqlo: long sleeved Heattech underwear, Jeans, a light Windbreaker. I also wore a folded handkerchief over my ears under the helmet, old socks with holes cut for the SPD pedal cleats over the Shimano shoes (“Belgian shoe covers”) and ski gloves when it was coldest.
  • I was more tired at the end of my 136 km day than after this 227 km. Eating and drinking often enough are key for long distance. Eat before you’re hungry, drink before you’re thirsty.
  • My butt hurt more on my previous saddle towards the end of the 156 km ride than the Brooks B17 towards the end of the 227 km. The Brooks is great!
  • I had some pain in my left shoulder joint, maybe from the cold and my Achilles tendons felt a bit sore the next day. I probably should have hydrated more before the ride and kept my shoulders warmer.
  • Navigating with the brevet cue sheet was more difficult than I had expected. I needed to edit the printout with bigger fonts and some translation from Japanese.
  • I logged the entire ride with the Strava Android app, with the phone connected to my dynamo hub USB charger via a Li-polymer buffer battery. The phone remained fully charged throughout and at the end the buffer battery charge state was 4 out of 5 LEDs, just like at the beginning. I could ride for days without running out of mobile power.
  • As I already learnt on my 136 km Miura ride (Feb 5, 2012), if you want to go far, start early in the morning and keep going as much as you can. You’ll be amazed how many km you can do in a day if you try!

Links:

Brooks B17 Standard saddle for my Bike Friday

A couple of days ago I signed up for a 300 km bicycle ride in May. Besides some training to prepare myself for the event I am also upgrading my Bike Friday folding bike.

The first investment has been a Brooks leather saddle. This British firm has an excellent reputation amongst long distance cyclists. On my last 150+ km ride there were two other riders with Brooks, one of them was Sarah Outen who has cycled from Europe to Tokyo on hers. The other was a friend of mine who had toured for weeks across East Tibet on his. Towards my longest ride so far I found it hard to sit on my previous bike saddle. My upcoming ride in May will be almost twice as far, so I will need to be as comfortable as I can. The B17 Standard is Brooks’ entry level model meant primarily for touring.

So far the impression is excellent: Even though Brooks saddles are supposed to take a break-in period of up to 1000 km, I have felt totally comfortable on mine from the first minute. Definitely recommended!

On the 40 km test ride I had my first puncture in 2000 km, but it was quickly fixed with my spare tube, tools and compact pump.

My second investment for the coming ride is a dynamo light, the Busch + Müller Lumotec IQ Cyo N Plus LED Front Light (175QNDi), which should be more effective than the small battery powered light that I now use. The current light is OK in town, but I wouldn’t want to rely on in the absence of street lights out of town.

More about the B&M IQ Cyo N Plus here once I will have received it and had a chance to test it!