Upgrading to the Pixel 6 Pro

After several Nexus phones, a Pixel 3 and a Pixel 3a, the new Google Pixel 6 was an easy upgrade choice. I’ve been very happy with both the Pixel 3 and Pixel 3a, especially the image quality, so much so that I virtually stopped using my cameras. Just about the only thing the DSLR still did better was the optical zoom. The new Pixel 6 Pro has one dedicated telephoto lens that should help narrow the gap. I ordered it in December and it arrived in the new year.

I chose to migrate the contents of my Pixel 3 to the Pixel 6 Pro, since that was my main camera phone before. The new phone has 512 GB of flash memory vs. 256 GB in the old one so there are no storage issues. Copying files across using the upgrade tool and a USB-C cable was relatively straightforward. I wish the migration did not default to Japanese (my old phone was set to English), but that was no major obstacle and I could change the language afterwards.

Moving Line and WhatsApp chats across via a Google account was not difficult either, I just had to do some searches to get the backup and restore steps right. I moved the data-only SIM card from the old phone to the new one before I started. With the data-only SIM card I use a Google Voice account for SMS-verification but I will soon swap the SIM card for a voice-enabled SIM that directly handles SMS with a new phone number.

On my Pixel 3a I am using Pasmo/Suica for contactless payments and train fares since it has the Mobile FeliCa chip needed for “osaifu ketai” (wallet mobile phones). My US sourced Pixel 3 does not have this functionality. I wasn’t sure if the Pixel 6 purchased from the Japanese Google online shop would have the chip or not, since I could not find any explicit reference to it. However, it seems to work.

First I tried to directly charge the phone with cash at a machine at train station but the phone wasn’t recognized when I placed it into the charging cradle.

Then I tried to install and setup the Mobile Suica app, a truly horrible piece of software that must have roots in the pre-smartphone era. No joy! It turns out there is also a Pasmo app in the Google Play store. Uusally I treat Pasmo and Suica as synonymous since they’re different brand names for the same technology but in this case they’re not the same thing. The Pasmo app was really easy to install and set up. I selected the configuration without personal details (i.e. not linked to a bank account or credit card) and everything went smoothly. Charging it at the train station worked and so did a payment at a convenience store.

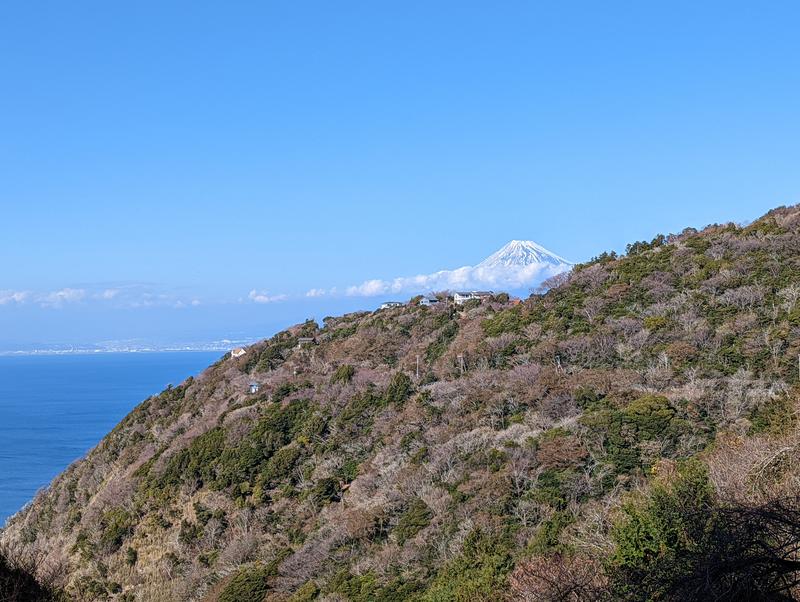
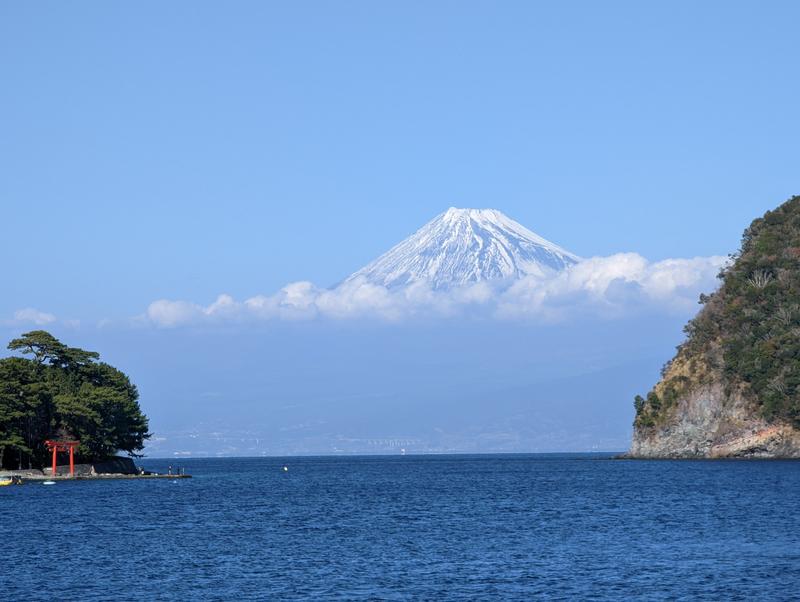
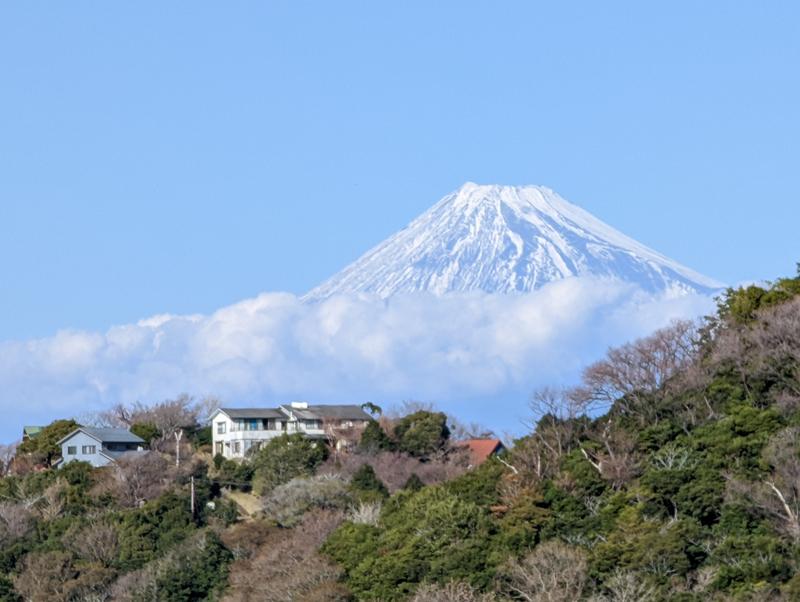
So how about the camera, the main reason I bought the phone? I tested it on Monday, which was a public holiday (Coming of Age Day), on a 162 km bicycle ride in west Izu. The weather was perfect for the numerous Mt Fuji views. I took shots from morning to after sunset, many of them telephoto shots zooming into Mt Fuji (see image above and below).

I will be able to make good use of this on my bike rides.

Rakuten Mobile and Google Pixel 3 / Pixel 3a

In mid-2019 the time came to change my mobile phone contract. For some reason mobile phone carriers in Japan do not want to reward your loyalty if you stick with them beyond the initial contract period and instead stiff you through higher prices or reduced discounts once the contract renews after 24 or 25 months. To me that’s just stupid, but anyway that’s how I had ended up with a Softbank Mobile contract and a new Google Pixel 3a after two years with UQ Mobile.

Now Rakuten Mobile had entered the ring to challenge the big three operators (docomo, au and Softbank), offering their “Rakuten UN-LIMIT V” which is free for 12 months for the first 3 million customers and has no penalty for cancelling after that. On paper it’s an offer with which you can’t loose. Rakuten’s network is still being built up from scratch, but the company has a roaming deal with au to give sufficient coverage until then. The plan includes 5 GB of data per month in the roaming area as well as 2 GB per month in 66 countries abroad (most of the destinations for international business travelers). I was willing to give it a try, even though they did not explicitly guarantee an unlocked Google Pixel 3a would work with their network. But we’re talking about Google, right? This is a trillion dollar company making some of the best phones outside of Apple and responsible for the operating system running on 3 out of 4 smartphones worldwide.

So I took the leap of faith and applied for MNP (mobile number portability) from my old carrier. Then I applied for “Rakuten UN-LIMIT V”. A few days later an envelope arrived from Rakuten Mobile with a new SIM card. When I activated the new SIM, the old Softbank SIM was disabled and the phone lost network access. I followed the printed instructions for swapping the SIM card but no joy: The new SIM card didn’t start working. Even after I manually selected the new APN (it wasn’t activated by default), the phone did not receive a phone number and there was no mobile data access, only WiFi. I googled the problem and found some blog posts with work-arounds that only work on Rakuten’s own network, not the roaming areas. Even so, I couldn’t make it work. My Pixel 3a didn’t even see any Rakuten network in the area where I live, densely populated Setagaya in Tokyo. I even tried the Rakuten SIM in my other phone, a Pixel 3 purchased off Amazon in the US. Same problem, no data. I called support and they told me what I already knew, that the Google Pixel 3 and Google Pixel 3a are not on their supported list. The list of supported devices for the Rakuten UN-LIMIT V service mentions the Google Pixel 4, Pixel 4 XL and Pixel 4a but no Pixel 3 or 3a. For Rakuten with Docomo lines or au lines they list the Docomo Pixel 3a as the only compatible device from Google.

Rakuten Mobile support told me I could either buy a different phone or transfer the number to another provider or give up the number altogether.

So I requested an MNP number from Rakuten Mobile (3000 yen + tax) to move on and applied for a voice + data SIM from a Mobile Virtual Network Operator (MVNO). Three days later I had that SIM in my mailbox. I plugged it in, followed the phone-based activation procedure and 10 minutes later had a working phone again, with voice, SMS and 3 GB of data for 1600 yen a month + tax.

I really hope Rakuten will get its act together. The Japanese oligopoly of docomo, au and Softbank with difficult to understand but ultimately overpriced plans needs some real competition. But if they are serious, how can they not support Google’s flagship phones? Rakuten blew a one time chance to gain a loyal customer. Meanwhile I’m happy with IIJmio, the service I signed up for.

Pixel 3a: “Analogue audio accessory detected. The attached device is not compatible with this phone”

Three months ago my wife and I both changed our local smartphone plans and changed to a Google Pixel 3a.

Within a week she had a problem where her phone would suddenly shut down when the battery still had 50-60% charge left, while doing nothing. This even happened after the phone had been factory reset, with no third party apps installed. It took a few weeks before Softbank Mobile replaced the phone under warranty.

Now it’s my turn it seems. Recently I would find the phone with less than 50% of battery left in the morning when I had left it hooked up to the charger (so it should have been at 100%). I would reconnect the phone but it would not show the charging symbol. I then tried different cables and chargers and also rebooted the phone. Eventually it would charge again.

Today it showed the following error:

Analogue audio accessory detected. The attached device is not compatible with this phone

Nothing was plugged into its headphone socket or into the USB C port. There was no analog audio device connected. I googled the problem and most results suggested it was a problem with the USB C port. That makes sense, since it would explain both the charging issues and the audio warning, as one can plug an analog device into the USB C port via an adapter.

Other results suggested a factory reset may get it working again, but that did not work for me. After the factory reset I could charge the phone with the charger from my earlier Nexus 6P and a USB C cable when powered off. However, after I powered it up and started the system restore, it no longer charged from either that charger or from the Pixel 3a charger or a Pixel 3 charger. The problem was back.

Time to take it back to the Softbank Mobile shop, I guess 🙁

Needless to say, I am not impressed with a 2/2 failure rate for our Pixel 3a phones so far. The Pixel 3a was great while it worked. The picture quality seems as good as for its more powerful sibling, the more expensive Pixel 3 and battery life was decent too. But that is all meaningless if it randomly shuts down or you can no longer charge it.

UPDATE: Softbank Mobile sent the two months old Pixel 3a in for testing and repair. A couple of days later they quoted almost 20,000 yen (US$190) for the repair of the unspecified damage, which they said would not be covered under warranty 🙁

Picasa: “Failed to download album list”

If you are still using the Picasa 3 desktop application by Google and got the above error message, here’s some bad news for you: Google has finally killed this app. On March 26, 2018 they announced that it would no longer be able to upload new albums. So this error message is not temporary and there is no direct fix.

I think it’s very regrettable that Google has been killing off Picasa step-by-step. This is only the latest nail in the coffin. I had been using Picasaweb and Picasa since 2010 and they were great products.

The good news is that you can still create albums from folders using a web browser. Say you have a folder named “2018-03-26 Cherry Blossom Party”. Just follow these steps (for Windows and Chrome):

1) Select its parent folder in Windows Explorer, then slowly click on the folder that you want to upload, twice: Once to select it, then once more to enable you to edit the folder name as if to rename it. When the name becomes editable, press Ctrl+C to copy the folder name, then press Esc to keep the name unchanged. This stores the folder name in the copy-and-paste clipboard, which will save you from having to manually retype the name later.

2) In Chrome, go to https://photos.google.com/ and click on “Upload” (on the top right). A file selector dialog will open up. Click through to the contents of the folder you want to upload. Select all files in the folder using Ctrl+A and click “Open” to confirm the upload.

3) The browser will upload all files and give you a choice of “Add to album” or “Shared album”. Select “Add to album”. To create a new album with the name of the folder, select “New album”. Click on the album name showing as “Untitled” and use Ctrl+V to paste the name you copied in step 1. Hit Enter and click on the check mark to confirm creation of the new album.

Voila, you have a new album online, with the same name as the local folder. Repeat as needed for multiple folders. This is as simple as it gets without the old Picasa app.

Getting Rid of the EMUI Launcher on the Huawei P9 Lite

Last time I switched mobile provider here in Japan, I signed up for a contract that included a Huawei P9 Lite. My biggest grip about it is its non-standard EMUI interface that runs on top of Android 6.0.1.

Previously I was using a Nexus 5, which had worked OK for me, though the picture quality of its camera was rather mediocre. One nice thing about the Nexus 5 was that it runs stock Android, with no customization. Its user interface is identical to that of my other phone, a Nexus 6P.

I really prefer stock Android without OEM customization. For one, stock Android means you can get version upgrades sooner and for longer (or at all!).

I found the EMUI launcher confusing. For example, I did not see any easy way to launch an app that didn’t have a desktop link.

It’s possible to switch from EMUI to the standard Google launcher. Here are the steps I performed:

1) Install “Google Now Launcher” via Play Store.

2) Swipe down, select Shortcuts and then Settings

3) Enter “def” into the search box at the top (may have to scroll up first)

4) Select “Default app settings”

5) Select “Launcher” and pick “Google” instead of “Huawei Home”. Ignore the warning that tries to scare you into sticking with EMUI (you can always change back by following the same steps and selecting “Huawei Home” again).

6) There you go!

The irritating long push home button

Another irritation that seemed to happen more on the Huawei than on my other phones was the Google screen that pops up (seemingly randomly) when I just try to go to the home screen. It has a “Want answers before you ask?” prompt at the bottom and a Google search box with voice search option at the top. I really don’t need this screen because the standard Android home screen already has a Google search bar at the top. I’d rather have the home screen with all my app shortcuts come up reliably whenever I push the Home button!

It took me a while to figure out that this Google search screen comes up on what the phone thinks is a long push of the Home button, which has a different meaning from a regular short tap. If that happens, just tap again and it will go to the home screen. Or just make it your habit to double tap the home screen to go to the home screen, then this should never happen 🙂

Google broke Picasa uploads

Having used Google Picasaweb for picture-hosting for many years, Google’s transition to Google Photos has been a frustrating experience. The original Picasaweb has always worked better for me than its supposed replacement. Several friends of mine who had also been using Picasaweb have already switched to other services, including Facebook.

The latest nail in the coffin came a few days ago, when the Picasa 3 application failed to upload new albums to Google Photo. The error message was:

Error: Request failed
Click here to View Errors

The link revealed that it was a server error:

HTTP Error 400 – https://picasaweb.google.com/post?tok={long-token-here}[156]

It looks like someone at Google broke the upload servers. When they announced the transition a year ago, Google wrote:

Desktop application
As of March 15, 2016, we will no longer be supporting the Picasa desktop application. For those who have already downloaded this—or choose to do so before this date—it will continue to work as it does today, but we will not be developing it further, and there will be no future updates.

For now, the workaround appears to be to use “File | Export Picture to Folder” in the Desktop application to create files no wider than 1600 pixels (below the limit for unlimited free uploads) and then upload those file sets to Google Photo using its web interface.

At the moment it is still possible to share Google Photo images in blog and forum posts but for how much longer? First you must share the album, for example by clicking on the “share” icon in the album in Google Photo, then “Get Link” to generate a link, which you don’t actually have to use. Then you can view an image, right-click on it and select “Open image in new tab”. The URI above the new tab that opens can be used for embedding images in blogs and forums. If or more precisely, when Google also breaks this feature then Google Photos will become unusable for me.

I am looking for a good solution to be hosted on one of my own servers that will replace Google Photos, without size limits and without any hassle for resizing images for public sharing, that will let me control who can see what images like the old Picasaweb did.

Nexus 6P Flashing Charge Icon

Recently the USB-C quick charger that came with my Huawei Nexus 6P appeared to stop working. I normally leave the phone charging over night, but one morning I found its battery charge was low and it hadn’t been charging. When I disconnected and reconnected it to the cable (which is reversible with USB-C connectors on both ends), the lightning bolt inside the battery charge indicator kept blinking (flashing on and off), rather than being solid on as it normally would while the device is charging.

Disconnecting and reconnecting the device or unplugging and reconnecting the charger to the wall socket made no difference whatsoever. Reversing the cable direction did not help either.

My only way to still charge the phone was to use a USB-A to USB-C cable that draws power from a PC USB socket, which is a much slower way to charge the phone. So I decided that the charger must have failed after less than a year of use. I already started looking for USB-C quick chargers on Amazon (they exist but are much more pricey than USB-A chargers), but didn’t order one yet.

Today I decided to Google for the problem and found others who had the exact same issue. It turned out that simply powering down the phone and powering it up again will fix the problem: Yepp, it will charge again!

I’m not sure what the fundamental issue is, but it seems I won’t have to rush out and buy a new charger (which wouldn’t have helped anyway!), as the issue is on the phone side.

If a simple phone reboot fixes it and it doesn’t happen too often, I guess I can live with that. The Nexus 6P has worked great for me so far.

Removing “Suggested for you” category from Google News

In November 2014 Google added a “Suggested for you” category to Google News which includes articles on topics that it thinks are of interest to you.

Now, Google has some pretty smart algorithms for rating websites with content that people are searching for to give you the most relevant information, but even 18 months after this particular feature was launched in Google News I find its results pretty poor. They merely distract from news items I am really interested in.

For example, if you search for the lyrics of a song by a particular artist because a family member asks you to then you’re likely to be seeing articles about that artist popup in your feed daily for weeks and months…

The solution is easy:

  • Open Google News while you’re logged in to Google
  • Click on the “Personalize” button on the top right
  • Look for a “Suggested for you” category with a slider next to it.
  • Move the mouse to that category and click the trash can that appears next to the slider
  • Save the changes

Should you ever want to restore the category, you can click “Personalize” and “Reset” to undo all personalization.

Google Maps Engine brings back custom routes

Last year I stopped updating Google Maps on my Android phone because Google had dropped important functionality with Google Maps 7.x. Google Maps 6.x for Android was a great tool for following mapped routes on long bicycle rides, especially randonnes of 200 km and more. After an update I had to revert to Google Maps 6.x to get it back. This also meant I could no longer allow Android to install all available updates in one go. I always had to manually confirm all updates except Maps to not lose 6.x again.

Finally Google has brought this functionality back. There are still missing bits, but at least the product seems usable again for my purposes.

On Android there is an app called Google Maps Engine, which supports loading custom maps. Select “Open a map” in the menu. You’ll get a list of maps created by you or shared with you.

This menu can be populated from a desktop machine. There you can import existing maps created for Maps 6.x. Go to https://mapsengine.google.com/map/ and select “Open a map” (you need to be logged in to your Google account). Select “Classic My Maps”. You’ll be able to select one of your existing maps and import it in to Maps Engine. After that it will become available to the Google Maps Engine app on your Android and you can use it for navigation. The route will show as a blue line and special locations, such as my brevet PCs (“points de controle”, route check points) will show marked with a pin.

One drawback of Maps Engine on the Android compared to the old Google Maps 6.x is that it doesn’t seem to support displaying a ruler on a map yet. Thus when you zoom in or out you won’t be able to tell how far you are from any point you see on the map, whether one cm on the screen corresponds to 100 m or 10 km on the map. This is the same problem that Google Maps 7.x had when it was launched last year. Hopefully it will be fixed soon. Still, it is disconcerting that Google misses out such basic functionality when launching products. Are all their eyes on monetization these days?

Google does an “Apple Maps” to its own Maps

Last night Google proved to me that you don’t have to be Apple to shoot yourself in the foot with a major Maps application release.

Naturally, online maps are a big feature on mobile devices, which is why it’s important to get them right.

Not too long ago Apple ended up with egg on their faces when they introduced their own Maps application to replace Google Maps. Google has just done the same. They rolled out a completely new Maps app starting from the middle of July and yesterday it landed on my Android phone. I was just preparing for a 280 km bicycle trip and had mapped out the route to follow, which I usually use Google Maps for. Imagine my surprise when I found that following an externally mapped route file was no longer supported on the latest Google Maps app: It doesn’t support the “My Maps” feature any more. With “My Maps” you can map a route using a number of third party products and highlight key locations, such as restaurants or shops on the map and assign a name to this. Google Maps then marks these points of interest with asterisks and highlights the route with a coloured line that you can follow easily. Simple but powerful. Well, that’s how it used to be before the “upgrade”.

This is what they say on their official blog:

Finally, My Maps functionality is not supported in this release but will return to future versions of the app.

Sounds to me like they were keen to release a new version of the product, even thought it wasn’t ready yet — just like Apple. Interestingly enough, the iOS version of Google Maps didn’t have the “My Maps” feature either. So what Google has done is to dumb down its flagship product to the level of the inferior version it ships on its competitor’s operating system!

Another annoying omission was the ability to display a scale bar (ruler) illustrating distances on the map, at whatever zoom level. This option has gone. It was quite useful to be able to estimate distances on the map. Without it, I simply don’t have a clue about distances unless I’m totally familiar with the area, in which case I presumably wouldn’t be using Google Maps in the first place.

My temporary fix was to uninstall Google Maps, reverting back to the factory installed version of Google Maps. This gets Google Maps working again, but it’s not sticky. After uninstalling it, the “upgrade” (i.e. downgrade) was back again the following day. Therefore it is important to disable automatic updates in the Google Play settings. Once you do that you will have to manually confirm all updates for apps other than Maps (and you need to avoid confirming Maps updates, which will still be offered).

Other problems that caused user complaints:

  • No more offline maps – the new version only supports map viewing with a mobile data or WiFi connection
  • Removal of +/- (zoom buttons) – zooming in and out now takes two fingers
  • Fewer and less relevant local search results
  • No more green/red/yellow lines along roads to indicate congestion levels
  • Removal of Google Latitude (which I never used)

UPDATE (2013-08-16): Version 7.1.0 appears to have brought back the scale bar. However, I won’t be installing it until My Maps also comes back.