What is Skipity and why is it in FireFox?

I mostly use Google Chrome these days, but still have Mozilla FireFox installed as a browser, which used to be my standard browser before I switched to Chrome.

Today I launched FireFox again and was surprised to see something called Skipity in its toolbar. Furthermore, when I tried to go to my browser custom start page (a page with my most useful links) it took me to the Skipity website. A Google search showed that Skipity comes as part of an add-on called “Download Youtube video 12.0”. I removed that add-on, restarted FireFox, opened the URL I previously had as the browser start page and went to “Tools > Options > General > Startup” to select that URL as the start page again.

Any software that changes the start page of the browser without your consent should be permanently banned from your computer!

strcpy data corruption on Core i7 with Linux 64bit

If you’re C programmer, does this code look OK to you?

#include <stdio.h>
#include <stdlib.h>
#include <string.h>

int main(int argc, char* argv[])
{
  char szBuffer[80];
  strcpy(szBuffer, "abcdefghijklmnopqrstuvwxyz");
  printf("Before: %s\n", szBuffer);
  strcpy(szBuffer, szBuffer+2);
  printf(" After: **%s\n", szBuffer);

  return 0;
}

Here is the output on my server, a Core i7 running Debian 6:

Before: abcdefghijklmnopqrstuvwxyz
After: **cdefghijklmnopqrstuvwzyz

What the program does is dropping two characters from a text string in a buffer, moving the rest of it left by two characters. You expect the moved characters to stay in sequence, but if you compare the last three characters of the output you see that that isn’t the case. The ‘x’ has been obliterated by a duplicate ‘z’. The code is broken.

It’s a bug, and not a straightforward one, as I’ll explain.

I first came across it a couple of months ago, as I was moving some code of mine from an Athlon 64 Linux server to a new Intel Core i7 server. Subsequently I observed strange corruption in data it produced. I tracked it down to strcpy() calls that looked perfectly innocent to me, but when I recoded them as in-line loops doing the same job the bug went away.

Yesterday I came across the same problem on a CentOS 6 server (also a Core i7, x86_64) and figured out what the problem really was.

Most C programmers are aware that overlapping block moves using strcpy or memcpy can cause problems, but assume they’re OK as long as the destination lies outside (e.g. below) the source block. If you read the small print in the strcpy documentation, it warns that results for overlapping moves are unpredicable, but most of us don’t take that at face value and think we’ll get away with it as long as we observe the above caveat.

That is no longer the case with the current version of the GNU C compiler on 64-bit Linux and the latest CPUs. The current strcpy implementation uses super-fast SSE block operation that only reliably work as expected if the source and destination don’t overlap at all. Depending on alignment and block length they may still work in some cases, but you can’t rely on it any more. The same caveat theoretically applies to memcpy (which is subject to the same warnings and technically very similar), though I haven’t observed the problem with it yet.

If you do need to remove characters from the middle of a NUL terminated char array, instead of strcpy use your own function based on the memmove and strlen library functions, for example something like this:

void myStrCpy(char* d, const char* s)
{
  memmove(d, s, strlen(s)+1);
}
...
  char szBuffer[80];
...
  // remove n characters i characters into the buffer:
  myStrCpy(szBuffer+i, szBuffer+i+n);

I don’t know how much existing code the “optimzed” strcpy library function broke in the name of performance, but I imagine there are many programmers out there that got caught by it like I was.

See also:

APC Smart-UPS 750 with Ubuntu 11.4


I finally got myself an uninterruptible power supply (UPS). The infamous August heat in Tokyo has been pushing power use including air conditioning close to the limit of what Tepco can supply: All 10 reactors in Fukushima Daiichi and Daini are either destroyed or shut down. In total about 2/3 of the nuclear power capacity in Japan is currently offline. That gave me one more reason to shop for a UPS. The other was that I have a Linux server and Linux file systems tend to use a lot of write buffering, which can make a mess of a hard disk partition if power is lost before the data is fully written to disk.

A friend recommended APC as a brand. Researching which of their ranges was suitable for my server, it appeared that some advanced PC power supplies with Power Factor Correction (PFC) have problems with the consumer level APC models, which output a square wave when in battery power mode. The more business-oriented models output something closer to a sine wave, the shape of power supplied by your utility company. Because of that I went for the APC Smart-UPS range. The server draws less than 50W, so there wasn’t really much point going for the beefiest models. That’s how I picked the APC Smart-UPS 750 with 500W of output power. My exact model is the SUA750JB, the 100 V, 50/60 Hz model for Japan. If you live in North America, Europe, Australia or New Zealand you’ll use either the 120V or 230V models. There’s also a 1000W (1500 VA) model, the APC Smart-UPS 1500, which features a larger capacity battery and larger power output.

The UPS arrived within two days. There’s a safety plug at the back of the unit which when open disconnects the battery for transport, which you’ll have to connect to make it work. The internal lead-acid batteries appeared to come fully charged. They are fully sealed units that are supposed to be leak-proof.

My unit came with a manual in Japanese and English but no software of any kind. It came with a serial cable, which I don’t have any use for, as virtually all modern PCs no longer have legacy serial and parallel ports. What I needed was a USB cable with one type A and one type B connector and that was not included. I am not sure why APC bundles the serial cable and not the USB cable. For an item in this price range, the USB cable should not be extra. However, I had a couple of suitable cables lying around from USB hard disks and flat screen monitors with built-in USB hubs, so it wasn’t a problem. You may want to check if the unit you’re buying comes bundled with the USB cable or if you may need to get one separately.

Once you connect the UPS to the PC using a USB cable, you should be able to verify that Linux has detected the device. Run:

me@ubuntu-pc:~$ lsusb
Bus 003 Device 003: ID 051d:0002 American Power Conversion Uninterruptible Power Supply

The software I’m using for linux is the apcupsd daemon, whose source code is available on SourceForge. I compiled it this way:

./configure --enable-usb
make
sudo make install

To be able to run it you need to set some config files. In /etc/default/apcupsd set

ISCONFIGURED=yes

In /etc/apcupsd/apcupsd.conf:

UPSCABLE usb (default: smart)
UPSTYPE usb (default: apcsmart)
DEVICE (default: /dev/ttyS0)

Stop and start the daemon and you’re in business:

/etc/init.d/apcupsd stop
/etc/init.d/apcupsd start

While the daemon is stopped you can also run apctest to run various tests on the unit.

Test that the UPS works, by pulling the power cable from the wall socket. The UPS should raise an audible alarm and its LEDs should switch from the sine wave symbol to the sine wave with battery poles symbol. Also be aware that UPS batteries do not last forever, especially if they’re used in a hot environment. You may get anywhere between 2 to 4 years of use out of them. Replacement batteries from third parties are usually available for much less than original parts from the UPS manufacturer.

Gateway M-6750 with Intel Ultimate-N 6300 under Ubuntu and Vista

My Gateway M-6750 laptop uses a Marvell MC85 wireless card, for which there is no native Linux driver. Previously I got it working with Ubuntu 9.10 using an NDIS driver for Windows XP. Recently I installed Ubuntu 11.04 from scratch on this machine (i.e. wiping the Linux ext4 partition) and consequently lost wireless access again.

Instead of trying to locate, extract and install the XP NDIS driver again, this time I decided to solve the problem in hardware. Intel’s network hardware has good Linux support. I ordered an Intel Centrino Ultimate-N 6300 half-size mini PCIE networking card, which cost me about $35. Here is how I installed it.

Here is a picture of the bottom of the laptop. Remove the three screws on the cover closest to you (the one with a hard disk icon and “miniPCI” written on it) and open the cover. Use a non-magnetic screwdriver because the hard disk is under that cover too. As a matter of caution, use only non-magnetic tools near hard disks or risk losing your data.

Remove the screw that holds the MC85 card in the mini PCI slot on the right. Remove the network card. Carefully unplug the three antenna wires. Connect those wires to the corresponding locations on the Intel card. Insert the Intel card into the socket on the left. Note: I had first tried the Intel card in the socket on the right but in that case it always behaved as if the Wireless On/Off switch was in the Off position, regardless of its actual state. Even rebooting didn’t make it recognize the switch state. The left mini PCI socket did not have this problem 🙂

Because the Intel card is a half size card you will also need a half size to full size miniPCI adapter to be able to screw down the card to secure it. Instead I simply used a stiff piece of cardboard (an old business card) to hold it in place and closed the cover again. If you take your laptop PC on road a lot I recommend doing it properly (don’t sue me if the cardboard trick melts your motherboard or burns down your house).

Download the Intel driver and utility set for Windows from the Intel website using a wired connection. Under Ubuntu the card seemed to work first time I rebooted into it. I just had to connect to the WLAN.

UPDATE:

I fixed it properly using a half size to full size Mini PCI-E (PCI Express) adapter converter bracket by Shenzhen Fenvi Technology Co., Ltd. in Guangdong. I had found it on Alibaba. I paid $9.50 by Paypal and a bit over a week later five sets of brackets and matching screws arrived by mail from Hong Kong (one set is only $1.90 but the minimum order was 5, so that’s what I ordered). The brackets come with about a dozen each of two kinds of screws. Four of the smaller screws worked fine for me.

VIA PC3500 board revives old eMachines PC

Last September one of my desktop machines died and I bought a new Windows 7 machine to replace it. Today I brought it back to life again by transplanting a motherboard from an old case that I had been using as my previous Linux server. The replacement board is a VIA MM3500 (also known as VIA PC3500), with a 1.5 GHz VIA C7 CPU, 2 GB of DDR2 RAM and on-board video. It still has two IDE connectors as well as two SATA connectors, allowing me to use both my old DVD and parallel ATA HD drives, as well as newer high capacity SATA drives.

After the motherboard swap I had to reactivate Windows XP because it detected a major change in hardware. Most of the hardware of the new board worked immediately, I could boot and had Internet access without any reconfiguration. When I started with the new machine. I just had to increase video resolution from the default 640×480 to get some dialogs working.

I then downloaded drivers for the mother board and video from the VIA website. I now have the proper CN896 (Chrome IGP9) video driver working too.

When I tested the board as a server with dual 1 TB drives (RAID1), it was drawing 41W at idle. Running in my eMachines T6212 case with a single PATA hard drive it draws 38W at idle.

Before removing the old motherboard I made a note of all the cable connections on both motherboards. The front-mounted USB ports and card reader have corresponding internal cables, which connected to spare on-board USB connectors. The analog sound connectors connect to the motherboard too. The only port at the front left unconnected was the IEEE-1394 (FireWire / iLink) port, which has no counterpart on the VIA board.

It feels great to have my old, fully configured machine with all its data and applications back thanks to a cheap motherboard that works flawlessly.

Ubuntu 11.4, GA-H67MA-UD2H-B3, EarthWatts EA-380D, Centurion 5 II, 5K3000

CoolerMaster Centurion 5 II

It’s been 2 months since I have written a blog post that wasn’t about the Tohoku earthquake and tsunami or the Fukushima 1 nuclear disaster, but today I am taking a break from those subjects. The reason is that I replaced my local Ubuntu server with newer hardware. The primary requirements were:

  • GNU/Linux (Ubuntu)
  • Reasonably low power usage
  • Large and very reliable storage
  • Affordability

I was considering boards ranging from the new AMD Zacate E-350 dual core to LGA-1155 (“Sandy Bridge”) boards with the Core i5 2500K. First Intel’s P67/H67 chip set problems and then the disaster in Japan prompted me to postpone the purchase.

Finally I picked the GigaByte GA-H67MA-UD2H-B3, a MicroATX board with 4 SIMM slots in conjunction with the Core i3 2100T, a 35W TDP part with dual cores and 4 threads. The boxed version of the Intel chip comes with a basic fan that didn’t sound too noisy to me. I installed two 4 GB DDR3 modules for a total of 8 GB of RAM, with two slots still available. When you install two memory modules on this board you should install them in memory slots of the same colour (either the blue or the white pair) to get the benefit of dual channel.

Gigabyte GA-H67MA-UD2H-B3

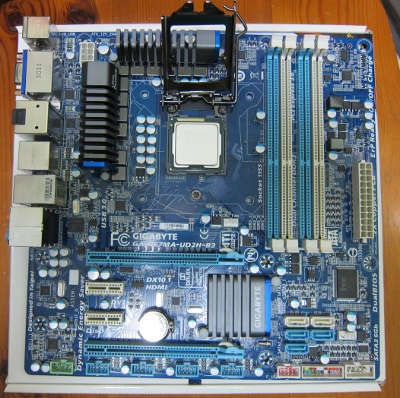
I chose a H67 board because of the lower power usage of the on-chip video and the 2100T has the lowest TDP of any Core 2000 chip. I don’t play games and my video needs are like for basic office PCs. Unlike P67 boards, H67 boards can not be overclocked. If you’re a gamer and care more about ultimate performance than power usage you would probably go for a P67 or Q67 board with an i5 2500K or i7 2600K with a discrete video card.

To minimize power use at the wall socket I picked an 80 Plus power supply (PSU), the Antec EarthWatts EA-380D Green. It meets the 80 Plus Bronze standard, which means it converts AC to DC with at least 82% efficiency at 20% load, at least 85% load at 50% load and at least 82% at full load. It’s the lowest capacity 80Plus PSU I could find here. 20% load for a 380W PSU is 76W. Since the standard does not specify the efficiency achieved below 20% of rated output and typically efficiency drops at the lower end, it doesn’t pay to pick an over-sized PSU.

Disk storage is provided by four Hitachi Deskstar 5K3000 drives of 2 TB each (HDS5C3020ALA632). These are SATA 6 Gbps drives, though that was not really a criterium (the 3 Gbps interface is still fast enough for any magnetic disks). I just happened to find them cheaper than the Samsung HD204UI that I was also considering and the drive had good reports from people who had used them for RAID5. The 2TB Deskstar is supposed to draw a little over 4W per drive at idle. I don’t use 7200 rpm drives in my office much because of heat, noise and power usage. Both types that I had considered have three platters of 667 GB each instead of 4 platters of 500 GB in older 2 TB drives: Fewer platters means less electricity and less heat. A three platter 2 TB drive should draw no more power than a 1.5 TB (3×500 TB) drive.

There are “enterprise class” drives designed specifically for RAID, but they cost two to three times more than desktop drives — so much for the “I” in RAID that is supposed to stand for “inexpensive”. These drives support a special error handling mode known as CCTL or TLER which some hardware RAID controllers and Windows require, but apparently the Linux software RAID driver copes fine with cheap desktop drives. The expensive drives also have better seek mechanisms to deal with vibration problems, but at least some of those vibration problems are worse with 7200 rpm drives than the 5400 rpm drives that I tend to buy.

Motherboard, PSU and 4 RAID drives in case

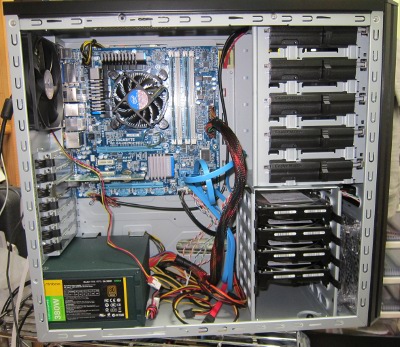
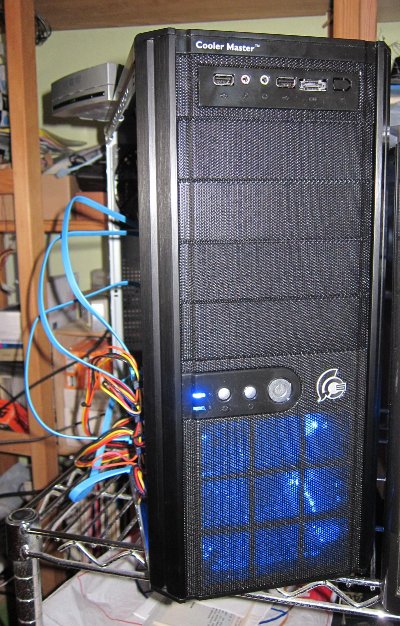
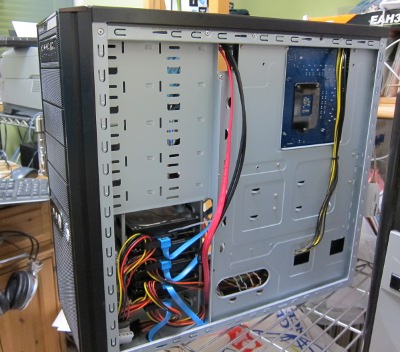
The case I picked was the CoolerMaster Centurion 5 II, which as you can see above is pretty large for a MicroATX board like the GA-H67MA-UD2H-B3, but I wanted enough space for at least 4 hard disks without crowding them in. Most cases that take only MicroATX boards and not full size ATX tend to have less space for internal hard disks or squeeze them in too tightly for good airflow. This case comes with two 12 cm fans and space to install three more 12 or 14 cm fans, not that I would need them. One of these fans blows cool air across the hard disks, which should minimize thermal problems even if you work those disks hard.

One slight complication was that the hard disks in the internal 3 1/4″ slots needed to be installed the opposite way most people expect: You have to take off both covers of the case, then connect power and SATA cables from the rear end (view to bottom of the motherboard) after sliding the drives in from the front side (view to top of motherboard). Once you do that you don’t even need L-shaped SATA cables. I could use the 4 SATA 6 Gbps cables that came with the GigaByte board. Most people expect to be able to install the hard disks just opening the front cover of the case and then run into trouble. It’s not a big deal once you figure it out, but quite irritating until then.

4 RAID drives in case

I installed Ubuntu 11.4, which has just been released, using the AMD64 alternate CD using a USB DVD drive. I configured the space for the /boot file system as a RAID1 with 4 drives and the / file system as a RAID6 with 4 drives with most of the space. Initially I had problems installing Grub as a boot loader after the manual partitioning, but the reason was that I needed to create a “bios_grub” partition on every drive before creating my boot and data RAID partitions.

RAID6 is like RAID5 but with two sets of parity data. Where the smallest RAID5 consists of three drives, a minimal RAID6 has four, with both providing two drives’ worth of net storage space. A degraded RAID6 (i.e. with one dead drive) effectively becomes a RAID5. That avoids nasty surprises that can happen with RAID5 when one of the other disks goes bad during a rebuild of a failed drive. If you order a spare when you purchase a RAID5 set and plan to keep the drive in a drawer until one of the others fails, you might as well go for a RAID6 to start with and gain the extra safety margin from day 1.

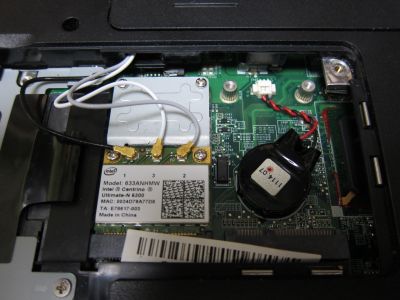
I had problems getting the on-board network port to work, so I first used a USB 2.0 network adapter and later installed an Intel Gigabit CT Desktop Adapter (EXPI9301CT). With two network interfaces you can use any Linux machine as a broadband router, there are various pre-configured packets for that.

While the RAID6 array was still syncing (writing checksums computed from data on two drives to two other drives) and therefore keeping all disks and partly the CPU busy the machine was drawing about 58W at the wall socket, as measured by my WattChecker Plus. Later, when the RAID had finished rebuilding and the server was just handling my spam feed traffic, power usage dropped to 52W at the wall socket. That’s about 450 kWh per year.

The total cost for the server with Core i3 2100T, 8 GB DDR3 RAM (1333), H67 MicroATX board, PCIe Ethernet card, 4 x 2 TB SATA drives, case and 380W PSU was just under 80,000 yen including tax, under US$1,000.

SoftBank Mobile “Home Antenna FT” – an update

About two weeks ago I fixed the wireless black hole that was my new home by installing SoftBank Mobile’s “Home Antenna FT” femtocell adapter. It provides indoors mobile phone reception for my family, connecting the small mobile phone cell to SoftBank’s network via my FLET’S Hikari Next broadband connection.

Yesterday I noticed that the antenna had stopped working and my Android had no reception. It had been shipped to us with a “Hikari BB Unit” broadband router.

When I first installed the Home Antenna FT I found that I could get it working by simply hooking it up on the LAN side of my existing broadband router. No luck this time. Wherever I connected it inside the LAN its status LED turned red and I didn’t give me any signal. As far as I knew nothing had changed in my LAN.

After some fruitless poking around and a half hour phone call to SoftBank’s hotline I had little alternative but starting from scratch, following the supplied Home Antenna FT setup instructions precisely. This involved connecting the following to an Ethernet hub (I used the four port hub on the LAN side of a spare router with its WAN side disconnected, but any cheap 4-port hub will do):

  • one of the Ethernet ports on the FTTH ONU
  • the WAN port of the “Hikari BB Unit” broadband router
  • a PC (I used an ancient notebook running Windows 2000)

Then I popped the CD-ROM that came with the FLET’S ONU into the latop’s drive and followed the SoftBank configuration steps. It involved installing some software for PPPoE, which Windows theoretically doesn’t really need, rebooting and then accessing a FLET’S website and entering a CAF ID and access key.

Not sure why, but after that the “Internet connection” LED of the Hikari BB Unit turned green and the Home Antenna FT started providing a signal after it was hooked up one of the LAN ports of the Hikari BB Unit. I could then remove the hub and laptop, directly hooking up the WAN port of the BB Unit to the FLET’S ONU and everything still worked.

Out of curiosity I once moved the Home Antenna FT back to my other router, but still no joy: It only worked with the Hikari BB Unit. So I moved it back there and it will stay there.

Epson PM-A950 under Windows 7 64bit

Earlier this month, an old eMachines T6212 bought in April 2005, a humble single core 1.6 GHz Athlon64 that had served me faithfully for more than 5 years, finally died. So two weeks ago I bought an Acer Aspire ASM3910-N54E, a Core i5-650 machine with 4 GB of RAM (max. 8 GB) and a 640 GB hard disk. It came with Windows 7 Home 64bit.

I replaced the C: drive with a 1 TB drive and added another 1.5 TB drive that I previously used in a USB-enclosure. I am using the on-board video with dual 1280×1024 monitors (Dell 1905FP), hooked up via an analog VGA cable and a digital HDMI-to-DVI cable.

The best thing I can say about Windows 7 is that it’s not as bad as Vista. I wish I could have stuck with Windows XP, but at least Windows 7 doesn’t get in the way as much as Vista did. It feels a bit more like Mac OS X, if that is what you like. It’s going to get more and more difficult to get drivers for new hardware that still support XP, but on the other hand older hardware may have problems working with Windows 7, for example my old Logitech QuickCam Zoom is not supported by Windows 7.

Epson PM-A950 printer driver

Today I tried to print from the new machine for the first time and found I needed a new printer driver for my almost 4 year old Epson PM-A950 USB printer/scanner. Though Microsoft’s documentation states that the printer is supported by Windows 7 out of the box, it will do so only using a generic Epson printer definition which probably will not support all the functionality. So I searched the Epson Japan website and found these two drivers (the 64bit version worked fine for my version of Windows 7):

  • Windows 7 32bit / Windows Vista 32bit / Windows XP / Windows 2000:
    http://www.epson.jp/dl_soft/file/7461/a950f652.EXE
  • Windows 7 64bit / Windows Vista 64bit / Windows XP x64 Edition:
    http://www.epson.jp/dl_soft/file/7462/a950h652.EXE

Energy efficiency

So far I’m very happy with the new machine. The machine draws about 40W when idle, considerably less than its less powerful predecessor (69W). The lastest Core i3 and Core i5 machines are very energy efficient. My i5 actually did better than a VIA MM3500 (1.5 GHz single core VIA C7). The only x86-compatible machines I have that beat the i5 on power usage at idle are either notebooks or are desktops built using notebook chipsets (i.e. the Mac Mini).

Installing OpenWRT on WZR-HP-G300NH from DD-WRT

Last month I bought a Buffalo WZR-HP-G300NH router and flashed it with DD-WRT open source firmware to use at my new home. However, I had problems with the router resetting itself periodically and with a weak WiFi signal. It appears DD-WRT for this router is not yet ready for prime time, though it may be in better shape by the end of the year.

Since I read that OpenWRT for the same router was fairly robust, I investigated switching from DD-WRT to OpenWRT. It turned out easier than I thought.

Using putty under Windows I did a ssh session to the router running DD-WRT. From there I downloaded the new firmware into the /tmp folder, trimmed off the 32 byte header and wrote the result to flash memory:

# cd /tmp
# wget http://downloads.openwrt.org/backfire/10.03.1-rc3/ar71xx/openwrt-ar71xx-wzr-hp-g300nh-jffs2-tftp.bin
# dd if=openwrt-ar71xx-wzr-hp-g300nh-jffs2-tftp.bin of=firmware.trx bs=32 skip=1
# mtd -r write firmware.trx linux

When the mtd command finished it dropped the connection to putty. I waited for the router to finish its reboot. Then I released and reacquired the IP address on Windows using ipconfig /release and ipconfig /renew. I launched the FireFox browser with 192.168.1.1 to configure OpenWRT. The first thing you should do once you’re connected to the web interface is assign an administrative password, because by default there isn’t one.

My next stumbling block was the fact that the WAN port had a different MAC address under OpenWRT than under DD-WRT. In DD-WRT the WAN and LAN ports on the WZR-HP-G300NH have the same MAC address, but in OpenWRT the WAN MAC address is larger by one. As a result DHCP from the ISP treated it as a new client that needed a new IP address, but the cable modem had already assigned its only IP address to the old MAC address. The solution was to pull the power cord from my Cisco cable modem, reconnect it and wait for the modem to reinitialize (watch the LEDs). Then do the same with the router. Reconnect ssh to the router and the WAN port has an IP address.

I also assigned Google’s open DNS server (8.8.8.8 / 8.8.4.4) to the router rather than leaving the default but I’m not sure if that was really necessary.

I set up the wireless SSID and selected WPA2 and a key. Finally I could specify transmit power to reach the whole building.

The OpenWRT UI doesn’t look quite as slick as DD-WRT, but it seems to work well and all the basic configuration seemed easy enough through the web interface. What I really liked best about the WHR-HP-G54 that this router replaces for me was its rock-solid reliability, followed by its WiFi coverage and feature set. With OpenWRT the WZR-HP-G300NH looks like a worthy successor to it.

DD-WRT on Buffalo WZR-HP-G300NH (Japanese version, A0 A3)

I’ll be moving to a new house next week, my first move in a decade. To make the switchover as smooth as possible I decided to set up and test the broadband connection and router at the new location ahead of the move, so I’d only have to bring along my PCs and everything should work on the new router that will duplicate the existing setup.

I chose the Buffalo WZR-HP-G300NH because it is supported by DD-WRT, Linux-based open source firmware that I also use on my Buffalo WHR-HP-G54. The new router has 32 MB of flash vs. 4 MB on the old one and 64 MB of RAM vs. 16 on the old one, which will make it much easier to add more features. It also offers 11n with wireless speeds up to 300 Mbps versus up to 54 Mbps on the old router that supports 11b and 11g. One USB-port provides access to mass storage for hosting a website, for audio or video files or for a Samba file server.

Installing DD-WRT was much easier on the Buffalo WZR-HP-G300NH than on its predecessor, as the DD-WRT team offers a special firmware version that can be flashed directly from the firmware upgrade menu of the standard Buffalo firmware. The older router required the use of TFTP for that and the steps involved were more complicated.

Here is what I did:

  • Go to http://dd-wrt.com/site/support/router-database and search for WZR-HP-G300NH. Open the page for this router and download file buffalo_to_ddwrt_webflash-MULTI.bin to the local hard disk.
  • Connect one of the LAN ports of the router via an Ethernet cable to your PC. You can leave the blue WAN port disconnected. Check with ipconfig on Windows or ifconfig on Linux that you receive an IP address like 192.168.11.2. Start your Browser and open http://192.168.11.1/ (enter user name root and leave the password empty).
  • Select the firmware upgrade link on the initial configuration screen or Admin Config / Update in the regular menus. Select local file and browse to the buffalo_to_ddwrt_webflash-MULTI.bin downloaded above. Start the upgrade. This takes about 6 minutes, during which you must not reset or power off the router. When the progress bar reaches 100% and the DIAG LED stops flashing you’re done.
  • Start your browser and open http://192.168.1.1/ — you should see the DD-WRT menus. Assign a new user name and password.
  • Reset the router using the 30/30/30 procedure: Push the reset button at the underside of the router and keep it pushed for a total of 90 seconds. After the first 30 seconds, pull the power cable without releasing reset. After another 30 seconds reconnect power, still holding down reset. After the final 30 seconds release reset. This clears the non-volatile RAM (NVRAM) for a factory reset.
  • Start your browser and again open http://192.168.1.1/ — again assign a new user name and password, which were cleared by the factory reset.

Congratulations! You now have a Buffalo WZR-HP-G300NH running English language open source DD-WRT firmware.