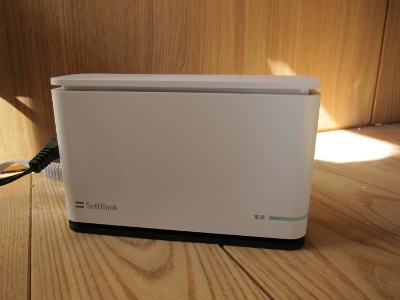
SoftBank Mobile “Home Antenna FT” – an update

About two weeks ago I fixed the wireless black hole that was my new home by installing SoftBank Mobile’s “Home Antenna FT” femtocell adapter. It provides indoors mobile phone reception for my family, connecting the small mobile phone cell to SoftBank’s network via my FLET’S Hikari Next broadband connection.

Yesterday I noticed that the antenna had stopped working and my Android had no reception. It had been shipped to us with a “Hikari BB Unit” broadband router.

When I first installed the Home Antenna FT I found that I could get it working by simply hooking it up on the LAN side of my existing broadband router. No luck this time. Wherever I connected it inside the LAN its status LED turned red and I didn’t give me any signal. As far as I knew nothing had changed in my LAN.

After some fruitless poking around and a half hour phone call to SoftBank’s hotline I had little alternative but starting from scratch, following the supplied Home Antenna FT setup instructions precisely. This involved connecting the following to an Ethernet hub (I used the four port hub on the LAN side of a spare router with its WAN side disconnected, but any cheap 4-port hub will do):

  • one of the Ethernet ports on the FTTH ONU
  • the WAN port of the “Hikari BB Unit” broadband router
  • a PC (I used an ancient notebook running Windows 2000)

Then I popped the CD-ROM that came with the FLET’S ONU into the latop’s drive and followed the SoftBank configuration steps. It involved installing some software for PPPoE, which Windows theoretically doesn’t really need, rebooting and then accessing a FLET’S website and entering a CAF ID and access key.

Not sure why, but after that the “Internet connection” LED of the Hikari BB Unit turned green and the Home Antenna FT started providing a signal after it was hooked up one of the LAN ports of the Hikari BB Unit. I could then remove the hub and laptop, directly hooking up the WAN port of the BB Unit to the FLET’S ONU and everything still worked.

Out of curiosity I once moved the Home Antenna FT back to my other router, but still no joy: It only worked with the Hikari BB Unit. So I moved it back there and it will stay there.

SoftBank “Home Antenna FT” (FEMTO AP-SR1-1) fixes weak mobile phone reception

We have four smartphones in our household, three Apple iPhones and one HTC Android phone, but for the last six months I basically couldn’t make calls indoors. This has now changed because of “Home Antenna FT”, a so called 3G femtocell.

Home Antenna FT access point

When we moved into our newly built home in Setagaya-ku, Tokyo half a year ago we discovered we had virtually no cell phone reception. Most of the time all four phones were out of signal range. If I left my phone leaning against the window pane in my office then I usually had enough of a signal to have it ring, but I couldn’t pick it up from there without immediately cutting the connection. I would then have to walk out into the street, wait to see some bars indicating a signal and then return the call to whoever had tried to reach me.

After several weeks I found out that SoftBank Mobile, our mobile provider offers a small device called “Home Antenna FT” for free to customers with connection problems. It acts as a low power mobile phone tower covering only the inside of one home, connecting to the SoftBank Mobile network using a broadband connection such as DSL or Fibre To The Home (FTTH) . The device is called FEMTO AP-SR1-1 and is made by SerComm Corporation in Taiwan.

I applied for one in September, but then later was told it couldn’t be used with J:COM, my then cable internet provider. I would have to change to NTT FLET’S Hikari (FTTH) or Yahoo BB (DSL). So I bit the bullet and changed provider in December, only to find out later that J:COM had also concluded an agreement with SoftBank Mobile. I wouldn’t have had to change after all.

Another month and a half passed until a box was delivered by Takkyubin (parcel service), which contained a broadband access router for use with the femtocell access point, but no access point. I already have a router and didn’t really want to replace it, but according to the instructions the new router was supposed to be connected in parallel to any PC that was hooked to the NTT Flet’s Optical Network Unit (ONU). I left it sitting on the shelf for a week until this morning when another, smaller box arrived. It was the access point.

I first hooked up the WAN port of the SoftBank router to the FLET’S ONU and the single network port on the FEMTO AP-SR1-1 to a LAN port of the router as per the instructions. I turned off / turned back on the mobile phone to make it seek a fresh base station, but initially had no luck. So I moved the access point to my office and and connected it to a small ethernet switch on the LAN side of my router. A little while later I had full signal strength on my mobile. Yeah! 🙂

I then moved the access point to a central location in my house, where I have with a WLAN access point with internal 4 port switch that is connected to the router using category 6 LAN cable and connected it to one of those 4 ports. Now the entire house is covered by the 3G signal. The unneeded SoftBank router went back into its cardboard box.

All in all, once I received the hardware it was a fairly painless experience.

Some people are concerned about cellphone radiation and having a micro version of “cell phone tower” right in the living room may be worrying to them, but in fact it’s a benign alternative to not having one: The further the base station, the more power the mobile phone has to emit to connect to it. By keeping the base station inside the home the mobile never never has to jack up the signal strength to levels that would penetrate exterior walls. If I do walk out of the front door, all bars disappear and only reappear when I stand far enough out in the street, indicating the device uses minimal power and only just covers the interior of our home.

FTTH (FLET’S HIKARI) with DD-WRT and OpenWRT

I recently changed from cable internet to fiber-to-the home (FTTH). The results are positive, even though the switch-over was not smooth. FLET’S HIKARI NEXT is a service operated by NTT East, Japan that provides speeds up to 200 Mbps for downloads and up to 100 Mbps for uploads over a fiber optics cable. The service also supports telephones and TV.

The idiosyncratic name of the service with the apostrophe is probably supposed to mean “Let’s go Fiber optics” and is typically Japanese (you’ll find many “Let’s …” slogans in not always grammatically correct English here). “Hikari” is Japanese for “light”.

For the 10 years that I lived in Yokohama I was a happy customer of itscom, a cable TV company and broadband internet service provider. Access was fast and reliable. What’s more, the IP address assigned to my router by the cable modem did not change for years, unless I explicitly forced a change by resetting the cable modem or I changed to a different router without cloning the MAC address of the previous router. That makes it easy to point a domain at the router, for example for hosting a website with virtually unlimited disk space on a PC on the LAN. IP address assignment happened via DHCP which is the default for most routers and PCs and basically involves no setup.

When I moved to Tokyo, I couldn’t stay with itscom because it didn’t cover our area. My son urged me to switch to FLET’S because it was faster. Also many electronic retailers offered discounts of about 30,000 yen (about US$360 right now) for FLET’S sign-ups when purchasing computers, TVs and other items. Nevertheless, I decided to avoid the potential pitfalls of switching technology and went for J:COM, a provider using similar technology to itscom. It was installed and worked OK.

Then we discovered that we had virtually no mobile phone reception in our new house. We have several iPhones, which in Japan are available exclusively through Softbank Mobile. Like ATT in the US, Softbank’s phone network does not have the best reputation for signal coverage. I guess that’s why both companies were keen to secure a deal with Apple for the iPhone.

For customers with reception problems Softbank Mobile offers a device called Home Antenna FT, which is like a small version of the base stations used outdoors, but covering only one home and hooked up via broadband. The catch was that they had only been installing these units for customers that used Yahoo BB ADSL or FLET’S HIKARI. They had no existing agreement with J:COM and no Home Antenna FT’s had been installed at J:COM cable customers before. So I finally decided I would make the switch and signed up for FLET’S HIKARI NEXT, even though I’d have to pay a fee for premature cancellation of the J:COM contract (J:COM did make an agreement with Softbank Mobile, but it was announced only after I had already signed the new contracts). While NTT East provides the fiber optics line and adapter, a separate company provides the Internet service and there are about 10 of them to chose from. Right now BB Excite is the cheapest (525 yen per month). OCN is a provider owned by NTT. We signed up for @T-COM for one year (1050 yen per month).

All the hardware was installed and tested, leaving the existing J:COM hookup largely undisturbed and available as a fallback position if I had trouble with FTTH setup. I was glad I did that. I reconfigured and connected my existing router, a Buffalo WHR-HP-G54 running open source DD-WRT firmware, from DHCP to PPPoE and entered the login user name and password sent by @T-COM. Then I released and renewed IP addresses from my PCs, but it wasn’t working.

Every time I made even minor changes to the router settings and applied them, the IP address on the WAN changed as PPPoE was renegotiated on initialization. This had a knock-on effect. I was using an ipv6 tunnel through Hurricane Electric, which lets me test out ipv6 specific software, but their tunnel can not route ipv6 traffic to me without knowing my ipv4 address. Every time my IP address changes I have to send an HTTP GET request to their server using a special URL that identifies my ipv6 tunnel. I had ipv6 set up in the router and it looked like every time the tunnel broke, DHCP stopped working in the router, which means the whole LAN fell apart. This had even happened to me itscom once, but there it was a rare problem as the IP address usually was very long lived.

So I tried my other router, a Buffalo WZR-HP-G300NH running open source OpenWRT. After setting it up for PPPoE and connecting it, the PC ended up with a 192.168.1.5 address, in a different subnet from the router and looking at 192.168.1.1 I got the ONU, not the router, just as if the router was not providing DHCP and NAT but letting the ONU provide DHCP. I checked all the settings and tried many permutations, but no luck. At some point I could no longer see the SSID of the WHR-HP-G54 when scanning from my Vista laptop, only the WZR-HP-G300NH so I thought I had to get that one working.

At midnight I reconnected the WHR-HP-G54 to the J:COM cable modem, restarted the router and the PCs and had a working system again, but no joy with FLET’S yet.

The next day I tried more things with the OpenWRT router before finally going back to the WHR-HP-G54 (DD-WRT). I gave up on ipv6 and disabled it. I managed to resolve the DNS problem by rebooting. For the occasional IP address changes I set up a batch job on a PC that monitors for external IP changes and runs a script at my registrar (regfish.com) to update the addresses for various dynamic domains so they would always become accessible again within minutes of any change.

Results

OpenWRT did not play well with PPPoE on FLET’S. I got much better results using DD-WRT, at least after disabling the Hurricane Electric ipv6 tunnel support (the 6to4 tunnel broken by the endpoint IP address change affected radvd, which was needed for DHCP, so the clients had problems with IP addresses or DNS servers that weren’t assigned).

Without ipv6, occasional IP address changes were inconvenient but solvable using dynamic DNS support at my DNS provider / registrar.

Both download and upload speed was significanty improved:

  • Speed using J:COM, using PowerLAN between the PC and the router:
    6.49 Mbps download, 6.24 Mbps upload, 12 ms ping time
  • Speed using FLET’S, using PowerLAN between the PC and the router:
    13.47 Mbps download, 11.39 Mbps upload, 11 ms ping time
  • Speed using FLET’S, using Ethernet cable between the PC and the router:
    24.47 Mbps download, 18.67 upload, 9 ms ping time

While I’m using PowerLAN, download and upload speed has approximately doubled while ping times have not changed much. The changing IP address has been inconvenient, but I could solved that using dynamic IP support at my registrar, who prevides the DNS service for the domain.

Duplicate networks with same connection / SSID in Vista

While trying to configure the routers for the new internet connection, I ended up with multiple instances of the same Wireless Network Connection showing (identified by one SSID, “DD-WRT-G54” in this example). See the screen shot below from a notebook running Windows Vista.
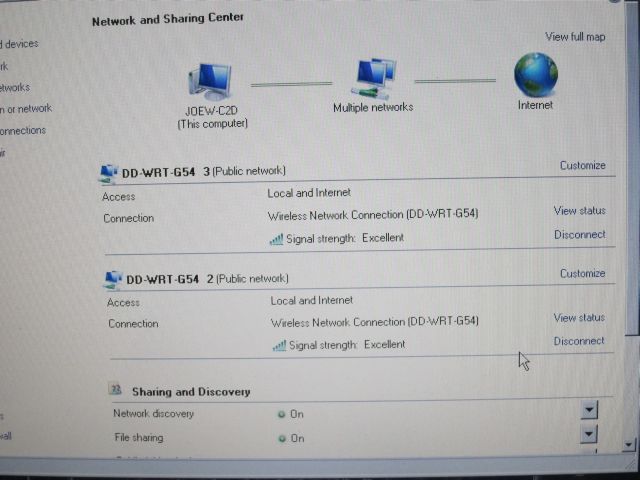
duplicate network connections

When I tried to remove either of them, both disappeared. When I then scanned for networks and it found it again, two copies would pop up again. Basically it activates and deactivates by whether or not the connection with the matching SSID has been added or not. If you have multiple networks that reference the same connection, adding or removing will always add or remove them together, it won’t get rid of just the unnecessary duplicates.

I never could figure out what caused it, but I found how to fix it:

To get down to a single network per connection again, click the Configure link in the screen. It will then give you an option to either merge multiple networks into one or to delete specific networks. Either will serve the purpose!

Photographs

A new fiber optical cable was installed from a junction box three houses away and hung along the phone lines on the power poles outside. The cable is thinner than an Ethernet or antenna cable, only about as thick as a USB cable.
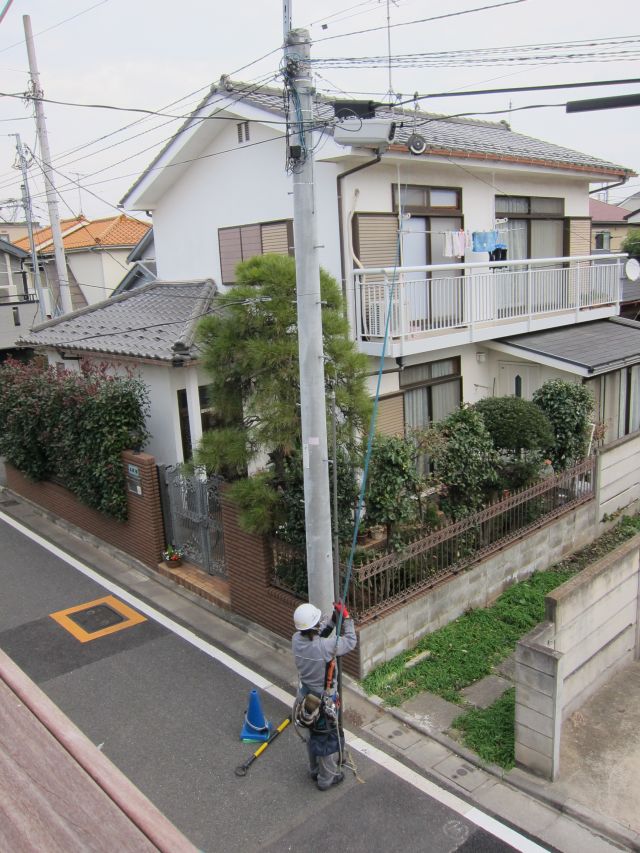
installing the cable on the electricity pole

The cable entered the house through a cable duct meant for the telephone. The duct was still empty because the existing landline was through the CATV cable.
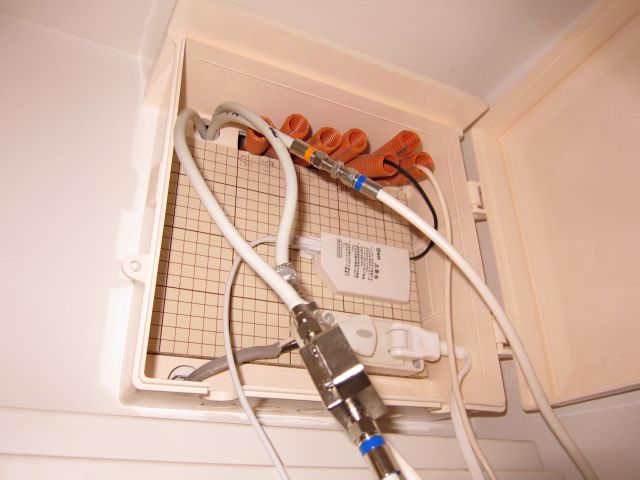
cable ducts: fiber and phone on the right

Here is the boxed Optical Network Unit (ONU) that converts the optical signals to Ethernet, analog phone and TV signals (and vice versa).
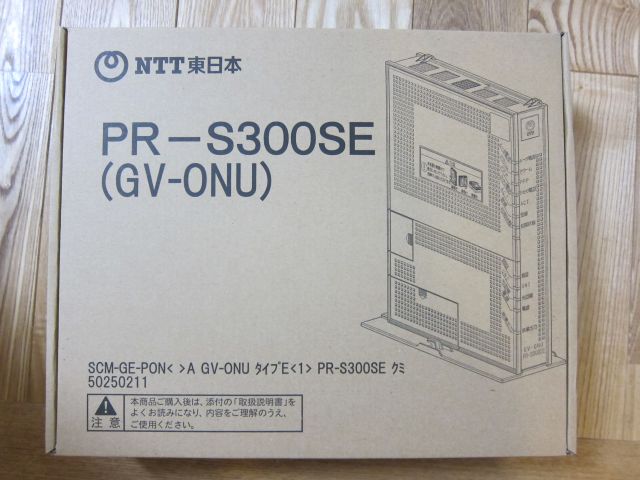
PR-S300SE - Optical Network Unit (ONU)

Here is the small cabinet off our entrance with the ONU, the broadband router and a cable modem and cable phone adapter from the previous provider.
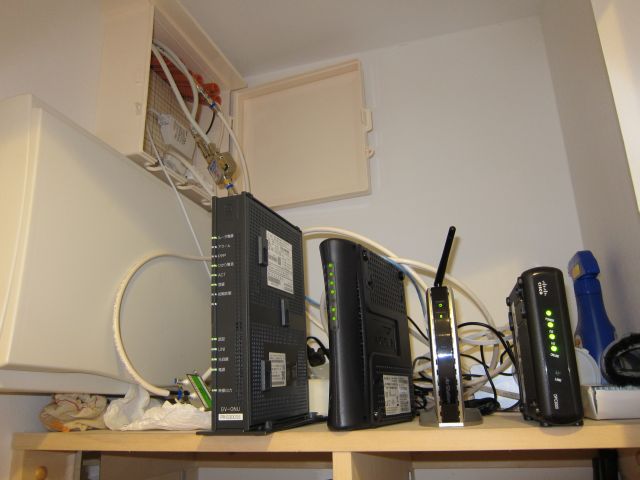
ONU, router and cable equipment

The return of the most robust router (WHR-HP-G54 / DD-WRT)

There, I’ve done it: I replaced my fancy new broadband router, a Buffalo WZR-HP-G300NH that supports 802.11n (up to 300 Mbps) with an older model that I had first purchased two years ago, the WHR-HP-G54 (802.11b/g, up to 54 Mbps). Besides supporting the newer, faster, better wireless standard, the newer router had a faster CPU, a USB port and much more RAM and ROM that should make it much more expandable. The trouble was, it was not as robust as the The most robust router I ever used, the WHR-HP-G54. Both routers support DD-WRT and OpenWRT, GNU/Linux-based open source router firmware.

First I had lots of problems with the WZR-HP-G300NH under DD-WRT, which apparently wasn’t ready for prime time on this router yet. The signal was too weak, I couldn’t connect from some parts of the building. Then I switched to OpenWRT and things looked better, but then I kept losing wireless connectivity on all mobile computers and smartphones in the building at random intervals. Only a router reset would allow them to reconnect, there was no other cure. Perhaps that would have been tolerable when it happened once a week, but it seemed to get worse. Finally, after having to reboot the router three times in one day I had enough. I found one supplier that still had stocks of the old WHR-HP-G54 and promptly ordered one.

The new old router arrived two days later. I only briefly accessed it from a PC without a WAN connection as a sanity check, before flashing it with dd-wrt.v24_mini_generic.bin using TFTP and then dd-wrt.v24-10070_crushedhat_4MB.bin using the DD-WRT web interface. I did perform a 30-30-30 reset after the mini flash. After the second flash I restored an NVRAM backup from the previous router of the same type saved back in June from the same firmware. Then I cloned the MAC address of the WAN port of my WZR-HP-G300NH so the latest router could keep on using the same broadband IP acquired via DHCP by its predecessor. After moving the WAN and LAN cables from the old router to the new one, everything just worked, including my ipv6 setup via Hurricane Electric. I just had to connect the wireless clients to the new SSID. Since then I have not reset the router once.

When new versions of DD-WRT and/or OpenWRT come out for the WZR-HP-G300NH I may give it a try again, but more likely I’ll just keep it as spare. I expect my second WHR-HP-G54 to work every bit as well as my first one. I don’t know how much the software was to blame and how much the hardware for the disappointing results with the newer design, but suspect that 802.11n may be too complex for its own good. There has to be a reason why it remained stuck in “Draft N” stage for so long…

I will pick a reliable router like the WHR-HP-G54 running DD-WRT over one that has a more fancy specification any day because reliability is what it takes to get the job done. If you can’t find the WHR-HP-G54, another good basic choice is the WRT54GL that also supports DD-WRT, but unfortunately it is not sold here in Japan and Amazon.com won’t ship it here from the U.S.

See also:

Canon PowerShot S95 vs DSLR

Three months ago one of my brothers visited me from Germany and we had a great time together, but somehow in between taking him to Meiji Shrine, Harajuku, Asakusa, Kamakura and Mt Fuji, my old Sony DSC-W80 digital camera went absent without leave: It was there one day and I couldn’t find it the next day. It never showed up again and I’m not sure exactly where or how I lost it.

To be perfectly honest, the Sony DSC-W80 had been actually my least favourite camera so far, mostly because of its poor indoor / low-light performance. I was almost glad to have been presented with an excuse to start looking for a better replacement, even if it would cost me some money. Many point and shoot cameras attract buyers with ever increasing megapixel numbers, but draw them from a tiny image sensor that captures nowhere near enough light for all those pixels, so you end up with more noise and distortion.

Last Christmas I visited my sister in law’s brother in law, who is a photography enthusiast and owns a Nikon D90 with a 16-85 VR DX lens. He took some shots of us sitting around the kitchen table at what I would consider pretty minimal light (we’re talking Germany in late December after all!) without using a flash. The sharpness, the colours and the detail in the pictures were just amazing. I started reading up about the Nikon D90 and was very impressed. I later found the camera with a good quality kit lens, the 18-55 VR DX for about JPY 75,000 at Amazon Japan, but also looked at its lesser sibling, the D5000, which uses the same high quality image sensor as the D90 and D300, but a lower resolution LCD and is a bit cheaper than the D90 (just under JPY 60,000 with the same lens).

Back in the late 1990s I had a Canon EOS SLR (analog), but it developed a problem with its lens and I never bothered to get it fixed, switching back to compacts instead. What I found then was that actually having a camera on you usually is more important than owning a better camera. The best SLR or DSLR is of no use if you don’t have it within reach when an opportunity for a great picture arises. Cameras that fit into a jacket pocket ended up getting more use, since I was always reluctant to bring along the bulky camera bag needed to protect the SLR.

This is the reason why I have abandoned the idea of a DSLR for now (i.e. until I get rich and can afford a good DSLR like the Nikon D90 as a *second* camera for special occasions). Today I ordered the Canon PowerShot S95, which Ken Rockwell calls the “world’s best pocket camera”. It combines a large image sensor with a compact body. Its main difference to its predecessor, the Canon PowerShot S90 is added support for 1280x720p video at 24 fps. In a few days I should know how it actually performs, as I’m planning to hike in the mountains west of Tokyo for autumn leaves viewing with friends. Then I’ll just need to make sure the Canon S95 won’t disappear like my Sony 😉

UPDATE (2010-11-16):

I ordered the camera at Camera Kaikan (camera-k.net) on Sunday morning and it was delivered on Monday morning, little more than 24 hours later. I bought a no-name 8 GB class 4 SD card for it. The class (i.e. minimum writing speed in MB per second) of the card matters only for video, where data streams to the card continuously.

You can get really cheap class 2 SD cards, but that’s not fast enough to keep up with the 720p24 HD recording mode supported by the S95. Various people in online forums were saying class 10 was an unnecessary expense while recommending class 6 as the base line. However, looking at the file size of a one minute clip I took, 720p24 HD seems to result in a data rate of 2.5 MB per second, or 37% below the 4 MB/s minimum required for class 4. So theoretically class 4 should work as well as class 6 for HD recording on the S95.

I am very pleased with the picture quality so far, but I’ve only started experimenting with the various modes and menus for manual control to explore its full potential.

My public Picasaweb gallery

Epson PM-A950 under Windows 7 64bit

Earlier this month, an old eMachines T6212 bought in April 2005, a humble single core 1.6 GHz Athlon64 that had served me faithfully for more than 5 years, finally died. So two weeks ago I bought an Acer Aspire ASM3910-N54E, a Core i5-650 machine with 4 GB of RAM (max. 8 GB) and a 640 GB hard disk. It came with Windows 7 Home 64bit.

I replaced the C: drive with a 1 TB drive and added another 1.5 TB drive that I previously used in a USB-enclosure. I am using the on-board video with dual 1280×1024 monitors (Dell 1905FP), hooked up via an analog VGA cable and a digital HDMI-to-DVI cable.

The best thing I can say about Windows 7 is that it’s not as bad as Vista. I wish I could have stuck with Windows XP, but at least Windows 7 doesn’t get in the way as much as Vista did. It feels a bit more like Mac OS X, if that is what you like. It’s going to get more and more difficult to get drivers for new hardware that still support XP, but on the other hand older hardware may have problems working with Windows 7, for example my old Logitech QuickCam Zoom is not supported by Windows 7.

Epson PM-A950 printer driver

Today I tried to print from the new machine for the first time and found I needed a new printer driver for my almost 4 year old Epson PM-A950 USB printer/scanner. Though Microsoft’s documentation states that the printer is supported by Windows 7 out of the box, it will do so only using a generic Epson printer definition which probably will not support all the functionality. So I searched the Epson Japan website and found these two drivers (the 64bit version worked fine for my version of Windows 7):

  • Windows 7 32bit / Windows Vista 32bit / Windows XP / Windows 2000:
    http://www.epson.jp/dl_soft/file/7461/a950f652.EXE
  • Windows 7 64bit / Windows Vista 64bit / Windows XP x64 Edition:
    http://www.epson.jp/dl_soft/file/7462/a950h652.EXE

Energy efficiency

So far I’m very happy with the new machine. The machine draws about 40W when idle, considerably less than its less powerful predecessor (69W). The lastest Core i3 and Core i5 machines are very energy efficient. My i5 actually did better than a VIA MM3500 (1.5 GHz single core VIA C7). The only x86-compatible machines I have that beat the i5 on power usage at idle are either notebooks or are desktops built using notebook chipsets (i.e. the Mac Mini).

Excessive JPEG compression on Android phones

A few weeks ago I got my first smart-phone, an HTC Magic (aka Google Ion or myTouch 3G) which uses Android 1.6.

Originally I had wanted to get the HTC Desire with Android 2.1 from Softbank, but they had no more stocks of the old model and weren’t going to start shipping the new model until October. I couldn’t wait that long. That’s how I ended up getting an Android phone from the US.

I first transplanted the USIM from my almost three year old Softbank Samsung 707SCII into the Android phone, which wasn’t locked to any provider. I could then make calls here in Japan.

Next I added Softbank’s “smart phone pakehodai” (smart phone unlimited data) plan to my existing contract, after telling the company that I was going to use my existing USIM in an imported Android phone. They didn’t raise any objections to that. The plan is about 5700 yen per month (about US$67), plus 315 yen to enable web access and mail (US$3.60), which I had previously disabled as I was only using SMS besides voice calls. I configured APNs for accessing the Softbank network using this link, which then gave me full web access from my new phone even when not on my wireless LAN at home.

So far it has been a fun experience and I’m still exploring new features and applications.

The application I enjoy most so far is Google Maps. Having moved from the semirural suburbs of Yokohama to a densely populated part of Tokyo recently, I’m now exploring local back streets on foot or on the bicycle as well as riding trains, of which there are plenty. Google Maps will easily find me a train connection to anywhere in this city of 13 million people, including directions for walking to and from stations and down to the minute connection schedules (Japanese trains are famously punctual).

I was disappointed however by the picture quality of the 3 MP camera (1536 by 2048 pixels) on the phone, not that my expectations were too high to start with. But I was shocked to see that when I copied these 3 MP image files off the phone using a USB cable, they were only 330 to 700 MB (500 MB on average) in size even when taking pictures at the highest quality settings. This is 2 to 3 times smaller than typical 3 MP cameras.

My old Sony P8 (also a 3 MP camera) averaged around 1.3 MB per image. One Megabyte or more per image is fairly typical for high quality settings at 3 MP. That means the Android camera must be using very aggressive JPEG compression settings, which reduce detail and produce artifacts, to squeeze pictures into 40% of the space used on other cameras. And you can really tell from just looking at the pictures: They look somewhat blurred and fuzzy, not as sharp and crisp as you’d expect even from a modest 3 MP camera.

What’s worse, I could not find any setting that would let me change this. A search on Google confirmed that others using different Android phones have the same problem, but currently no solution.

I hope Google will address this problem on the Android 2.2 upgrade, because with these software settings the capabilities of the hardware are wasted, even more so on 5 MP or 8 MP camera models. It makes no sense to aggressively compress pictures when the user has selected optimum quality, especially on a camera that can be expanded with up to 16 GB per microSD memory card.

Installing OpenWRT on WZR-HP-G300NH from DD-WRT

Last month I bought a Buffalo WZR-HP-G300NH router and flashed it with DD-WRT open source firmware to use at my new home. However, I had problems with the router resetting itself periodically and with a weak WiFi signal. It appears DD-WRT for this router is not yet ready for prime time, though it may be in better shape by the end of the year.

Since I read that OpenWRT for the same router was fairly robust, I investigated switching from DD-WRT to OpenWRT. It turned out easier than I thought.

Using putty under Windows I did a ssh session to the router running DD-WRT. From there I downloaded the new firmware into the /tmp folder, trimmed off the 32 byte header and wrote the result to flash memory:

# cd /tmp
# wget http://downloads.openwrt.org/backfire/10.03.1-rc3/ar71xx/openwrt-ar71xx-wzr-hp-g300nh-jffs2-tftp.bin
# dd if=openwrt-ar71xx-wzr-hp-g300nh-jffs2-tftp.bin of=firmware.trx bs=32 skip=1
# mtd -r write firmware.trx linux

When the mtd command finished it dropped the connection to putty. I waited for the router to finish its reboot. Then I released and reacquired the IP address on Windows using ipconfig /release and ipconfig /renew. I launched the FireFox browser with 192.168.1.1 to configure OpenWRT. The first thing you should do once you’re connected to the web interface is assign an administrative password, because by default there isn’t one.

My next stumbling block was the fact that the WAN port had a different MAC address under OpenWRT than under DD-WRT. In DD-WRT the WAN and LAN ports on the WZR-HP-G300NH have the same MAC address, but in OpenWRT the WAN MAC address is larger by one. As a result DHCP from the ISP treated it as a new client that needed a new IP address, but the cable modem had already assigned its only IP address to the old MAC address. The solution was to pull the power cord from my Cisco cable modem, reconnect it and wait for the modem to reinitialize (watch the LEDs). Then do the same with the router. Reconnect ssh to the router and the WAN port has an IP address.

I also assigned Google’s open DNS server (8.8.8.8 / 8.8.4.4) to the router rather than leaving the default but I’m not sure if that was really necessary.

I set up the wireless SSID and selected WPA2 and a key. Finally I could specify transmit power to reach the whole building.

The OpenWRT UI doesn’t look quite as slick as DD-WRT, but it seems to work well and all the basic configuration seemed easy enough through the web interface. What I really liked best about the WHR-HP-G54 that this router replaces for me was its rock-solid reliability, followed by its WiFi coverage and feature set. With OpenWRT the WZR-HP-G300NH looks like a worthy successor to it.

DD-WRT on Buffalo WZR-HP-G300NH (Japanese version, A0 A3)

I’ll be moving to a new house next week, my first move in a decade. To make the switchover as smooth as possible I decided to set up and test the broadband connection and router at the new location ahead of the move, so I’d only have to bring along my PCs and everything should work on the new router that will duplicate the existing setup.

I chose the Buffalo WZR-HP-G300NH because it is supported by DD-WRT, Linux-based open source firmware that I also use on my Buffalo WHR-HP-G54. The new router has 32 MB of flash vs. 4 MB on the old one and 64 MB of RAM vs. 16 on the old one, which will make it much easier to add more features. It also offers 11n with wireless speeds up to 300 Mbps versus up to 54 Mbps on the old router that supports 11b and 11g. One USB-port provides access to mass storage for hosting a website, for audio or video files or for a Samba file server.

Installing DD-WRT was much easier on the Buffalo WZR-HP-G300NH than on its predecessor, as the DD-WRT team offers a special firmware version that can be flashed directly from the firmware upgrade menu of the standard Buffalo firmware. The older router required the use of TFTP for that and the steps involved were more complicated.

Here is what I did:

  • Go to http://dd-wrt.com/site/support/router-database and search for WZR-HP-G300NH. Open the page for this router and download file buffalo_to_ddwrt_webflash-MULTI.bin to the local hard disk.
  • Connect one of the LAN ports of the router via an Ethernet cable to your PC. You can leave the blue WAN port disconnected. Check with ipconfig on Windows or ifconfig on Linux that you receive an IP address like 192.168.11.2. Start your Browser and open http://192.168.11.1/ (enter user name root and leave the password empty).
  • Select the firmware upgrade link on the initial configuration screen or Admin Config / Update in the regular menus. Select local file and browse to the buffalo_to_ddwrt_webflash-MULTI.bin downloaded above. Start the upgrade. This takes about 6 minutes, during which you must not reset or power off the router. When the progress bar reaches 100% and the DIAG LED stops flashing you’re done.
  • Start your browser and open http://192.168.1.1/ — you should see the DD-WRT menus. Assign a new user name and password.
  • Reset the router using the 30/30/30 procedure: Push the reset button at the underside of the router and keep it pushed for a total of 90 seconds. After the first 30 seconds, pull the power cable without releasing reset. After another 30 seconds reconnect power, still holding down reset. After the final 30 seconds release reset. This clears the non-volatile RAM (NVRAM) for a factory reset.
  • Start your browser and again open http://192.168.1.1/ — again assign a new user name and password, which were cleared by the factory reset.

Congratulations! You now have a Buffalo WZR-HP-G300NH running English language open source DD-WRT firmware.

CodeWebLog.com, a pile of garbage indexed by Google

Often when I post on my blog, I get a linkback from another blog that has repackaged my posting. While I like other bloggers quoting from my site, many backlink-sites I come across look completely automated. They contain nothing but machine-generated quotes taken from fresh human-generated blog postings that have just appeared on other sites. Presumably these content thieves do it to attract search traffic (i.e. click revenue) and for boosting their own page rank.

However there are even more annoying sites, for example sites like CodeWebLog.com: While researching information for a programming project, Google repeatedly showed me hits on that site that looked promising. When I clicked on the links however I found meaningless garbage, consisting of hashed up partial sentences obviously quoted from technology blogs, but without any link back to the full source. None of the text really made any sense. It was total garbage, but with enough unique keywords to show up in search results and waste people’s time.

I reported these Google spammers to Google’s abuse department and hope they will ban them from their index.