wget: “Issued certificate has expired” after September 30, 2021

Two websites that I download data from using automated processes stopped giving me new data from October 1. When I investigated the problem, I could see an error message from the wget program in Linux:

Connecting to SOME.HOSTNAME (SOME.HOSTNAME)|1.2.3.4|:443… connected.
ERROR: cannot verify SOME.HOSTNAME’s certificate, issued by ‘/C=US/O=Let’s Encrypt/CN=R3’:
Issued certificate has expired.
To connect to SOME.HOSTNAME insecurely, use `–no-check-certificate’.

The quick fix, obviously, was to add the –no-check-certificat to the command line, which allows the download to go ahead, but what’s the root cause? My assumption was that the site owner had let an SSL certificate expire, but after it happened with a second site from the same date, I got suspicious. It turns out, Let’s Encrypt which is used by many websites for free encryption certificates previously had a certificate that expired on September 30 and which has been replaced by a new certificate but many pieces of software don’t retrieve the new certificate. That’s because it’s signed with a new root certificate that a lot of older software don’t trust yet. They need an updated of the root certificate store.
In my case, running

sudo yum update

would update the ca-certificates package and that allowed wget to trust the new certificate.
Please see these links for more information:

Outlook Express Error 0x800CCC0B and the End of TLS 1.0 (Deprecated SSL Protocol)

Microsoft Outlook Express (OE) is an obsolete mail client that was available in Microsoft Windows XP, Windows 2003 Server and older Microsoft operating systems. It was no longer available on Windows Vista and later, though Windows Live Mail is relatively close in user interface and appearance.

Despite being obsolete and only working on operating systems no longer supported or updated by Microsoft, it still has some users who prefer its simple but powerful user interface. Some of those users will have had a frustrating experience recently, when various mail servers stopped working for outbound mail in OE. Specifically, these are mail servers that use SSL on submission port 465 or 587 for SMTP.

Secure Socket Layer (SSL) is a mechanism for encrypting data between a client and a server. You may know it from website URIs starting with “https:” and web sessions displaying a padlock symbol next to the URI. There are various protocol versions that can implement this encryption layer. One of these, TLS 1.0 which was conceived in 1999, has now been officially deprecated (made officially obsolete) as of the end of June 2018. Software now has to use more recent protocols, such as TLS 1.1, TLS 1.2 or the recently defined TLS 1.3.

Unfortunately, TLS 1.0 is all that OE will speak. It does not understand TLS 1.1 or later. Therefore it can not pick up mail from a POP server using SSL on port 995 or an IMAP server on port 993 or send mail to an SMTP server on port 465 (or 587) with SSL enabled.

Workaround
The only workaround I am aware of (other than switching to a more modern mail client) is to use Stunnel, a tool for Windows or Linux that acts as a proxy. You can configure it to establish an SSL connection to a given host and port when a connection to a given local port is made. Thus you could configure OE to connect to port 9465 on the machine running Stunnel, which might then connect via SSL to smtp.example.com:465 using a more modern TLS version supported by Stunnel (but not directly by OE).

Example
Let’s say Outlook Express was configured to submit outbound mail to smtp.outboundmailserver.com, port 587 via SSL/TLS. This is our SMTP server. Once this server refuses to allow TLS 1.0 connections, Outlook Express will no longer work. Let’s say we also have a simple Linux server mylinuxserver.com. This could even be something like a Raspberry Pi single board computer booting off flash memory. It can run on a local IP in our LAN, if you don’t need to have access from outside your building (OE running on a desktop). On this server we install the stunnel package:

sudo yum install stunnel

Please read the documentation on how to enable the service and have it auto-start when the Linux server reboots.

Next we configure stunnel to act as a client on our behalf and configure it to accept TLS 1.0 connections from us and forward them to the real POP3, SMTP or IMAP server using the latest TLS on our behalf. We will create lines like these in /etc/stunnel/stunnel.conf:

client = yes

;cert = /etc/pki/tls/certs/stunnel.pem
;sslVersion = TLSv1
;chroot = /var/run/stunnel
;setuid = nobody
;setgid = nobody
;pid = /stunnel.pid
;socket = l:TCP_NODELAY=1
;socket = r:TCP_NODELAY=1

[smtp-outboundmailserver]
accept = 1587
connect = smtp.outboundmailserver.com:587

Create other entries for the services that you need TLS support for and restart the stunnel service. Then reconfigure Outlook Express to access the Linux host and the port number listed with “accept = ” in place of the original server that refused your Outlook Express TLS 1.0 connection. You should be good to go!

Long term you will still need to migrate to another mail client such as Thunderbird, Windows Mail or OE Classic, but this workaround will buy you some time for that.

Western Digital 4 KB sector drive alignment for Windows XP and 2003 server

If your existing Windows XP or Windows 2003 Server machine needs a new C: drive, there are ways of upgrading to one of the latest drives without a complete software reinstall, but you may encounter some stumbling blocks due to the new Advanced Format technology, which uses 4 KB sectors.

When one of my PCs developed hard disk problems and I had to upgrade one of its drives, I also checked out my other machines. I found the C: drive of a Windows 2003 Server machine was about to fail. Windows 2003 is basically the server version of Windows XP, with which it shares most components. I opted for a 1 TB WD Red drive (WD10EFRX) by Western Digital, since these drives are designed for 24/7 operation, primarily for use in Network Attached Storage (NAS) appliances (desktop drives are only designed for an 8 hours on, 16 hours off use pattern).

I did not want to reinstall everything from scratch on that machine, so I used a Linux boot DVD and the GNU dd utility to mirror the failing drive onto the new WD Red drive (“sudo dd if=/dev/sda of=/dev/sdb”). As a result, all the partitions were in the same place and the same size as on the old drive, a Seagate Barracuda 7200.11 320 GB. The partitions on the old drive had not been aligned on 4 KB boundaries as is recommended to get decent performance on modern Advanced Format drives, so I needed to run an align tool to move the partition to the proper place. Western Digital offers one free to its customers, so that should be easy then, right?

No quite. I encountered all the troubles described by others in this thread: Basically, the download link for the WD Align tool (AcronisAlignTool_s_e_2_0_111.exe) takes you back to the same page, over and over, without error message. It turns out that you need to be registered and logged in to the WD site for the download link to do anything. You need to register both your contact details (name, e-mail address, postal address, phone number) and your hard disk’s serial number. For the latter I had to shut down the machine again and take out the drive once more to take a look, because the number is not printed on the cardboard box, only on the drive itself.

Once I registered my new drive, a download link did appear next to the registered product, but from it I found I could only download Acronis True Image and not the Acronis Align Tool (Advanced Format Software, WD Align). The WD Red series drives are all Advanced Format Drives, as is pretty much every drive made since 2011, but WD say it is designed for NAS use and hence don’t see the need for a fix for what they see as a Windows XP problem.

Various people online recommended a download site in Ukraine that apparently offers a copy of that program, but if you’re downloading from sites like that you risk installing malware on your computer. Beware!

There is a safer solution. I had to register another Western Digital drive, an old WD10EARS to get a usable download link for Advanced Format Software. If you don’t happen to have one lying around, a Google image search for WD10EARS will show you many photographs of disk drives with clearly readable serial numbers on the label. And apparently, these serial numbers will do the trick! 😉

After I downloaded the software, I ran it to make a bootable CD (it also seems to be Linux-based), booted and ran it and 1 hour and 30 minutes later my C: partition was showing up as properly aligned.

I can understand that Western Digital wants to restrict the use of licensed Acronis software to its own customers, denying other brands a free ride. However, the hoops it is making people jump through to be able to use one of their new drives as an upgrade to an existing Windows XP machine is just ridiculous. If a login is required to do the download, it should clearly say so. And if a drive uses 4 KB sectors (Advanced Format), its serial number should qualify you for the download. There are millions of existing XP users out there still and many will need new hard disks before they need a new computer.

Gateway M-6750 with Intel Ultimate-N 6300 under Ubuntu and Vista

My Gateway M-6750 laptop uses a Marvell MC85 wireless card, for which there is no native Linux driver. Previously I got it working with Ubuntu 9.10 using an NDIS driver for Windows XP. Recently I installed Ubuntu 11.04 from scratch on this machine (i.e. wiping the Linux ext4 partition) and consequently lost wireless access again.

Instead of trying to locate, extract and install the XP NDIS driver again, this time I decided to solve the problem in hardware. Intel’s network hardware has good Linux support. I ordered an Intel Centrino Ultimate-N 6300 half-size mini PCIE networking card, which cost me about $35. Here is how I installed it.

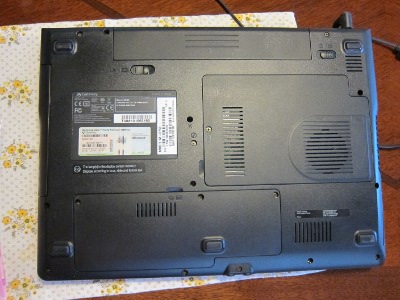
Here is a picture of the bottom of the laptop. Remove the three screws on the cover closest to you (the one with a hard disk icon and “miniPCI” written on it) and open the cover. Use a non-magnetic screwdriver because the hard disk is under that cover too. As a matter of caution, use only non-magnetic tools near hard disks or risk losing your data.

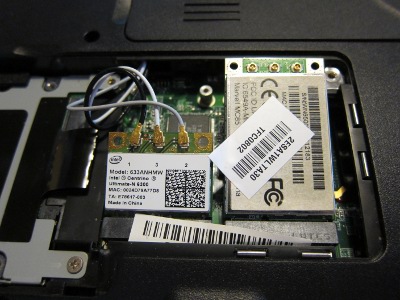
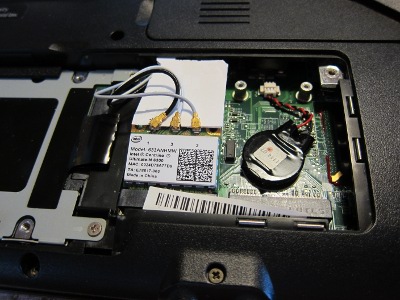
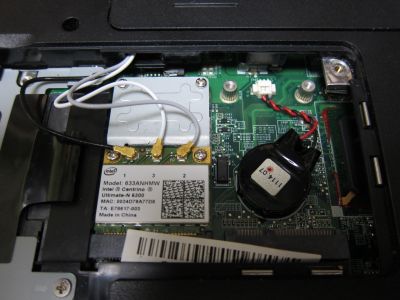
Remove the screw that holds the MC85 card in the mini PCI slot on the right. Remove the network card. Carefully unplug the three antenna wires. Connect those wires to the corresponding locations on the Intel card. Insert the Intel card into the socket on the left. Note: I had first tried the Intel card in the socket on the right but in that case it always behaved as if the Wireless On/Off switch was in the Off position, regardless of its actual state. Even rebooting didn’t make it recognize the switch state. The left mini PCI socket did not have this problem 🙂

Because the Intel card is a half size card you will also need a half size to full size miniPCI adapter to be able to screw down the card to secure it. Instead I simply used a stiff piece of cardboard (an old business card) to hold it in place and closed the cover again. If you take your laptop PC on road a lot I recommend doing it properly (don’t sue me if the cardboard trick melts your motherboard or burns down your house).

Download the Intel driver and utility set for Windows from the Intel website using a wired connection. Under Ubuntu the card seemed to work first time I rebooted into it. I just had to connect to the WLAN.

UPDATE:

I fixed it properly using a half size to full size Mini PCI-E (PCI Express) adapter converter bracket by Shenzhen Fenvi Technology Co., Ltd. in Guangdong. I had found it on Alibaba. I paid $9.50 by Paypal and a bit over a week later five sets of brackets and matching screws arrived by mail from Hong Kong (one set is only $1.90 but the minimum order was 5, so that’s what I ordered). The brackets come with about a dozen each of two kinds of screws. Four of the smaller screws worked fine for me.

VIA PC3500 board revives old eMachines PC

Last September one of my desktop machines died and I bought a new Windows 7 machine to replace it. Today I brought it back to life again by transplanting a motherboard from an old case that I had been using as my previous Linux server. The replacement board is a VIA MM3500 (also known as VIA PC3500), with a 1.5 GHz VIA C7 CPU, 2 GB of DDR2 RAM and on-board video. It still has two IDE connectors as well as two SATA connectors, allowing me to use both my old DVD and parallel ATA HD drives, as well as newer high capacity SATA drives.

After the motherboard swap I had to reactivate Windows XP because it detected a major change in hardware. Most of the hardware of the new board worked immediately, I could boot and had Internet access without any reconfiguration. When I started with the new machine. I just had to increase video resolution from the default 640×480 to get some dialogs working.

I then downloaded drivers for the mother board and video from the VIA website. I now have the proper CN896 (Chrome IGP9) video driver working too.

When I tested the board as a server with dual 1 TB drives (RAID1), it was drawing 41W at idle. Running in my eMachines T6212 case with a single PATA hard drive it draws 38W at idle.

Before removing the old motherboard I made a note of all the cable connections on both motherboards. The front-mounted USB ports and card reader have corresponding internal cables, which connected to spare on-board USB connectors. The analog sound connectors connect to the motherboard too. The only port at the front left unconnected was the IEEE-1394 (FireWire / iLink) port, which has no counterpart on the VIA board.

It feels great to have my old, fully configured machine with all its data and applications back thanks to a cheap motherboard that works flawlessly.

Epson PM-A950 under Windows 7 64bit

Earlier this month, an old eMachines T6212 bought in April 2005, a humble single core 1.6 GHz Athlon64 that had served me faithfully for more than 5 years, finally died. So two weeks ago I bought an Acer Aspire ASM3910-N54E, a Core i5-650 machine with 4 GB of RAM (max. 8 GB) and a 640 GB hard disk. It came with Windows 7 Home 64bit.

I replaced the C: drive with a 1 TB drive and added another 1.5 TB drive that I previously used in a USB-enclosure. I am using the on-board video with dual 1280×1024 monitors (Dell 1905FP), hooked up via an analog VGA cable and a digital HDMI-to-DVI cable.

The best thing I can say about Windows 7 is that it’s not as bad as Vista. I wish I could have stuck with Windows XP, but at least Windows 7 doesn’t get in the way as much as Vista did. It feels a bit more like Mac OS X, if that is what you like. It’s going to get more and more difficult to get drivers for new hardware that still support XP, but on the other hand older hardware may have problems working with Windows 7, for example my old Logitech QuickCam Zoom is not supported by Windows 7.

Epson PM-A950 printer driver

Today I tried to print from the new machine for the first time and found I needed a new printer driver for my almost 4 year old Epson PM-A950 USB printer/scanner. Though Microsoft’s documentation states that the printer is supported by Windows 7 out of the box, it will do so only using a generic Epson printer definition which probably will not support all the functionality. So I searched the Epson Japan website and found these two drivers (the 64bit version worked fine for my version of Windows 7):

  • Windows 7 32bit / Windows Vista 32bit / Windows XP / Windows 2000:
    http://www.epson.jp/dl_soft/file/7461/a950f652.EXE
  • Windows 7 64bit / Windows Vista 64bit / Windows XP x64 Edition:
    http://www.epson.jp/dl_soft/file/7462/a950h652.EXE

Energy efficiency

So far I’m very happy with the new machine. The machine draws about 40W when idle, considerably less than its less powerful predecessor (69W). The lastest Core i3 and Core i5 machines are very energy efficient. My i5 actually did better than a VIA MM3500 (1.5 GHz single core VIA C7). The only x86-compatible machines I have that beat the i5 on power usage at idle are either notebooks or are desktops built using notebook chipsets (i.e. the Mac Mini).

RsyncServer not started because pid file rsyncd.pid exists

I had a scary experience today because one of my Windows PCs “blue screened”, i.e. it crashed. While the “Blue Screen of Death” was fairly common in Windows 95 and 98, it is unusual to see it on any healthy machine running Windows 2000, XP, 2003 or 2008 Server, Vista or Windows 7.

Since the CPU fan of the machine had been running faster than normal recently, I had already suspected it of dust buildup in the CPU heat sink and when I opened up the machine, my suspicion was confirmed. I pulled out some dust and vacuumed the machine before starting it up again.

The machine booted normally and the fan was quiet, but I got alerts from another machine that it could not connect to the Rsync server of the restarted machine. I use an Rsync service for Windows to synchronize data updates between various machines. The service was shown with startup mode “Automatic”, which means it should start whenever Windows is booted, but it was not showing as “Started”. Looking into the log file at “C:\Program Files\ICW\rsyncd.log” I found several of these error messages, one each for every restart I had performed after the crash:

2010/05/08 15:37:45 [2128] rsync: failed to create pid file rsyncd.pid: File exists (17)
2010/05/08 15:37:45 [2128] rsync error: error in file IO (code 11) at clientserver.c(985) [receiver=3.0.6]
2010/05/08 15:52:32 [2120] rsync: failed to create pid file rsyncd.pid: File exists (17)
2010/05/08 15:52:32 [2120] rsync error: error in file IO (code 11) at clientserver.c(985) [receiver=3.0.6]
2010/05/08 16:11:13 [2644] rsync: failed to create pid file rsyncd.pid: File exists (17)
2010/05/08 16:11:13 [2644] rsync error: error in file IO (code 11) at clientserver.c(985) [receiver=3.0.6]

Probably the sudden crash had prevented the Rsync service from deleting its pid (process ID) file, as it normally does when it is shut down orderly.

After I deleted “C:\Program Files\ICW\rsyncd.pid” I was able to start the service and the other machine could connect to it and synchronize with it properly.

Hopefully the machine will keep running reliably again now that the heat sink is clean again. I will keep checking it for dust buildup at least monthly now that the summer months are approaching.

Fix Windows as default boot on Ubuntu with Grub2 loader

If you install Ubuntu on a machine that came with Windows pre-installed you have the choice of preserving Windows and chose each time you boot which operating system to run. By default, the boot menu will list the current Linux kernel, followed by any older Linux kernel versions, followed by a memory test and finally the original Windows version. By changing a GRUB boot loader configuration file you can chose which one is the default that gets booted when you just wait and don’t touch the keyboard.

(NOTE: The following instructions assume the Grub2 loader used in Ubuntu 9.10 – earlier versions are different)

For example, the menu might look like this:

Ubuntu, Linux 2.6.31-14-generic
Ubuntu, Linux 2.6.31-14-generic (recovery mode)
memory test (memtest86+)
memory test (memtest86+, serial console 115200)
Windows Vista (loader) (on /dev/sda1)

You can configure Linux to — unless you tell it otherwise — always boot Vista by setting GRUB_DEFAULT in /etc/default/grub to the number of lines above the entry you want to boot (4 in this case), instead of 0 (zero) for the top entry. After any change to /etc/default/grub you need to also run sudo update-grub:

joe@ubuntu910:~$ gksudo gedit /etc/default/grub

GRUB_DEFAULT=4

joe@ubuntu910:~$ sudo update-grub

The problem with that is, when the next kernel update comes out, two lines will be inserted at the top and your default value now selects the wrong entry:

Ubuntu, Linux 2.6.31-15-generic
Ubuntu, Linux 2.6.31-15-generic (recovery mode)
Ubuntu, Linux 2.6.31-14-generic
Ubuntu, Linux 2.6.31-14-generic (recovery mode)
memory test (memtest86+)
memory test (memtest86+, serial console 115200)
Windows Vista (loader) (on /dev/sda1)

You would need to manually select the latest kernel and repeat the above steps with a new value of 6 in this case. This is clearly a problem. Fortunately, there’s a simple workaround: use a name instead of a number for selecting the default. Here is how it works:

1) List the bootable operating systems:

joe@ubuntu910:~$ fgrep menuentry /boot/grub/grub.cfg
menuentry “Ubuntu, Linux 2.6.31-15-generic” {
menuentry “Ubuntu, Linux 2.6.31-15-generic (recovery mode)” {
menuentry “Ubuntu, Linux 2.6.31-14-generic” {
menuentry “Ubuntu, Linux 2.6.31-14-generic (recovery mode)” {
menuentry “Memory test (memtest86+)” {
menuentry “Memory test (memtest86+, serial console 115200)” {
menuentry “Windows Vista (loader) (on /dev/sda1)” {

2) Mark and copy the entry you want to stay bootable, including double quotes, for example "Windows Vista (loader) (on /dev/sda1)".

3) Edit the Grub configuration and paste the new value after the GRUB_DEFAULT= (in place of 0 or 4 or whatever number):

joe@ubuntu910:~$ gksudo gedit /etc/default/grub
GRUB_DEFAULT=”Windows Vista (loader) (on /dev/sda1)”
joe@ubuntu910:~$ sudo update-grub

Note: Make sure to close the gedit window before doing sudo update-grub

That’s it, no more Grub configuration tinkering required! 🙂

NTFS disk corruption on frequent file creates and deletes

I recently upgraded a secondary hard disk in a Windows machine from a Seagate Barracuda 7200.11 1 TB drive to a Western Digital Caviar Green WD15EADS 1.5 TB drive. Mirror imaging the data off the old drive to the new drive using the Linux dd utility from an Ubuntu live CD went very smoothly and completed in a little over three hours, but I subsequently hit a snag when I tried to resize the partition on the larger drive.

The image copy of the 1 TB NTFS partition resulted in a 1 TB partition followed by 500 GB of unallocated space, which I wanted to add to the free space of the NTFS partition. That should be no problem for Linux gparted, but only if the partition to be resized is internally consistent. If it is not, one will have to use CHKDSK /F under Windows to fix it first.

C:\>chkdsk m: /f
CHKDSK is verifying files (stage 1 of 3)...
0 percent complete. (0 of 21942736 file records processed)
Deleted corrupt attribute list entry
with type code 144 in file 2300.
Deleted corrupt attribute list entry
with type code 176 in file 2300.
Deleting corrupt attribute record (144, $I30)
from file record segment 2300.
Deleting corrupt attribute record (176, $I30)
from file record segment 2300.
Deleted corrupt attribute list entry
with type code 144 in file 2332.
Deleted corrupt attribute list entry
with type code 176 in file 2332.
Deleting corrupt attribute record (144, $I30)
from file record segment 2332.
Deleting corrupt attribute record (176, $I30)
from file record segment 2332.
Deleted corrupt attribute list entry
with type code 144 in file 2342.
Deleted corrupt attribute list entry
with type code 176 in file 2342.
Deleting corrupt attribute record (144, $I30)
from file record segment 2342.
Deleting corrupt attribute record (176, $I30)
from file record segment 2342.
21942736 file records processed.
File verification completed.
41475 large file records processed.
0 bad file records processed.
1552 EA records processed.
0 reparse records processed.
CHKDSK is verifying indexes (stage 2 of 3)...
10 percent complete. (4118 of 81648013 index entries processed)
Correcting error in index $I30 for file 2300.
10 percent complete. (5149 of 81648013 index entries processed)
Correcting error in index $I30 for file 2332.
Correcting error in index $I30 for file 2342.
34 percent complete. (23316097 of 81648013 index entries processed)
Correcting a minor error in file 2300.
Correcting a minor error in file 2332.
Correcting a minor error in file 2342.
81648013 index entries processed.
Index verification completed.
CHKDSK is recovering lost files.
997 unindexed files processed.
CHKDSK is verifying security descriptors (stage 3 of 3)...
21942736 security descriptors processed.
Security descriptor verification completed.
Inserting data attribute into file 2300.
99 percent complete. (1 of 939015 data files processed)
Inserting data attribute into file 2332.
Inserting data attribute into file 2342.
939015 data files processed.
Correcting errors in the master file table's (MFT) BITMAP attribute.
Correcting errors in the Volume Bitmap.
Windows has made corrections to the file system.

1465135996 KB total disk space.
871385828 KB in 18183533 files.
7651336 KB in 939018 indexes.
0 KB in bad sectors.
22057856 KB in use by the system.
65536 KB occupied by the log file.
564040976 KB available on disk.

4096 bytes in each allocation unit.
366283999 total allocation units on disk.
141010244 allocation units available on disk.

Googling for these error messages, I found a Knowledgebase article by Microsoft about disk corruption on Windows NT that could occur with frequent file creates and deletes (for which they had a fix) and a posting by a Windows XP user who also frequently creates and deletes files.

The three files reported by CHKDSK were three folders on my hard disk. CHKDSK converted them into zero length files. After recognizing this, I deleted these files and recreated the original directories. Since then my application has been working again.

As it so happens, these three directories are three places on my computer where the largest number of files is created and deleted in rapid and random succession (there’s one process each creating them and one process each asynchronously consuming them), just like in the articles that I googled.

If anyone else comes across a similar problem with NTFS with similar symptoms, I would be glad to hear from them.

Update 2009-11-20:
The three corrupted folders that were turned into zero length files by ChkDsk did not actually disappear completely. Instead their contents was moved to a hidden folder tree. Note the above lines:

CHKDSK is recovering lost files.
997 unindexed files processed.

I looked on the hard disk for hidden files or folder from the command prompt:

M:\> dir /ah m:\found.*
 Volume in drive M is wd15
 Volume Serial Number is E861-DD52

 Directory of m:\

2009-11-18  17:39    <DIR>          found.000
               0 File(s)              0 bytes
               1 Dir(s)  576,809,738,240 bytes free

This hidden folder contains the three lost directories:

M:\>dir m:\found.000
 Volume in drive M is wd15
 Volume Serial Number is E861-DD52

 Directory of m:\found.000

2009-11-20  12:06    <DIR>          dir0000.chk
2009-11-18  17:39    <DIR>          dir0001.chk
2009-11-18  17:39    <DIR>          dir0002.chk
               0 File(s)              0 bytes
               3 Dir(s)  576,804,810,752 bytes free

Looking at the contents of each of these folders I could soon tell which was which and move those files back to the original path.

Marvell MC85 with NdisWrapper on Ubuntu 9.10

Last week I updated my Gateway M-6750 from Ubuntu 9.04 to Ubuntu 9.10 (“Karmic Koala”) and managed to get myself into a right mess, as I lost access to both my wired and wireless internet connections. I then burnt an Ubuntu 9.10 live CD from an ISO image dowloaded with uTorrent and reinstalled from there. That got the wired connection working, but the wireless was still gone. Before I fixed that problem I upgraded my notebook hard disk drive, complete with dual-boot Vista and Ubuntu partitions, to a new 500 GB drive (see yesterday’s blog post).

The Marvell MC85 doesn’t have a native Ubuntu driver yet. Therefore you have to use a Windows XP driver for it as described here. You can download the Netgear wn311t_setup_4_1.exe driver set and extract its content on either XP or Wine. You’ll end up with NetMW14x.inf, netmw143.sys and netmw145.sys. Only NetMW14x.inf and netmw145.sys are actually needed.

See my instructions in my earlier blog post for the initial steps (look for a section labeled “Update, 2008-03-18”).

Installing the driver with ndiswrapper does almost everything. The magic ingredient that was missing when I tried to get it working this time was to ensure that ndiswrapper loads every time, before using the Network Manager or when booting up. Without ndiswrapper the Windows driver won’t be loaded and Ubuntu simply won’t see the wireless adapter. It will show up as unclaimed on this command:

lshw -C network

*-network UNCLAIMED
description: Ethernet controller
product: Marvell Technology Group Ltd.
vendor: Marvell Technology Group Ltd.
physical id: 0
bus info: pci@0000:02:00.0
version: 03
width: 32 bits
clock: 33MHz
capabilities: pm msi pciexpress bus_master cap_list
configuration: latency=0
resources: memory:f6000000-f600ffff memory:f4000000-f400ffff
*-network
description: Ethernet interface
product: RTL8101E/RTL8102E PCI Express Fast Ethernet controller
vendor: Realtek Semiconductor Co., Ltd.
physical id: 0
bus info: pci@0000:06:00.0
logical name: eth0
version: 01
serial: 00:e0:b8:XX:XX:XX
size: 10MB/s
capacity: 100MB/s
width: 64 bits
clock: 33MHz
capabilities: pm vpd msi pciexpress bus_master cap_list rom ethernet physical tp mii 10bt 10bt-fd 100bt 100bt-fd autonegotiation
configuration: autonegotiation=on broadcast=yes driver=r8169 driverversion=2.3LK-NAPI duplex=half latency=0 link=no multicast=yes port=MII speed=10MB/s
resources: irq:28 ioport:4000(size=256) memory:fa200000-fa200fff memory:c0000000-c001ffff(prefetchable)

Ubuntu uses file /etc/modules to enumerate extra drivers and kernel modules that need to be loaded at boot time. Therefore I needed to add a line in /etc/modules using gedit:

gksudo gedit /etc/modules

Add

ndiswrapper

in a line of its own at the bottom of the file and save it, then restart your machine. After the reboot you should be able to use the Network Manager to manage wireless connections, including looking for available networks and configuring security parameters (for WPA, WPA2 / RSN) to be able to connect.

I found many other threads and blog postings that discussed manually editing configuration files and configuring wpa_supplicant, but none of that is required if you just configure Ndiswrapper for NetMW14x.inf, tell NDiswrapper about the device ID and then ensure that Ndiswrapper is always laoded. Here is the lshw output with Ndiswrapper having claimed the wireless adapter:

*-network
description: Wireless interface
product: Marvell Technology Group Ltd.
vendor: Marvell Technology Group Ltd.
physical id: 0
bus info: pci@0000:02:00.0
logical name: wlan0
version: 03
serial: 00:16:44:XX:XX:XX
width: 32 bits
clock: 33MHz
capabilities: pm msi pciexpress bus_master cap_list ethernet physical wireless
configuration: broadcast=yes driver=ndiswrapper+netmw14x driverversion=1.55+NETGEAR,10/04/2006, 2.1.4.3 ip=192.168.42.122 latency=0 link=yes multicast=yes wireless=IEEE 802.11g
resources: irq:16 memory:f6000000-f600ffff memory:f4000000-f400ffff
*-network
description: Ethernet interface
product: RTL8101E/RTL8102E PCI Express Fast Ethernet controller
vendor: Realtek Semiconductor Co., Ltd.
physical id: 0
bus info: pci@0000:06:00.0
logical name: eth0
version: 01
serial: 00:e0:b8:XX:XX:XX
size: 10MB/s
capacity: 100MB/s
width: 64 bits
clock: 33MHz
capabilities: pm vpd msi pciexpress bus_master cap_list rom ethernet physical tp mii 10bt 10bt-fd 100bt 100bt-fd autonegotiation
configuration: autonegotiation=on broadcast=yes driver=r8169 driverversion=2.3LK-NAPI duplex=half latency=0 link=no multicast=yes port=MII speed=10MB/s
resources: irq:28 ioport:4000(size=256) memory:fa200000-fa200fff memory:c0000000-c001ffff(prefetchable)

Notice the driver=ndiswrapper+netmw14x after configuration:. If you get that you should be in business! 🙂