Outlook Express Error 0x800CCC0B and the End of TLS 1.0 (Deprecated SSL Protocol)

Microsoft Outlook Express (OE) is an obsolete mail client that was available in Microsoft Windows XP, Windows 2003 Server and older Microsoft operating systems. It was no longer available on Windows Vista and later, though Windows Live Mail is relatively close in user interface and appearance.

Despite being obsolete and only working on operating systems no longer supported or updated by Microsoft, it still has some users who prefer its simple but powerful user interface. Some of those users will have had a frustrating experience recently, when various mail servers stopped working for outbound mail in OE. Specifically, these are mail servers that use SSL on submission port 465 or 587 for SMTP.

Secure Socket Layer (SSL) is a mechanism for encrypting data between a client and a server. You may know it from website URIs starting with “https:” and web sessions displaying a padlock symbol next to the URI. There are various protocol versions that can implement this encryption layer. One of these, TLS 1.0 which was conceived in 1999, has now been officially deprecated (made officially obsolete) as of the end of June 2018. Software now has to use more recent protocols, such as TLS 1.1, TLS 1.2 or the recently defined TLS 1.3.

Unfortunately, TLS 1.0 is all that OE will speak. It does not understand TLS 1.1 or later. Therefore it can not pick up mail from a POP server using SSL on port 995 or an IMAP server on port 993 or send mail to an SMTP server on port 465 (or 587) with SSL enabled.

Workaround
The only workaround I am aware of (other than switching to a more modern mail client) is to use Stunnel, a tool for Windows or Linux that acts as a proxy. You can configure it to establish an SSL connection to a given host and port when a connection to a given local port is made. Thus you could configure OE to connect to port 9465 on the machine running Stunnel, which might then connect via SSL to smtp.example.com:465 using a more modern TLS version supported by Stunnel (but not directly by OE).

Example
Let’s say Outlook Express was configured to submit outbound mail to smtp.outboundmailserver.com, port 587 via SSL/TLS. This is our SMTP server. Once this server refuses to allow TLS 1.0 connections, Outlook Express will no longer work. Let’s say we also have a simple Linux server mylinuxserver.com. This could even be something like a Raspberry Pi single board computer booting off flash memory. It can run on a local IP in our LAN, if you don’t need to have access from outside your building (OE running on a desktop). On this server we install the stunnel package:

sudo yum install stunnel

Please read the documentation on how to enable the service and have it auto-start when the Linux server reboots.

Next we configure stunnel to act as a client on our behalf and configure it to accept TLS 1.0 connections from us and forward them to the real POP3, SMTP or IMAP server using the latest TLS on our behalf. We will create lines like these in /etc/stunnel/stunnel.conf:

client = yes

;cert = /etc/pki/tls/certs/stunnel.pem
;sslVersion = TLSv1
;chroot = /var/run/stunnel
;setuid = nobody
;setgid = nobody
;pid = /stunnel.pid
;socket = l:TCP_NODELAY=1
;socket = r:TCP_NODELAY=1

[smtp-outboundmailserver]
accept = 1587
connect = smtp.outboundmailserver.com:587

Create other entries for the services that you need TLS support for and restart the stunnel service. Then reconfigure Outlook Express to access the Linux host and the port number listed with “accept = ” in place of the original server that refused your Outlook Express TLS 1.0 connection. You should be good to go!

Long term you will still need to migrate to another mail client such as Thunderbird, Windows Mail or OE Classic, but this workaround will buy you some time for that.

Gateway M-6750 with Intel Ultimate-N 6300 under Ubuntu and Vista

My Gateway M-6750 laptop uses a Marvell MC85 wireless card, for which there is no native Linux driver. Previously I got it working with Ubuntu 9.10 using an NDIS driver for Windows XP. Recently I installed Ubuntu 11.04 from scratch on this machine (i.e. wiping the Linux ext4 partition) and consequently lost wireless access again.

Instead of trying to locate, extract and install the XP NDIS driver again, this time I decided to solve the problem in hardware. Intel’s network hardware has good Linux support. I ordered an Intel Centrino Ultimate-N 6300 half-size mini PCIE networking card, which cost me about $35. Here is how I installed it.

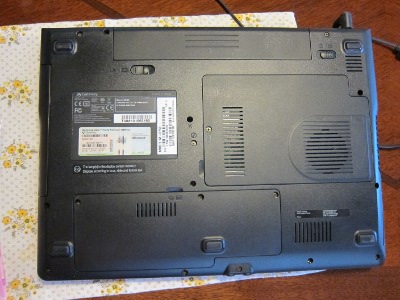
Here is a picture of the bottom of the laptop. Remove the three screws on the cover closest to you (the one with a hard disk icon and “miniPCI” written on it) and open the cover. Use a non-magnetic screwdriver because the hard disk is under that cover too. As a matter of caution, use only non-magnetic tools near hard disks or risk losing your data.

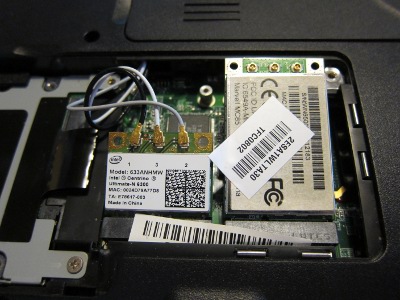
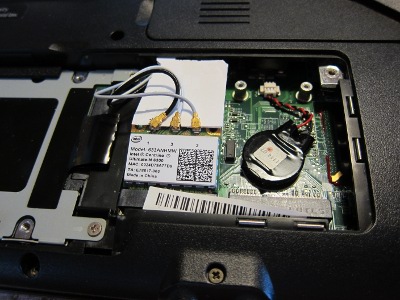
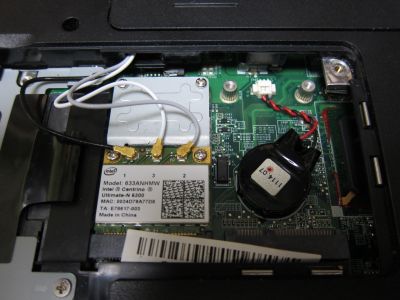
Remove the screw that holds the MC85 card in the mini PCI slot on the right. Remove the network card. Carefully unplug the three antenna wires. Connect those wires to the corresponding locations on the Intel card. Insert the Intel card into the socket on the left. Note: I had first tried the Intel card in the socket on the right but in that case it always behaved as if the Wireless On/Off switch was in the Off position, regardless of its actual state. Even rebooting didn’t make it recognize the switch state. The left mini PCI socket did not have this problem 🙂

Because the Intel card is a half size card you will also need a half size to full size miniPCI adapter to be able to screw down the card to secure it. Instead I simply used a stiff piece of cardboard (an old business card) to hold it in place and closed the cover again. If you take your laptop PC on road a lot I recommend doing it properly (don’t sue me if the cardboard trick melts your motherboard or burns down your house).

Download the Intel driver and utility set for Windows from the Intel website using a wired connection. Under Ubuntu the card seemed to work first time I rebooted into it. I just had to connect to the WLAN.

UPDATE:

I fixed it properly using a half size to full size Mini PCI-E (PCI Express) adapter converter bracket by Shenzhen Fenvi Technology Co., Ltd. in Guangdong. I had found it on Alibaba. I paid $9.50 by Paypal and a bit over a week later five sets of brackets and matching screws arrived by mail from Hong Kong (one set is only $1.90 but the minimum order was 5, so that’s what I ordered). The brackets come with about a dozen each of two kinds of screws. Four of the smaller screws worked fine for me.

RsyncServer not started because pid file rsyncd.pid exists

I had a scary experience today because one of my Windows PCs “blue screened”, i.e. it crashed. While the “Blue Screen of Death” was fairly common in Windows 95 and 98, it is unusual to see it on any healthy machine running Windows 2000, XP, 2003 or 2008 Server, Vista or Windows 7.

Since the CPU fan of the machine had been running faster than normal recently, I had already suspected it of dust buildup in the CPU heat sink and when I opened up the machine, my suspicion was confirmed. I pulled out some dust and vacuumed the machine before starting it up again.

The machine booted normally and the fan was quiet, but I got alerts from another machine that it could not connect to the Rsync server of the restarted machine. I use an Rsync service for Windows to synchronize data updates between various machines. The service was shown with startup mode “Automatic”, which means it should start whenever Windows is booted, but it was not showing as “Started”. Looking into the log file at “C:\Program Files\ICW\rsyncd.log” I found several of these error messages, one each for every restart I had performed after the crash:

2010/05/08 15:37:45 [2128] rsync: failed to create pid file rsyncd.pid: File exists (17)
2010/05/08 15:37:45 [2128] rsync error: error in file IO (code 11) at clientserver.c(985) [receiver=3.0.6]
2010/05/08 15:52:32 [2120] rsync: failed to create pid file rsyncd.pid: File exists (17)
2010/05/08 15:52:32 [2120] rsync error: error in file IO (code 11) at clientserver.c(985) [receiver=3.0.6]
2010/05/08 16:11:13 [2644] rsync: failed to create pid file rsyncd.pid: File exists (17)
2010/05/08 16:11:13 [2644] rsync error: error in file IO (code 11) at clientserver.c(985) [receiver=3.0.6]

Probably the sudden crash had prevented the Rsync service from deleting its pid (process ID) file, as it normally does when it is shut down orderly.

After I deleted “C:\Program Files\ICW\rsyncd.pid” I was able to start the service and the other machine could connect to it and synchronize with it properly.

Hopefully the machine will keep running reliably again now that the heat sink is clean again. I will keep checking it for dust buildup at least monthly now that the summer months are approaching.

Fix Windows as default boot on Ubuntu with Grub2 loader

If you install Ubuntu on a machine that came with Windows pre-installed you have the choice of preserving Windows and chose each time you boot which operating system to run. By default, the boot menu will list the current Linux kernel, followed by any older Linux kernel versions, followed by a memory test and finally the original Windows version. By changing a GRUB boot loader configuration file you can chose which one is the default that gets booted when you just wait and don’t touch the keyboard.

(NOTE: The following instructions assume the Grub2 loader used in Ubuntu 9.10 – earlier versions are different)

For example, the menu might look like this:

Ubuntu, Linux 2.6.31-14-generic
Ubuntu, Linux 2.6.31-14-generic (recovery mode)
memory test (memtest86+)
memory test (memtest86+, serial console 115200)
Windows Vista (loader) (on /dev/sda1)

You can configure Linux to — unless you tell it otherwise — always boot Vista by setting GRUB_DEFAULT in /etc/default/grub to the number of lines above the entry you want to boot (4 in this case), instead of 0 (zero) for the top entry. After any change to /etc/default/grub you need to also run sudo update-grub:

joe@ubuntu910:~$ gksudo gedit /etc/default/grub

GRUB_DEFAULT=4

joe@ubuntu910:~$ sudo update-grub

The problem with that is, when the next kernel update comes out, two lines will be inserted at the top and your default value now selects the wrong entry:

Ubuntu, Linux 2.6.31-15-generic
Ubuntu, Linux 2.6.31-15-generic (recovery mode)
Ubuntu, Linux 2.6.31-14-generic
Ubuntu, Linux 2.6.31-14-generic (recovery mode)
memory test (memtest86+)
memory test (memtest86+, serial console 115200)
Windows Vista (loader) (on /dev/sda1)

You would need to manually select the latest kernel and repeat the above steps with a new value of 6 in this case. This is clearly a problem. Fortunately, there’s a simple workaround: use a name instead of a number for selecting the default. Here is how it works:

1) List the bootable operating systems:

joe@ubuntu910:~$ fgrep menuentry /boot/grub/grub.cfg
menuentry “Ubuntu, Linux 2.6.31-15-generic” {
menuentry “Ubuntu, Linux 2.6.31-15-generic (recovery mode)” {
menuentry “Ubuntu, Linux 2.6.31-14-generic” {
menuentry “Ubuntu, Linux 2.6.31-14-generic (recovery mode)” {
menuentry “Memory test (memtest86+)” {
menuentry “Memory test (memtest86+, serial console 115200)” {
menuentry “Windows Vista (loader) (on /dev/sda1)” {

2) Mark and copy the entry you want to stay bootable, including double quotes, for example "Windows Vista (loader) (on /dev/sda1)".

3) Edit the Grub configuration and paste the new value after the GRUB_DEFAULT= (in place of 0 or 4 or whatever number):

joe@ubuntu910:~$ gksudo gedit /etc/default/grub
GRUB_DEFAULT=”Windows Vista (loader) (on /dev/sda1)”
joe@ubuntu910:~$ sudo update-grub

Note: Make sure to close the gedit window before doing sudo update-grub

That’s it, no more Grub configuration tinkering required! 🙂

Backing up / migrating your hard disk data with a Ubuntu live CD

Recently two hard disks died in my household, both of which were Windows boot disks, just as if I needed a reminder how quickly one can lose important data. This and some troubles while upgrading my Gateway M-6750 notebook from Ubuntu 9.04 to Ubuntu 9.10 (“Karmic Koala”) prompted me to get some spare hard disks and do a complete backup / upgrade.

I upgraded my notebook from 250 GB to 500 GB, and I can now keep my old drive as a safe snapshot to go back to if anything should ever go wrong with the new drive.

The most important tools needed for this were an Ubuntu 9.10 live CD from an ISO image (downloaded with uTorrent) and the NewerTech Universal USB 2.0 Adapter, which lets you hook up just about any IDE or SATA drive to a USB-equipped computer.

My notebook has Windows Vista on it, for which Gateway did not ship an install DVD – theres’s only a recovery partition. For installing Ubuntu I had originally shrunk the Vista NTFS partition on the 250 GB drive to make space for a 60 GB Linux partition, which provides a dual-boot feature via the GRUB loader.

I ordered some WD Scorpio Blue 500 GB notebook hard disks (WD5000BEVT) from Amazon and they arrived the next day. These are good work horse drives. I hooked one up to the NewerTech Universal USB 2.0 Adapter and booted into the Ubuntu Live CD.

From there I started a terminal window and used the “dd” command to make an image copy of the drive, see below. Be very careful with the source and destination specification. Use fdisk -l to verify which drive is which and in some cases the USB drive will appear as /dev/sdc instead or /dev/sdb. For IDE (PATA) drives the names could be /dev/hda, /dev/hdb, etc. If you specify the wrong drive as the destination you could wipe out all your data!

sudo dd if=/dev/sda of=/dev/sdb

This will copy every single byte from the first SATA hard disk to the second SATA (or USB 2.0) hard disk on the machine. You won’t have to worry about what partitions there are and which one is bootable, because it will simply copy all of them.

I started it last thing before I went to bed. It took about 2 hours to copy the entire 250 GB of the existing to the existing WD2500BEVS to the new drive. In the morning I shut down Ubuntu, opened the bottom of the case and transplanted the new drive inside, which took a small screw driver and about 10 minutes. Then I fired up the machine again and it successfully booted both Windows Vista and Ubuntu 9.10 off the new drive.

Since the new drive had more space, I wanted to resize the partitions so that each could take 250 GB instead them having to share that space. GNU utility gparted lets you do that. It can shrink, grow and move partitions pretty any way you like. You can tell it the new size of a partition and how much space to leave before and after it.

I first did not know that gparted can move partitions as well as resizing them, so I decided to remove the Ubuntu partitions, grow the NTFS (Windows) partitions and the reinstall Ubuntu into the remaining space. Be careful when removing an Ubuntu partition in a dual-boot system, because the active loaded and its menu file will be in the Ubuntu partition. Thus if you shoot it without first making the Windows partition the active boot partition you won’t be able to boot off that hard disk any more! Either boot of your operating system install CD/DVD or off an operating system recovery partition (if available) and select the command prompt. From there use fixldr /mbr (2000/XP/2003) or bootrec /FixMbr (Vista / 7) to rewrite the Master Boot Record. This will disable the Ubunto bootstrap loader. Make sure Windows will boot without the Ubuntu boot menu coming up. No you can remove the Ubuntu
partitions.

With sudo gparted on the Ubuntu Live CD you can resize the NTFS partition for Windows to any sensible value. In my case I got an error because some NTFS data structures were in an inconsistent state. To fix that I had to boot Windows and run chkdsk /f from a command prompt and then restart. Windows fixed the problem and one restart later I was back in Ubuntu live and gparted was able to resize the partition

After that I installed Ubuntu into the free space that I’d left for it on the 500 GB drive.

Given the low cost of SATA and USB 2.0 drives versus the time and data lost when something goes wrong with your hard disk, I do recommend a full image backup like mine. The dd command also lets you copy drives or partitions to files, so you can back up multiple machines to one large drive.

Acer Revo R3600 and other dual core Atom 330 NVidia Ion nettops

The new Acer AspireRevo R3600 (Acer AspireRevo R3610-U9012) that combines a dual core Atom 330 processor with the Nvidia Ion platform was introduced at the IFA consumer electronics fair in Berlin in September. It is just one of several interesting new nettops coming out now that will offer significantly more processing power, especially for video decoding, while still using little electricity.

Low cost, low power Atom CPUs in small desktop cases (nettops) such as the Asus EeeBox 202 first became popular about a year ago, following in the footsteps of their mobile cousins, netbooks such as the Asus Eee PC range. The latest generation of machines are adding new features and more performance, which will expand the market for low end machines.

Other machines with similar specs to the AspireRevo (dual core Atom 330, NVIDIA Ion chip set and 2 to 4 GB of RAM) include the Asus EeeBox EB1012, the ASUS EeeBox EB1501, the ASRock Ion 330 / Valore ION 330 and the Zotac MAG HD-ND01. In addition, people are building their own low power Atom 330 NVIDIA ION desktops based on mini ITX motherboards such as the ZOTAC ION ITX A Series or the ASUS AT3N7A Atom 330 motherboard and small cases such as the M350.

So what makes this latest bunch of machines so interesting?

First, they use the dual core version of the Atom, the 330 which will speed up multi-tasking as well as single applications that are multi-threaded (click here for a table comparing performance of the N330 to other CPUs).

Second, they abandon the rather pedestrian Intel 945GC chip set (which is basically a four year old design by now) and replaced it with the NVidia GeForce 9400 chip set (Intel Atom + NVidia 9400 = NVidia Ion). The new chip set not only supports DirectX 10 for Windows Vista and Windows 7 but also hardware decoding of digital video. This dramatically reduces the CPU load in software video players that take advantage of it, so that even a humble Atom CPU can keep up with high definition 1080p video streams.

Video performance may have been less of an issue on small netbooks with tiny 1024×600 pixel screens and lacking optical drives, but nettops and other desktops are more likely to use 20 inch screens and bigger that lend themselves well to watching video clips and movies.

Still, NVidia Ion is not a perfect solution for video yet. Amongst others, high definition Adobe Flash videos currently may still have problems because Adobe does not yet take advantage of decoding hardware even if present. For now, only Core 2 and other faster CPUs can cope with all video formats with all software, but Adobe has announced support for hardware decoding for Flash video before the end of the year, at least for the Windows version of Adobe.

NVidia Ion is also much more energy efficient than the Intel 945 GC Express chipset that was used in some earlier Atom nettops. While the Mobile 945 chipset used with single core Atom N270 netbooks (945GSE) is reasonably efficient, the desktop version of the 945 chip set used with the single core Atom N230 and dual core Atom 330 burns more than 20 Watt, over 5 times as much as the modest 4 Watt of the Atom 230 itself and 2 1/2 times as much as the 8 W of the 330. In fact the 945GCE is so inefficient that the cooling fan on the first Intel Atom desktop board had to be mounted on the 945 chip, not the N230 CPU which could be cooled with a passive heat sink alone. Less power than a conventional desktop means not only a lower electricity bill and a smaller carbon footprint, it also means less fan noise and heat.

A dual core Atom with the Ion chip set will actually consume less power than a single core N230 with the 945GC chip set (see GeForce 9400M Versus 945GC – Review Tom’s Hardware : Nvidia’s Ion: Lending Atom Some Wings for a full comparison of the two chip sets).

Another major benefit of the NVidia chipset is that it supports up to 4 GB of RAM while the 945GC and 945GSE are limited to 2 GB even though the Atom was capable of more. This limitation didn’t get much attention before because most Atom machines were shipped with Windows XP, which Microsoft did not allow to be bundled with machines that had more than a single GB of RAM, even though most of these machines could be upgraded to 2 GB by the user. However, if you add a 2 GB DIMM to a 945GSE board that already has 512 MB installed and one free slot, you will still only have 2 GB available, not 2.5 GB. The Ion removes this artificial barrier. Also, Ion boards typically have two DIMM slots while many 945 boards have only one. More memory is welcome because it often means less disk swapping, with a direct boost to performance. Ion offers better memory bandwidth too, which does help when both the CPU and the video chip have to share access to the main memory.

Most Ion boards have 3 internal SATA connectors and also one eSATA connector, while 945GC boards tend to have only two SATA and no eSATA ports. Having an eSATA port is great for using an external drive such as a Blue-Ray disk player or a an external hard disk subsystem such as the Guardian MAXimus external RAID-1 solution to provide robust Network Attached Storage (NAS) via a network-connected Ion machine. Ion nettops also tend to offer HDMI (a digital video link to digital TVs and monitors) and S/PDIF (digital multi-channel audio). Most have 6 or 8 USB ports and draft-N WiFi (802.11b/g/n). On top of that both 945GC and Ion support Gigabit Ethernet.

I’ve been checking online retailers for actual availability of the dual core Ion machines, but things have been moving slowly. I wonder if manufacturers have been holding back until after the Windows 7 release date on Oct 22, to avoid upgrade hassles. Who knows? For example, newegg.com stocks the ASRock ION 330 NVIDIA ION (which comes without any operating system) and the single core AspireRevo AR1600-U910H (which comes with XP), but any of the 2 GB or 4 GB dual core machines that for now are supposed to ship with Windows Vista, are not available yet. Likewise, Amazon sells a 2 GB single core version of the AspireRevo with Linux or a 1 GB single core version with XP, but no dual core version of it at all yet. Whatever the reason, for now you still have to be patient.

Hopefully more machines will gradually start hitting the stores by November and I certainly expect them in volume before Christmas. With a dual core CPU and the superior NVidia chip set, these carbon-saving small desktop machines are becoming viable for many new purposes, whether running Windows XP, Windows 7 or Linux.

Memory upgrades for Lenovo S10e, Aspire M5201, eMachines T6212

Last month my Gateway GT4014j suddenly died and I replaced it with an Acer Aspire M5201, which came with 2 GB of memory installed. That was less than the 3 GB I had in the Gateway and it affected some very memory hungry apps I use. So three weeks later I did a memory upgrade – a series of upgrades to be more precise. I bought two sets of memory upgrades and upgraded three machines.

In my experience, most computers don’t become obsolete because of CPU clock speeds that are too slow but because either there is too little main memory (RAM) for newer, more demanding (i.e. more bloated) applications or because the machine runs out of disk space. The latter used to be more of a problem than it is now, because of the availability of external USB drives, but lack of RAM is still a problem.

Giving your computer enough memory usually is the best way to give it a performance boost because insufficient memory will result in disk swapping. Without enough memory your applications will spend more time waiting for data to get swapped to and from disk, which slows even the fastest CPU down to a crawl such that even a medium or low end CPU with sufficient RAM could run circles around it.

When Vista came out, many manufacturers still sold 512 MB configurations with Vista Home Basic, while advertising mainly the processor speed. Buyers would have been far better off picking a somewhat slower CPU but equipped with a whole GB of RAM. The same is basically still true today for 1 GB machines (usually with Vista Home Premium) vs. 2 GB machines: More main memory almost always beats more Gigahertz!

Back to my Aspire M5201: It has four DIMM sockets (2 banks) for up to 8 GB of memory (2GBx4), but unless you run a 64-bit operating system such as a 64-bit Linux, Vista 64-bit or (from 22 Oct 2009) Windows 7 64-bit, you can’t actually make use of more than 4 GB. Therefore I opted to go as far as 4 GB only for two 1 GB DDR2 PC2-6400 DIMMs from Crucial Technology (CT12864AA800, from Tsukumo.co.jp). They were 1,980 yen each (about US$22) including sales tax.

I also ordered one 2 GB DDR2 PC2-5300 SODIMM (CT25664AC667) for 3,800 yen (about US$42) for a Lenovo IdeaPad S10e. The S10e is a typical Atom N270 netbook with 1 GB of RAM. One 512 MB SODIMM base memory is soldered in while the other can be replaced with either a 1 GB or 2 GB SODIMM. You end up with 1.5 GB or with 2 GB (not 2.5 GB because the 945 GSE chip set is not capable of addressing more than 2 GB of total memory). The Intel Atom itself supports up to 4 GB, which is why nettops with the NVIDIA Ion chip set such as the Acer Revo 3600 can handle up to 4 GB of RAM. The memory upgrade went very smoothly, especially the netbook. The Acer Aspire M5201 (AMD 780G chip set) now shows 3.75 GB of RAM in Windows while the Lenovo shows 1.99 GB.

Encouraged by that I removed the 1.5 GB of DDR DIMMs from my 2005-vintage eMachines T6212 and transplanted the 3 GB of DDR DIMMs (1 GB x 2 and 512 MB x 2) from the dead Gateway GT4014j to it. DDR memory was superseded by DDR2 3 years ago, but now that old machine that originally came with 512 MB shows 2.75 GB of memory in Windows.

If you’re not sure what memory is right for your machine or how much memory you can fit, Crucial have a convenient Memory Finder application that will figure it out for you.

IE7, IE8 and .exe files on network drive: “The publisher could not be verified…”

I recently upgraded a Windows XP machine from Internet Explorer 6 to IE 8. Since then I’ve been getting warnings whenever I wanted to run any .EXE file that doesn’t use code signing off a network drive.

My main browser on that machine is FireFox, but that doesn’t matter. The warning that comes up is the following:

The publisher could not be verified. Are you sure you want to run this software?

Apparently the same behaviour was already introduced when upgrading to IE 7. It may also happen with Service Pack 3 (SP3) for XP. Unlike for the similar query that happens for executable files downloaded off the Internet, there is no option to turn off the warning for a specific .EXE file.

There is however a way to allow all unsigned EXEs to run off a given network drive or network server without the warning. Here is what you do:

Open the Control Panel, select Internet Options, click the Security tab, select Local intranet, click Sites and the Advanced button. Add any server (e.g. \\myserver) by entering the name and clicking Add. The resources will be added as file://myserver. When you’re done click Close and OK.

This will allow all unsigned applications on the listed servers to execute without security prompt just as if they were on your local machine.

IPv6 with DD-WRT router and Hurricane Electric

Last weekend I got IPv6 working on my US$60 router, allowing all my machines here to talk IPv6 to the outside world. That includes an Ubuntu Linux server, 4 PCs and one Mac.

The biggest incentive for upgrading to IPv6 is the fact that at the current pace we’ll run out of (IPv4) IP addresses in about two years. These are the unique host addresses (usually written in dotted decimal format like 209.85.171.100) that identify client and server computers on the Internet. The newer IPv6 standard that replaces 32-bit addresses with 128-bit addresses will forever take care of this shortage. It will also do away with the primary need for Network Address Translation (NAT) which has been a big headache for voice over IP (VoIP) and other peer to peer applications.

However, over a decade after the introduction of the newer standard (in 1997), uptake is still slow. Many ISPs still don’t support IPv6 and neither does a lot of the equipment used at homes and offices. This is gradually starting to change. IPv6 is an integral part of modern operating systems such as Linux, Mac OS X, Windows 7, Windows 2008 Server, Windows Vista, Windows 2003 Server and Windows XP (where it’s optional).

If your ISP does not support IPv6, you can still use it by employing the services of a tunnel broker, which gives you IPv6 connectivity over an IPv4 tunnel. This lets you test your software with the new APIs, though you won’t gain native IPv6 performance. If you have a static IP you can use tunnelbroker.net by Hurricane Electric, Inc. Their service is professionally run and free. Another option is SixXS, but I have not tried them.

My router is a Buffalo WHR-HP-G54, which is compatible with the Linux based open source DD-WRT firmware. Recent versions of DD-WRT have IPv6 support. My first attempt with the v24 sp1 std build which is supposed to include IPv6 was unsuccessful, but I had more luck after trying the v24 10070 crushedhat version (dd-wrt.v24-10070_crushedhat_4MB.bin). Here’s what you do:

  • The following instructions assume that your WHR-HP-G54 router is running open source DD-WRT firmware. If your router is still running the default firmware, install DD-WRT v24 sp1 mini generic (SVN build 10020, 27-July-2008) on it. See my blog post on the WHR-HP-G54 with DD-WRT for detailed instructions. The WHR-HP-G54DD is a version of this router that comes with DD-WRT preinstalled.
  • Go to Security / Firewall on your DD-WRT and remove the check mark on Block anonymous WAN requests (ping) so that Hurricane Electric can verify your router exists by pinging it.
  • Go to www.tunnelbroker.net and sign up for an account. Then log in and go to Create a Regular tunnel. You’ll need to enter your static IP, which will be conveniently displayed. You have a choice of tunnel endpoints. Pick one that has a short ping time from where you are. Make a note of all the details of the tunnel that is created. You will need to enter some of these details on your router, in particular these:
    • Server IPv4 address
    • Server IPv6 address
    • Routed /64
  • Read crushedhat’s description of how to configure the router with his firmware, which should work with most Broadcom-based DD-WRT-compatible routers.
  • I’m assuming you have updated the firmware of your router before and know the usual caveats about “bricking” your router if anything goes wrong. I won’t be responsible for that. 😉 I went from the factory Buffalo firmware to v24 sp1 mini to v24 sp1 std to v24 sp1 mini to v24 crushedhat 10070, with no problems, but your mileage may vary. I downgraded from v24 sp1 std (4 MB) to v24 sp1 mini (2 MB) “just in case” before flashing crushedhat’s std (4 MB) build. I did not opt to reset the NVRAM to factory defaults.
  • Download a copy of the v24 crushedhat 10070 build and save it on your hard disk. Use a computer with a wired connection to the router, not WLAN for the firmware upgrade. Go to Administration / Firmware Upgrade and select the dd-wrt.v24-10070_crushedhat_4MB.bin file. Click the upgrade button. Don’t touch anything until after the router has reset and is running the new firmware.
  • Go to Administration / Management and check Enable for IPv6 and Radvd enabled. Then paste the following into the Radvd config box:

    interface br0
    {
    AdvSendAdvert on;
    prefix 2001:470:YYYY:YY::/64
    {
    AdvOnLink on;
    AdvAutonomous on;
    };
    };

    where 2001:470:YYYY:YY::/64 matches the value of “Routed /64” in the created tunnel given to you by Tunnelbroker.net:

    Server IPv4 address: 216.218.226.238
    Server IPv6 address: 2001:470:XXXX:XX::1/64
    Client IPv4 address: 219.110.159.121
    Client IPv6 address: 2001:470:YYYY:YY::2/64
    Routed /48: 2001:470:ZZZZ::/48
    Routed /64: 2001:470:YYYY:YY::/64

  • Go to Administration / Commands and enter these commands, then click Save Startup:

    ip tunnel add he-ipv6 mode sit remote 216.218.226.238 ttl 64
    ip link set he-ipv6 up
    ip addr add 2001:470:XXXX:XX::2/64 dev he-ipv6
    ip route add ::/0 dev he-ipv6
    ip addr add 2001:470:YYYY:YY:200:00ff:fe00:0000/64 dev br0

    Replace 216.218.226.238 with Server IPv4 address from your tunnel settings, 2001:470:XXXX:XX:: with the Server IPv6 address value and 2001:470:YYYY:YY:: with the Routed /64 value.

  • Go to Administration / Commands and enter these commands, then click Save Firewall:

    insmod ip6t_REJECT
    ip6tables -F
    ip6tables -A FORWARD -p tcp -i he-ipv6 –syn -m multiport –dports ftp-data,ftp,ssh,smtp,http,https,ntp,domain -j ACCEPT
    ip6tables -A FORWARD -p tcp -i he-ipv6 –syn -j REJECT –reject-with adm-prohibited
    ip6tables -A FORWARD -p udp -i he-ipv6 -m multiport –dports ntp,domain -j ACCEPT
    ip6tables -A FORWARD -p udp -i he-ipv6 -j REJECT –reject-with adm-prohibited

  • Now it’s time to check if everything works. It may take a few minutes or one reboot for your client to obtain an IPv6 address. Here is what things should look like after that:

    C:\>ipconfig

    Windows IP Configuration

    Ethernet adapter Motherboard Network Connection:

    Connection-specific DNS Suffix . :
    IP Address. . . . . . . . . . . . : 192.168.100.2
    Subnet Mask . . . . . . . . . . . : 255.255.255.0
    IP Address. . . . . . . . . . . . : 2001:470:YYYY:YY:290:feff:fe66:e237
    IP Address. . . . . . . . . . . . : fe80::290:feff:fe66:e237%6
    Default Gateway . . . . . . . . . : 192.168.100.1
    fe80::21d:73ff:fe3a:3b8c%6

    Tunnel adapter Teredo Tunneling Pseudo-Interface:

    Connection-specific DNS Suffix . :
    IP Address. . . . . . . . . . . . : fe80::ffff:ffff:fffd%5
    Default Gateway . . . . . . . . . :

    Tunnel adapter Automatic Tunneling Pseudo-Interface:

    Connection-specific DNS Suffix . :
    IP Address. . . . . . . . . . . . : fe80::5efe:192.168.42.2%2
    Default Gateway . . . . . . . . . :

    You can ping Google’s IPv6 servers:

    C:\>ping ipv6.google.com

    Pinging ipv6.l.google.com [2001:4860:c004::68] from 2001:470:YYYY:YY:290:feff:fe66:e237 with 32 bytes of data:

    Reply from 2001:4860:c004::68: time=307ms
    Reply from 2001:4860:c004::68: time=307ms
    Reply from 2001:4860:c004::68: time=331ms
    Reply from 2001:4860:c004::68: time=318ms

    Ping statistics for 2001:4860:c004::68:
    Packets: Sent = 4, Received = 4, Lost = 0 (0% loss),
    Approximate round trip times in milli-seconds:
    Minimum = 307ms, Maximum = 331ms, Average = 315ms

    Fire up FireFox 3 or the browser of your choice and go to http://www.kame.net/ – if the image of the turtle is dancing then you have IPv6 working. Go to http://whatismyv6.com/ to see your IPv6 address.

Good luck! 🙂

Windows 7 versus Linux on netbooks

“Does Linux stand a chance now that Windows 7 will run on netbooks?”, Shane O’Neill asks in an article in ComputerWorld on 15 January 2009 that overall sounds fairly optimistic on Microsoft’s prospects. However it largely avoids one crucial subject that matters for Microsoft in the struggle over market share in the booming nettop market: Money.

In 1985 Jack Tramiel, head of Atari Corporation came to visit Digital Research Inc. (DRI) to license its GEM graphical desktop environment for the new Atari 520ST. It was going to be a low-cost machine based on the same Motoroloa 68K CPU as Apple’s much more expensive Macintosh, which itself was a low-cost derivative of the Apple Lisa (that was long before Microsoft Windows became a viable product). Tramiel had a reputation as a fierce negotiator, so his counterpart at DRI, then the main competitor of Microsoft and Apple, was only half joking when he said to Tramiel: “Jack, I know you’ll probably start off by offering us a dollar per copy.” – “No,” replied Tramiel dryly. “50 cents.”

Tramiel knew that by coming out with a fully-functional product at rock-bottom prices he could grow the PC market. In the segment he envisaged there simply was no margin for a $50 operating system license. What was true when an Atari machine cost around $1000 is even more true today with $250-$450 netbooks, and future netbooks will be even cheaper than that. Soon we will also see netbooks based on the same low-power, low-cost ARM processors that power virtually all mobile phones.

Commentators cited by Computerworld on Windows 7 don’t really talk about money:

Analyst Rob Enderle, president of technology research firm The Enderle Group, agrees that Microsoft doesn’t see Linux as much of a threat and that refocusing on the netbook market is more about “Microsoft addressing the problem of having to keep shipping Windows XP long after its expiration date.”

Enderle says that getting XP on netbooks was clearly a response to Linux gaining traction, but that Microsoft is not afraid of consumers or OEMs having a preference for Linux.

“The problem was that Linux could run on a netbook and Vista couldn’t, not any consumer or OEM love for Linux,” he adds.

But Microsoft’s real problem wasn’t just that Vista was too big to fit on a 4 GB flash drive and too slow and bulky to run on an Intel Atom with 512 MB of RAM. It was also too expensive. So Microsoft could save face by charging next to nothing for its 5 year old Windows XP, but it didn’t make any real money on it. So what’s going to happen when Windows Vista 1.1 aka Windows 7 hits the streets in volume maybe a year from now?

Does it really matter to Microsoft shareholders and employees if the 21 million or so netbooks expected to be sold this year (and the even bigger numbers in 2010) will be running some version of Windows or a version of Linux (which is free), if previously those buyers would have picked up a more powerful machine that netted Microsoft $40-$100 per license?

Whether Windows 7 will run with decent performance on low-cost machines is really only half the question. The other is, how much Asus, Acer and the other netbook OEMs will offer to pay Steve Ballmer of Microsoft. Is it going to be $1 or 50c per copy? That is no way to sustain a business with a market capitalization of $150 billion and almost 90,000 employees worldwide (Jan 2009 numbers), as Microsoft is realizing to its horror.